This project is about a programmable countdown timer that can speak countdown numbers through an enclosed speaker ! User can set any countdown value between 0 to 100, thus device can countdown up to 100 seconds.
Voice countdown allows user to be "eyes-free" (kind of like hands-free), there is no need to look at the display during countdown.
The idea is to move to a safe distance while the timer is counting down. Then let something happen when the timer reaches zero.
Application
This device can be used to do relatively dangerous experiments/activities like:
- Igniting Fireworks
- Launching hobby Rockets
- Mixing dangerous Chemicals
- Doing hazardous Physics experiments
- Short Circuiting Electronics
- Starting a Fire
There are 3 GPIO pins available to interface with external devices to carry out trigger signal and do something stupid !
Disclaimer: This device is for 'harmless' mad-scientists and pyromaniacs, should not be used to harm others !
DemonstrationHardware BuildFollowing hardware are used to make this project:
- DF Beetle: Very small size Arduino Leonardo compatible board based on Atmega32UA4 microcontroller.
- DF Voice Rec/Playback Module: A complete voice recording solution with microcontroller, flash storage, microphone and speaker driver. It can hold about 40 minutes of MP3 files (in 48kbps quality) on the 16MB storage. A maximum of 1000 Audio files can be recorded or played. The board can be used independently with Rec/Play buttons or from a microcontroller over serial commands.
- 1306 OLED 128x32 display: I2C based display for showing user interface.
- Enclosed Speaker: Small size 8 Ohms 3 Watt speaker for loud voice.
- USB C cable to copy audio files from computer to voice module
- Micro USB cable to program the Beetle board
- Power bank to power the project.
You will also need a protoboard for soldering all the modules together, few push buttons for input, some small cable ties,
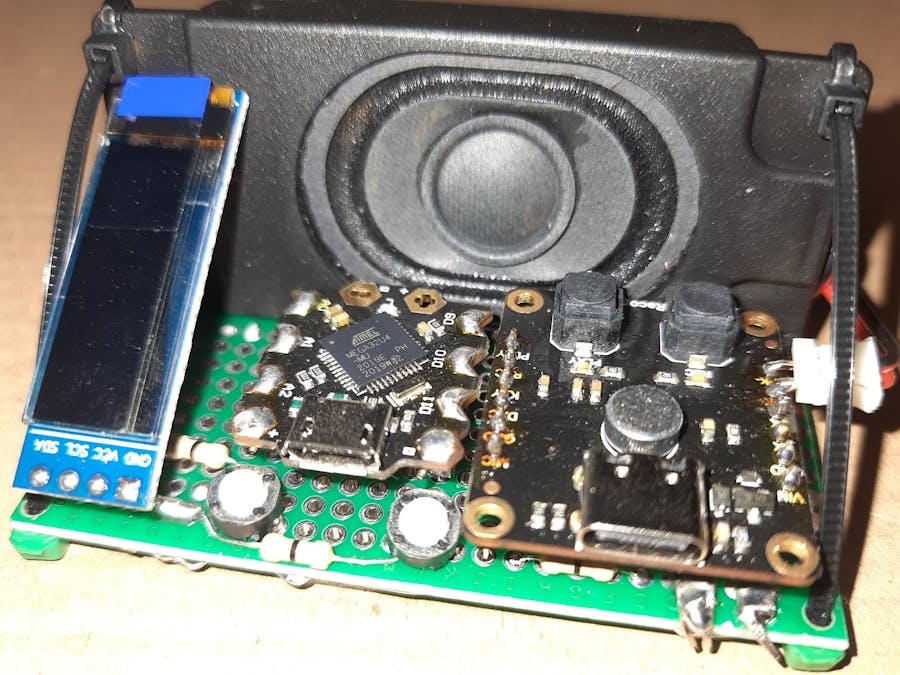
To interface with the I2C OLED, you need to connect to I2C pads, which are placed in an inconvenient location on Beetle board. Bend odd number pins on a 6 pin male header as shown in the the image below and solder to access I2C and Serial pads. This way, 10 I/Os + Vcc + Gnd can be accessed.
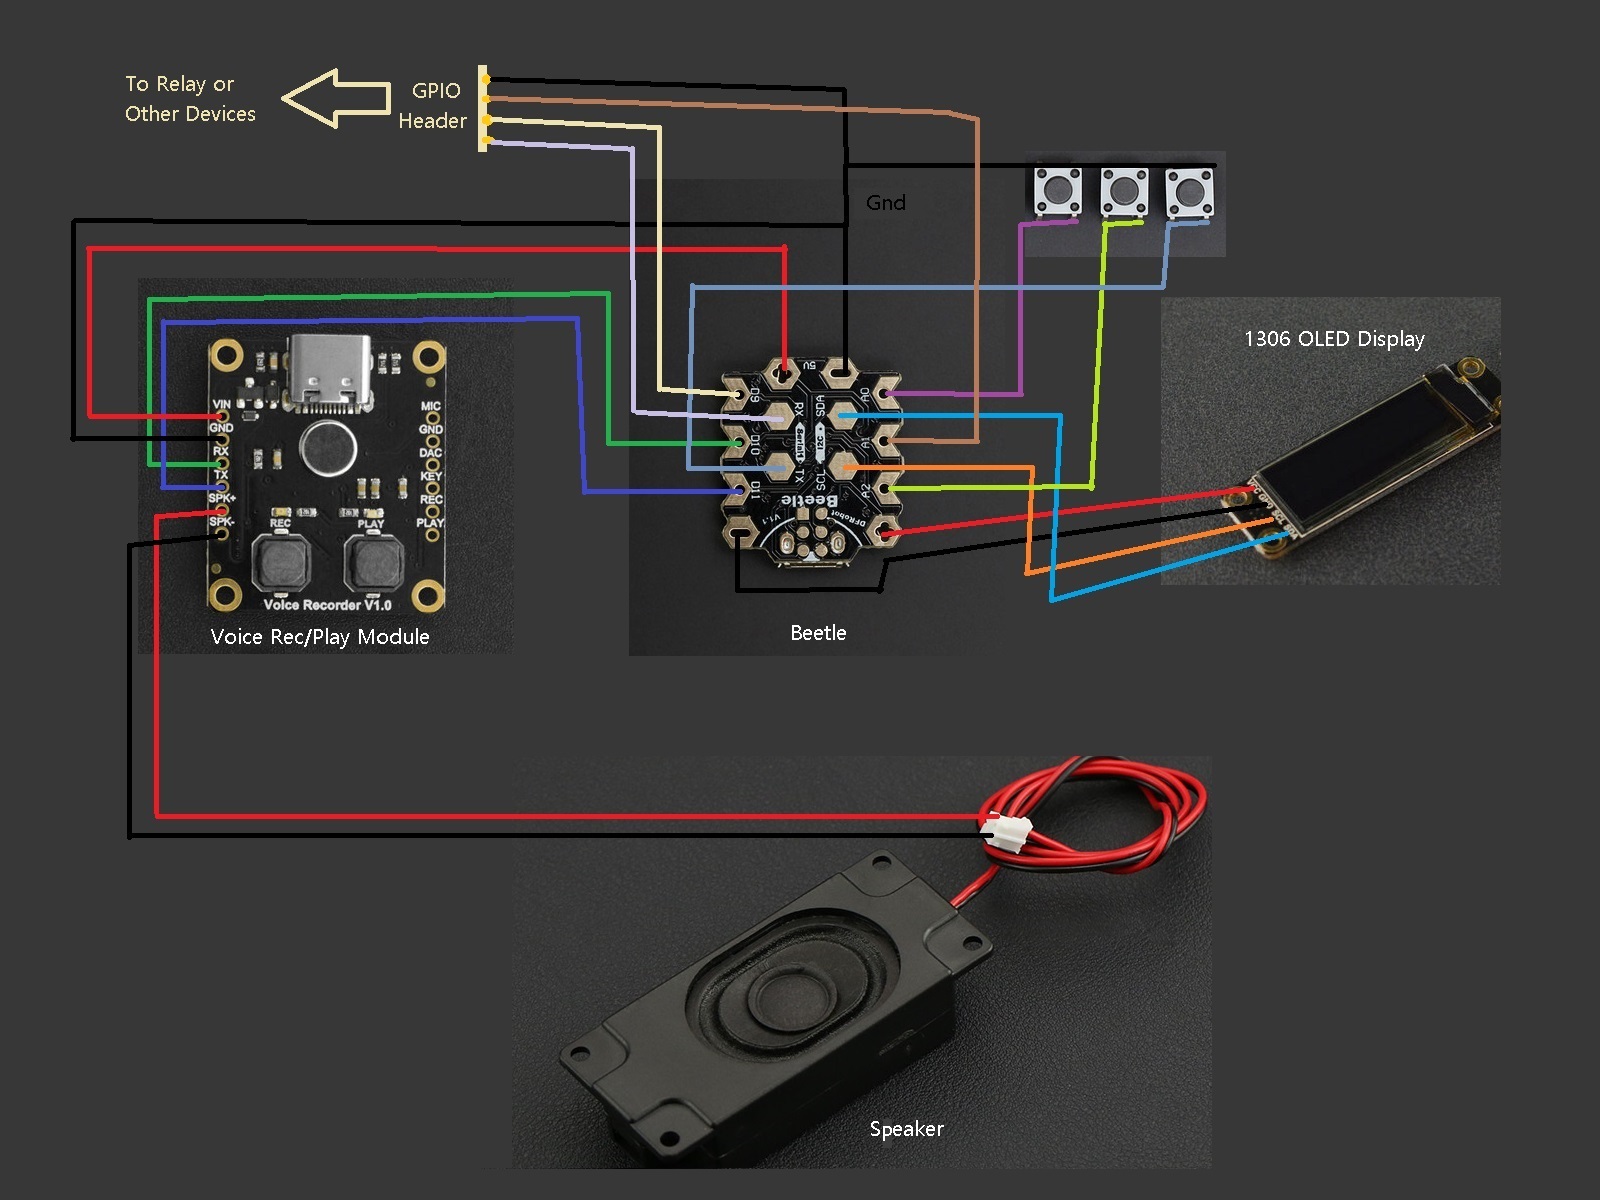
Solder all the modules and components according to the schematic:-
Use some cable ties to fasten the speaker with the protoboard in 90 degree position like this :-
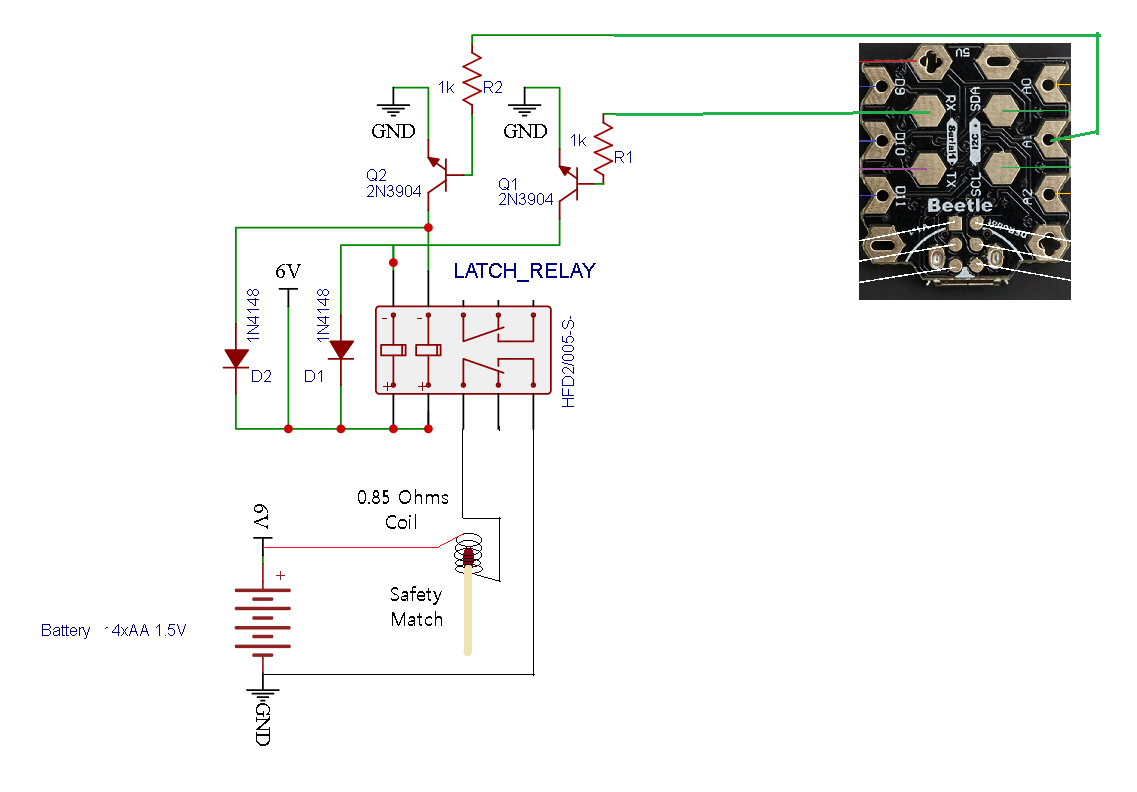
Fire starter circuit
This is a very simple DIY fire starter circuit made of very low resistance coil (anything between 0.5 to 2 ohms) wrapped around a safety match stick. Power the coil through any relay or MOSFET. The coil will heat up and match stick will flash. Nichrome or Kanthal coils (for vape devices) will provide best results. Even through hole resistor (half watt) or fuse wire will also work.
Preparing Voice Audio FilesStep1: I used this text-to-speech service to make the audios.
Step 2: While the speech was playing, the sound was recoded with Audacity . Select Windows WASPAPI and Source as Headphone/Speaker, then click the Record icon to capture audio playback in your computer.
Step 3: After recording, the audios are segmented into multiple mp3 files. To separate each segment of the audio (sound for every number), select that part with mouse, then use shortcut Ctrl+C (copy), Ctrl+N (new), Ctrl+V (paste) that audio segment. Repeat this step for each audio voice segment.
Step 4: Go to Files > Export as MP3, select 48 kbps quality and rename as FILE0000.MP3, FILE0001.MP3, FILE0002.MP3 up to FILE0100.MP3
(all the audio files are attached below, you can skip step 1-4, just download and copy the files according to step 5)
Step 5: Voice module is connected to computer with a USB C cable, 16 MB Flash Drive appeared. It will require formatting (FAT) when using for the first time. Next, all the mp3 files are copied to a DF_REC directory inside the voice module's flash drive.
Each filename corresponds to the voice of that number. For example, FILE0007.MP3 holds the sound for "Seven"
You can put maximum of 1000 MP3 files with total audio length of 40 minutes @ 48kbps. Higher sampling frequency song/audio voice will work but the audio length will be less due to larger file size
Alternatively, you can record your own voice directly on the module by pressing the Rec button (see reference section for details)
ProgrammingBefore diving into Arduino IDE, let's review the Beetle pins and associated functions:-
For some reason, I couldn't manage to use the hardware serial (pin 0 & 1) to control the voice module from Beetle.
- Pin 10 and 11 will be used to control the voice module
- Pin 2 & 3 are I2C pins to interface 1306 OLED
- Pin A0, 1 and A2 are connected to 3 push buttons
- Pin 0, A1 and 9 are available for interfacing external hardware
______________________________________________________
You will need to add couple of libraries and select the correct board profile for this project.
Step 1: As, Beetle is Arduino Leonardo, Open Arduino IDE and select Tools > Board > Arduino Leonardo
Step2: Download the Voice module library in zip file and add the library to Arduino from Sketch > Include Library > Add zip Library and select the downloaded zip file (DFRobot_DF1101S-master)
Step3: Next, add the 1306 OLED library from Tools > Library Manager > type 'u8g' and install the U8G library (by Oliver)
Step 4: Connect Beetle board to computer with micro USB cable, copy and paste the attached code below. Then compile and upload the firmware.
Done !
ReferencesConclusionThis project can have extended functionalities with some change in firmware. As the voice module can hold up to 1000 mp3 files, you can synthesize syntax (sentences in any human language) from multiple words : like - "Relay Activated" or "Low Battery" or "I am a Robot".
It is possible to speak up any number with some clever coding. For example: if you want to speak 575, you need 3 audio files playing the words "Five", " Hundred" and "Seventy-Five" in a sequence. All you need some mp3 files with sound from "Zero" to "Ninety-Nine" + "Hundred", "Thousand" "Million" "Billion" and "Trillion" to speak any number
Projects like voice warning systems, talking weather station, voice interactive UI can also be designed with the same hardware setup.


Comments
Please log in or sign up to comment.