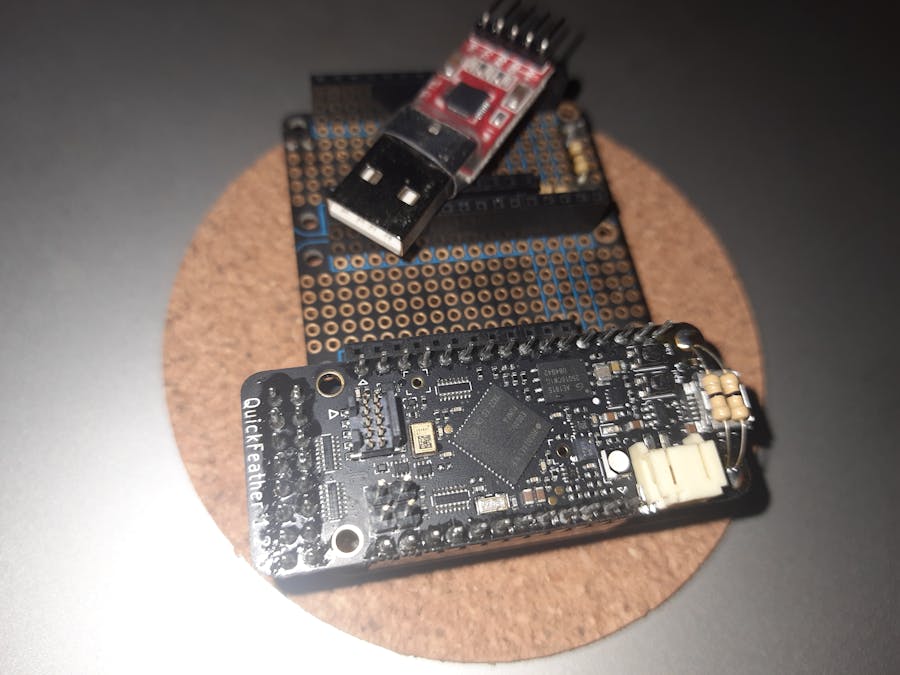
This is a tutorial to setup Zephyr development environment for Quick Feather development board on Ubuntu 20.04 Linux OS.
Step 1: Install UbuntuThis step is done on a Windows 10 machine, if you don't have Ubuntu installed on your computer.
You may skip this step if you have Ubuntu or any other Linux installed.
( I have tried on Windows, Endless OS and Puppy Linux but things didn't end up well, my recommendation would be to use Ubuntu for this)
- Download Ubuntu Desktop 20.04 on your computer from here
- You will need a USB Flash drive (at least 8GB) and an dedicated partition/drive (except C drive) on your Computer's hard disk drive for the installation. This drive will be formatted during the installation, so backup any important files.
- Download and install, Balena Etcher and run this program to Flash Ubuntu OS images to the USB flash drive to create a setup disk. The actual installation will run from this disk
- Next, you need to restart your computer to enter UEFI/BIOS. This step is different on different machine. If your computer supports UEFI (type Win Key + Change Advanced Startup Options) then go to Change Advance Startup Options > Advance StartUp > Restart Now
Then on choose an option screen, select : Use a device
Then on use a device screen, select : USB Storage
- If your computer is old and does not support UEFI, then you need to press any of the following keys on keyboard to enter BIOS during reboot. F1/F2/F8/DEL/ESC
Then change the boot priority for USB Flash Drive to 1st priority or top priority
Now, Ubuntu will load to computer RAM with full GUI Desktop. Follow the instructions inside Ubuntu Desktop to install in on hard drive
Follow the official setup guide from link below to walk you through the process:-
https://help.ubuntu.com/community/GraphicalInstall
=========================================================================================================================================================================================================
IMPORTANT !!!
/home/computer/ will be different on your computer, don't just copy following path locations, make sure to replace to right path.
For example: if you name your Ubuntu Account 'Alex' during setup, your path will be /home/alex/ instead of /home/computer/
Alternatively, name your Ubuntu Account as 'computer' during installation to avoid confusion and use following paths and commands
=========================================================================================================================================================================================================
Step 2: Install Zephyr EnvironmentThis step is where you will install Zephyr Environment on Ubuntu. This step is very well documented on the official Getting Started Guide , so I will not explain it here.
You need to open Terminal app
Basically you will have to issue all the following commands on a terminal and see all the downloads and installations happen
$ sudo apt update
$ sudo apt upgrade

$ sudo apt install --no-install-recommends git cmake ninja-build gperf \
  ccache dfu-util device-tree-compiler wget \
  python3-dev python3-pip python3-setuptools python3-tk python3-wheel xz-utils  file \ make gcc gcc-multilib g++-multilib libsdl2-dev

$ cmake --version

$ pip3 install --user -U west
$ echo 'export PATH=~/.local/bin:"$PATH"' >> ~/.bashrc
$ source ~/.bashrc

$ west init ~/zephyrproject
$ cd ~/zephyrproject
$ west update

$ west zephyr-export

$ pip3 install --user -r ~/zephyrproject/zephyr/scripts/requirements.txt

$ cd ~
$ wget https://github.com/zephyrproject-rtos/sdk-ng/releases/download/v0.11.4/zephyr-sdk-0.11.4-setup.run

$ chmod +x zephyr-sdk-0.11.4-setup.run
./zephyr-sdk-0.11.4-setup.run -- -d ~/zephyr-sdk-0.11.4

$ sudo cp ~/zephyr-sdk-0.11.4/sysroots/x86_64-pokysdk-linux/usr/share/openocd/contrib/60-openocd.rules /etc/udev/rules.d
sudo udevadm control --reload
Please follow part 1, 2, 3, 4 of the official guide carefully and install all the dependencies, sdk, arm toolchain.
Skip part 5 & 6 (Build the Blinky Example), because rest of the instructions won't work.
This will take a while, so grab some poison of yours (coffee/beer or whatever) while the setup goes on !!!Step 3: Install TinyFPGA Programmer
Install TinyFPGA Programmer by following this git repo :
https://github.com/QuickLogic-Corp/TinyFPGA-Programmer-Application
Open a Terminal and issue following commands to do so :
$ git clone --recursive https://github.com/QuickLogic-Corp/TinyFPGA-Programmer-Application.git

$ pip3 install tinyfpgab
Only clone the repository and install tinyfpgab (part1 from above link). Don't follow the rest of the steps, it's not necessary right now.
Step 4: What I did to make things work !This is the step that I had to figure out with trial and error.
Ideally, $ west flash command should upload code to development boards with Rom Bootloader. It appears that is not the case for Quick Feather board according to this documentation on Zephyr:-
https://docs.zephyrproject.org/latest/guides/flash_debug/host-tools.html
So, I tried TinyFPGA Programmer and it worked as expected. But there is a catch, Zephyr outputs elf file and TinyFPGA Programmer can flash bin file, I am not sure it will work with elf. But there is a way to get bin output for compiled code according to this :-
https://docs.zephyrproject.org/latest/reference/kconfig/CONFIG_BUILD_OUTPUT_BIN.html
I followed the link above and changed kconfig.deconfig in this location:-
/home/computer/zephyrproject/zephyr/boards/arm/quick_feather/kconfig.deconfigJust appended following lines to kconfig.deconfig :
config BUILD_OUTPUT_BIN
bool
default n
depends on BOARD_QUICK_FEATHER
Then in the terminal, I typed following 4 commands one by one:
$ cd ~/zephyrproject/zephyr
$ source zephyr-env.sh
$ cd
$ west build -p auto -b quick_feather/home/computer/zephyrproject/zephyr/samples/hello_world
Project has been compiled and bin file is generated in this location ---> /home/computer/build/zephyr/zephyr.bin
This zephyr.bin is for this C code demo ---> /home/computer/zephyrproject/zephyr/samples/hello_world/src/main.c
You can edit the main.c and add your own codes
Next I connected Quick Feather with USB cable and entered upload mode by pressing the reset button and then pressing the user button while the Blue LED was blinking. In the upload mode Green LED will pulse
Now In the command terminal, I typed following commands :-
$ sudo chmod a+rw /dev/ttyACM0
$ alias qfprog="python3 /home/computer/TinyFPGA-Programmer-Application/tinyfpga-programmer-gui.py"
$ qfprog --port /dev/ttyACM0 --mode --m4app /home/computer/build/zephyr/zephyr.bin
Flashing happened successfully !
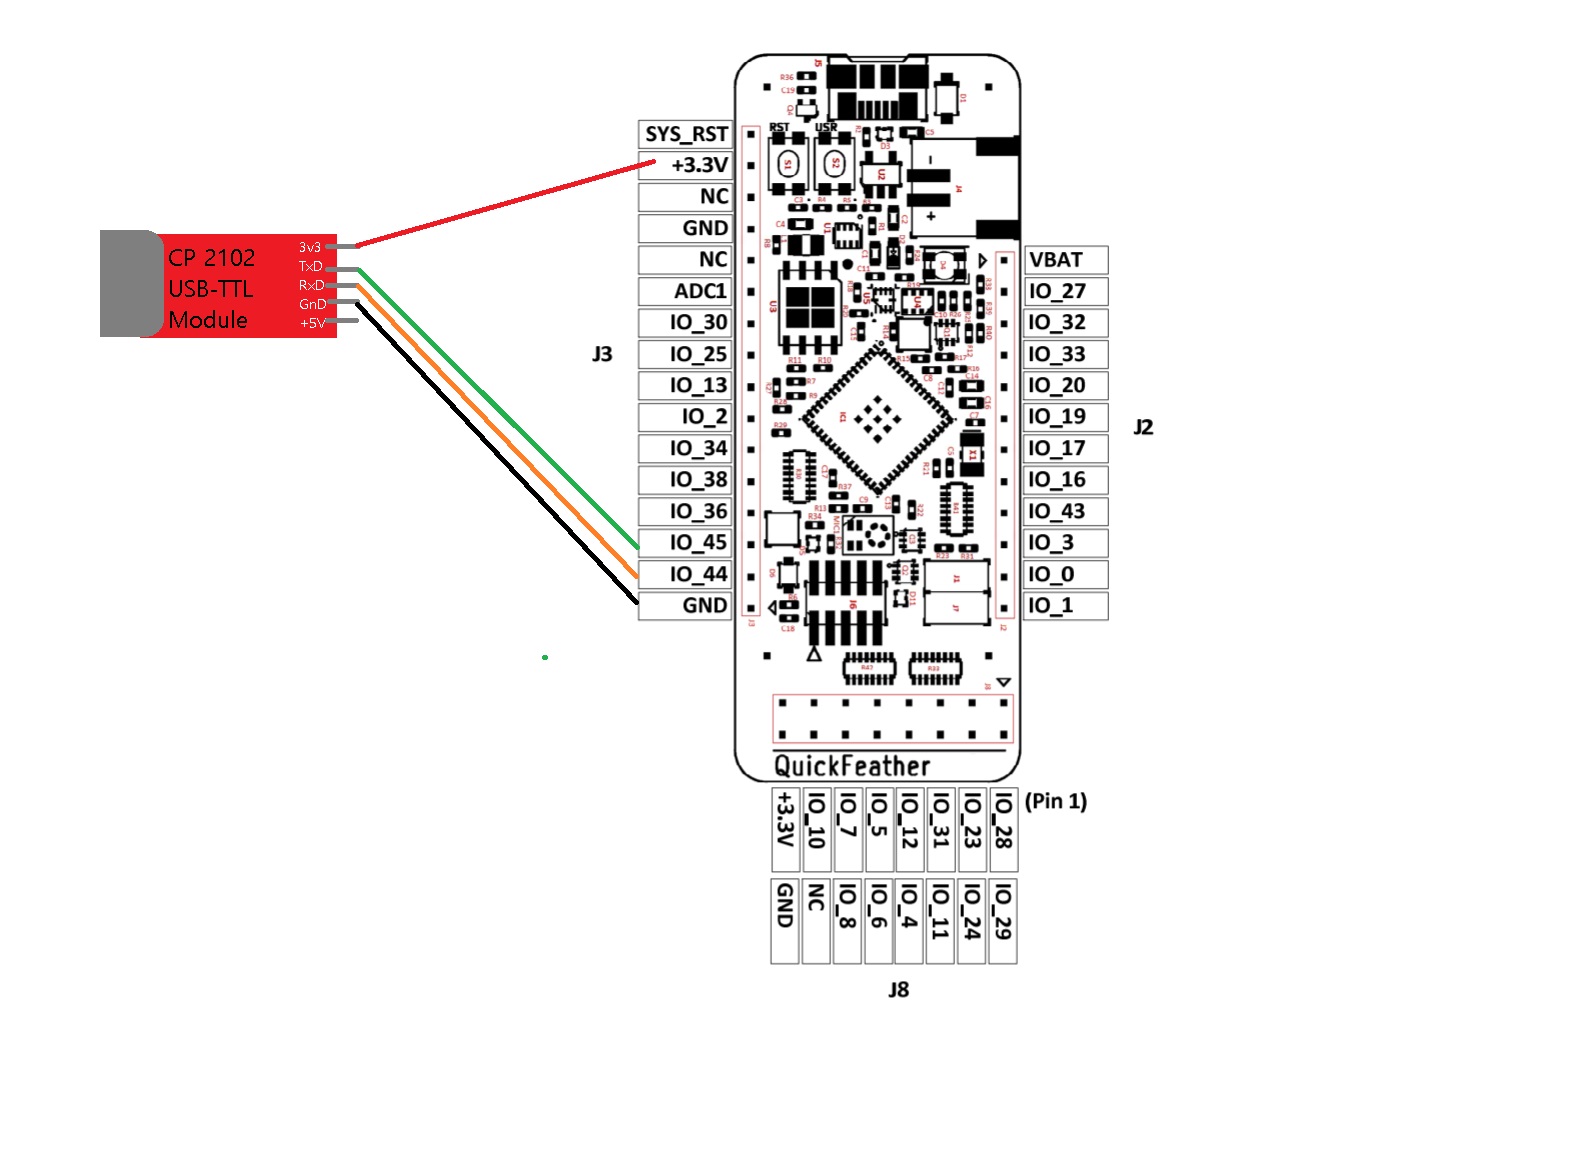
Disconnect Quick Feather from USB port and now connect Quick Feather to USB-Serial Adapter (3.3V, TX, RX, Gnd) and USB-Serial Adapter to computer's USB port.
Again In the command terminal, issue following command :-
$ sudo chmod a+rw /dev/ttyUSB0Now, Install Putty from Ubuntu Software (free app store)
Then open Putty and set : Serial, /dev/ttyUSB0, 115200 to open serial monitor.
Reset Quick Feather and let the Blue LED blink, don't press the user button this time.
After few sec output will appear on Putty serial monitor
You will find all the HAL support in this location for Quick Feather :-
/home/computer/zephyrproject/modules/hal/quicklogic/HALAll the .c and .h files for GPIO, ADC, SPI, I2C, TIMER modules are there to write your own programs ! Just #include those to your main.c and you are golden.
Here is an example :
//// note: this code is incomplete ////

#include <zephyr.h>
#include <sys/printk.h>

// HAL for GPIO as Output
#include <eoss3_hal_gpio.h>
#include<eoss3_hal_pad_config.h>

PadConfig pincfg_table[] =
 {
     // setup red LED
    .ucPin = PAD_22,
    .ucFunc = PAD22_FUNC_SEL_GPIO_6,
    .ucCtrl = PAD_CTRL_SRC_A0,
    .ucMode = PAD_MODE_OUTPUT_EN,
    .ucPull = PAD_NOPULL,
    .ucDrv = PAD_DRV_STRENGTH_4MA,
    .ucSpeed = PAD_SLEW_RATE_SLOW,
    .ucSmtTrg = PAD_SMT_TRIG_DIS,
  }


void main(void)
{
	HAL_GPIO_Write(6, true);
        // some delay here or use periodic task
        HAL_GPIO_Write(6,false);
        // some delay here or use periodic task
}


_SPmZ63wPgQ.png?auto=compress%2Cformat&w=40&h=40&fit=fillmax&bg=fff&dpr=2)
Comments
Please log in or sign up to comment.