


Hardware components | ||||||
 |
| × | 1 | |||
 |
| × | 1 | |||
 |
| × | 1 | |||
| × | 1 | ||||
 |
| × | 1 | |||
 |
| × | 3 | |||
 |
| × | 1 | |||
Software apps and online services | ||||||
 |
| |||||
 |
| |||||
Hand tools and fabrication machines | ||||||
 |
| |||||
 |
| |||||
This prototype project aims to create a portable, low-profile, Bluetooth-enabled (BLE) keyboard that can easily fit into your pocket. Using the nRF52840, a powerful and versatile microcontroller, this project demonstrates how to design and implement a fully functional BLE keyboard with a user-friendly OLED display. The keyboard is designed for convenience and ease of use, making it a perfect companion for mobile devices and other Bluetooth-compatible gadgets.
Demonstration
Here are some key features of the Low Profile Virtual BLE Pocket Keyboard:
- Bluetooth Low Energy (BLE) Connectivity: Allows seamless wireless communication with compatible devices.
- OLED Display: Provides a clear and concise interface for keyboard keys and status information.
- Compact and Portable: The low-profile design makes it easy to carry in your pocket.
- Easy Navigation: Scroll and select keys using simple button presses.
- Caps Lock Functionality: Toggle between uppercase and lowercase letters.
- Battery Efficient: Designed to minimize power consumption, ensuring longer battery life.
- One Handed Operation: Suitable for single handed typing
- Remote for Smart TVs : Can be used as a remote for Smart TVs
I have tested this keyboard on Windows and Android, not sure if it will work on iOS
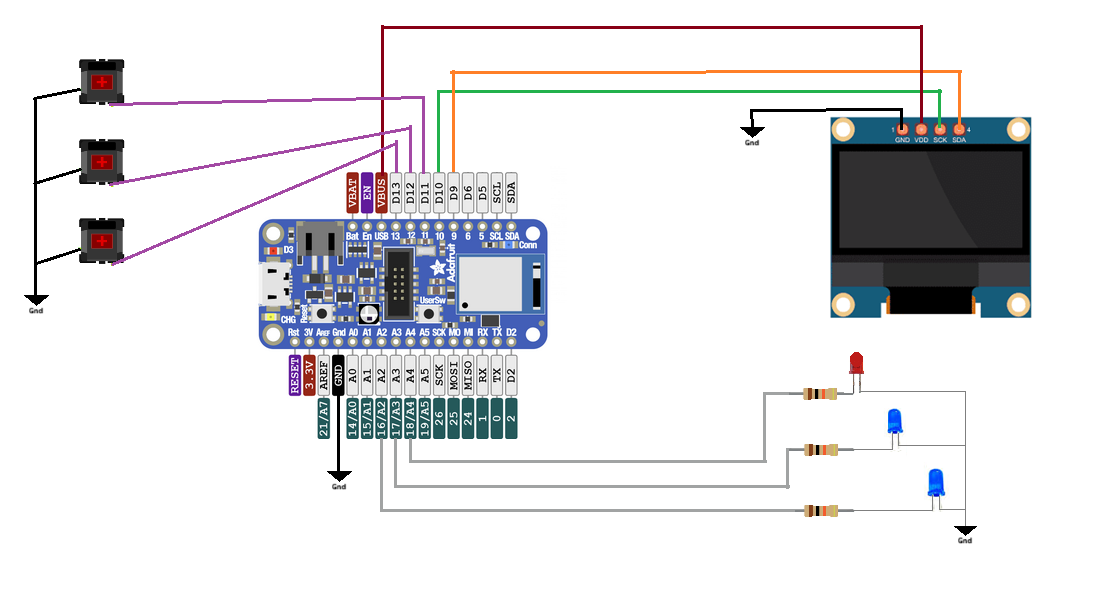
The hardware design of this project focuses on simplicity and portability. The key components used in this project are:
- nRF52840 Microcontroller: The heart of the project, providing BLE connectivity and handling keyboard inputs.
Any development board with nRF52840 mcu can be used for this project as long as it had the Adafruit Arduino Bootloader for Feather Express is burned into it
- OLED Display (SSD1306 128x64): Used to display the keyboard keys and other information.
Sp is Space BarBk is Back SpaceEn is EnterCL is Caps Lock(toggles ON/OFF)
- Buttons and LEDs: Used for navigation and selection of keys, as well as indicating the connection status. I have use Cherry MX equivalent Red and Blue switches.
Here is a brief overview of the hardware connections:
- The OLED display is connected to the nRF52840 using software I2C, with
SCL_PINset to 10 andSDA_PINset to 9. - The buttons for scrolling and selecting keys are connected to pins 11, 12, and 13.
- The LEDs indicating the status of the buttons are connected to analog pins A2, A3, and A4.
- Additional status LEDs for Bluetooth connectivity are connected to pins 24 and 25.
Compile and flash the attached code at the end of this page into a nRF52840 dev board from any Arduino IDE with version 1.8.7+ or later. See reference for details below.
Here is how the code works :
1. Including Libraries
#include <bluefruit.h>
#include <U8g2lib.h>
These lines include two libraries: bluefruit.h for Bluetooth functionalities and U8g2lib.h for the OLED display.
2. Defining Constants
#define SCL_PIN 10
#define SDA_PIN 9
#define KEY_BACKSPACE 0xSCL_PINandSDA_PINdefine the pins for I2C communication.KEY_BACKSPACEdefines the keycode for the backspace key.
3. Setting Up the OLED Display
U8G2_SSD1306_128X64_NONAME_F_SW_I2C u8g2(U8G2_R0, SCL_PIN, SDA_PIN, U8X8_PIN_NONE);This line sets up the OLED display using software I2C.
4. Defining Button Pins and LEDs
#define BUTTON_SELECT_PIN 11
#define BUTTON_SCROLL_UP_PIN 12
#define BUTTON_SCROLL_DOWN_PIN 3
#define LED_SELECT_PIN A7
#define LED_SCROLL_UP_PIN A2
#define LED_SCROLL_DOWN_PIN A6
These lines define the pins connected to buttons and LEDs.
5. Creating a Virtual Keyboard Layout
const char* keys[50] = {
  "q", "w", "e", "r", "t", "y", "u", "i", "o", "p",
  "a", "s", "d", "f", "g", "h", "j", "k", "l", ",",
  "z", "x", "c", "v", "b", "n", "m", ".", "@", "/",
  "0", "1", "2", "3", "4", "5", "6", "7", "8", "9",
  "=", "!", "?", "$", "*", "&", "Sp", "Bk", "En", "CL"
};
This array represents a virtual keyboard layout with 50 keys, including letters, numbers, and special characters.
6. Setting Initial Values
int keyIndex = 0;
bool CLsLock = false;
BLEHidAdafruit blehid;
unsigned long previousMillis = 0;
const unsigned long interval = 15000;keyIndextracks the current key selected.CLsLockindicates the Caps Lock status.blehidis an instance for Bluetooth HID communication.previousMillisandintervalare used to manage display refresh timing.
7. Setup Function
void setup() {
  // Initialization code here
}
This function runs once at the beginning and sets up the OLED display, buttons, LEDs, and Bluetooth.
8. Main Loop
void loop() {
  // Main code here
}
This function runs repeatedly and handles button presses, key selection, display updates, and Bluetooth connection status.
9. Start Bluetooth Advertising
void startAdv(void) {
  // Advertising code here
}
This function sets up Bluetooth advertising to make the device discoverable.
10. Update the Display
void updateDisplay() {
  // Display update code here
}
This function updates the OLED display based on the current key selection and Caps Lock status.
11. Send Key Presses
void sendKey(const char* key) {
  // Key sending code here
}
This function sends the selected key press over Bluetooth.
12. Handle Special Keys
void sendSpecialKey(uint8_t keycode) {
  // Special key sending code here
}
This function handles sending special keys like backspace.
13. Handle Bluetooth Connection Status
void is_not_connected() {
  // Disconnected status handling code here
}

void is_connected() {
  // Connected status handling code here
}
These functions control the status LEDs based on Bluetooth connection status.
Limitations- Not suitable for gaming or programming
- Not a replacement for 'real physical keyboard'
- Not all modifier keys and special control keys are implemented
- May exhibit input lag or debouncing
Adafruit Feather Express with Arduino
Flashing Bootloader into other nRF523840 board
1306 OLED display with u8g2 library
ConclusionThe Low Profile Virtual BLE Pocket Keyboard with the nRF52840 microcontroller is an excellent example of combining modern technology with experimental applications. This project not only demonstrates the capabilities of the nRF52840 but also provides a convenient and portable solution for those who need a compact and easy-to-use keyboard. Whether you're a hobbyist, a developer, or just someone looking for a cool DIY project, this BLE keyboard is sure to impress.
If you are into mechanical keyboard, this demo might be helpful to expand this into a real physical keyboard with matrix key switches layout as input, proper enclosure and your favorite key caps to add more flavor to the recipe ! By following the steps outlined in this article, you can create your own BLE keyboard and customize it to suit your needs. The flexibility of the nRF52840 and the simplicity of the design make it a perfect project for anyone interested in learning more about Bluetooth technology and embedded systems. So, grab your tools and get started on your journey to creating a low-profile virtual keyboard that fits right in your pocket!


_3u05Tpwasz.png?auto=compress%2Cformat&w=40&h=40&fit=fillmax&bg=fff&dpr=2)


Comments