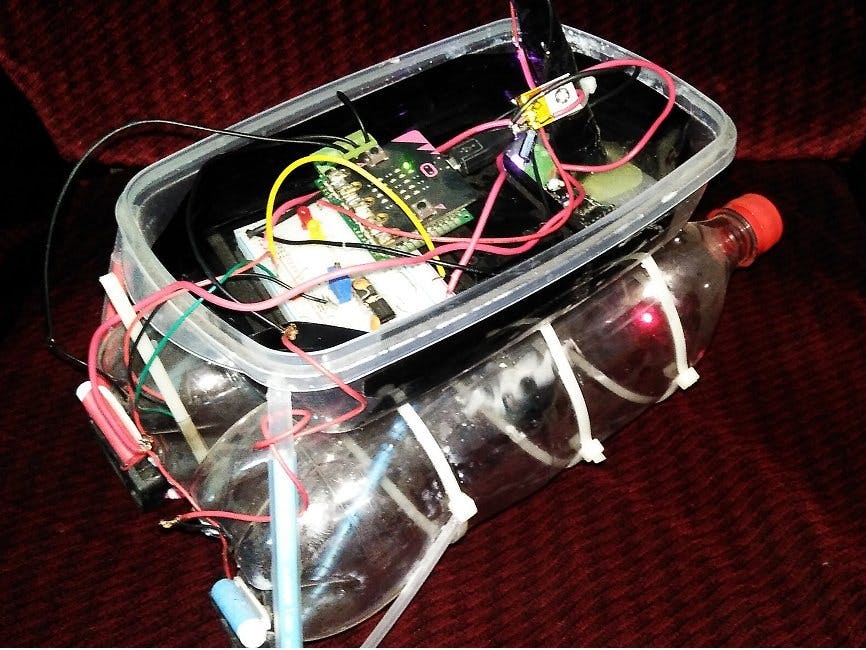
Water quality data is very important for industrial applications, utility water supply, agriculture and scientific research. With conventional fixed location water quality monitoring systems (installed in water treatment plants, swimming pool etc) the whole picture of water quality can not be captured. Again, for scientific research & detection of water pollution, going to different sites and collecting water samples for lab testing is a tedious process. In this project, it is intended to design an Autonomous Robot, which can automatically travel through water bodies, collect water quality data and send those data directly to remote end.
For this project, the water bot will collect following water quality parameters :-
- Temperature
- Conductivity
- Salinity
- Turbidity
- Total Suspended Solid
It will be self powered from its solar panels with power banks to store energy.
Working PrincipleThe brain of this robot is ARM M0 based (nRF51522) BBC Micro:bit board. This board is chosen for following reasons :
- Autonomous Navigation with on board MAG3110 magnetometer compass
- Movement detection with on board MMA8652 acclerometer
- Low power for extended battery life
- Built in BLE to IoT connectivity through Smart Phone
Autonomous Navigation is done with by maintaining compass heading with in a tolerance. During boot up the initial heading is taken as reference. There are two PWM driven propeller fans installed on the back of the robot.
If the robot is drifting to the LEFT from its reference heading, the power on the RIGHT propeller is increased (PWM) to correct course and vice versa. A PID control loop will maintain this function.
If the robot needs to turn LEFT/RIGHT, reference heading is updated by +/-90 degree and the PID control will take care of the turning.
Edge Detection for edge/wall/banks is done with ultrasonic sensor to avoid collision and automatic course correction.
Depth Detection may be necessary for shallow water bodies. Waterproof ultrasonic sensor may solve the problem
Water Quality Sensing will measure 5 parameters mentioned above with a LM35 temperature sensor, home-brew water conductivity sensor with metal electrodes and turbidity sensor with laser and photovoltaic cell.
IoT Connectivity will be made through Micro:bits BLE capabilities. BLE will connect the system to a smart phone which will work as Gateway. Over LTE network the phone connects to the cloud to send data. Alternatively, BLE-UART app enables data monitoring locally
Power to the propeller fans are delivered from a QC complaint power bank. 12 volts through PWM will be fed to the fans. Rest of the system will run on 3.3 volts.
For self charging, a 5 Watt solar panel will be attached later .
Step 1: Constructing the Vessel- The body of the water robot is build from cheap and disposable materials like empty cola bottles and food container.
- Super glue and cable ties are used to fasten every part together.
- CPU/Electronics cooling fans are used as propeller and parts of writing pen is used to add structural support. (scroll the images below)
Each bottle's capacity 1.25 liters. Which means, theoretically (Archimedes principle) this vessel can float 2.5 k.g. mass.
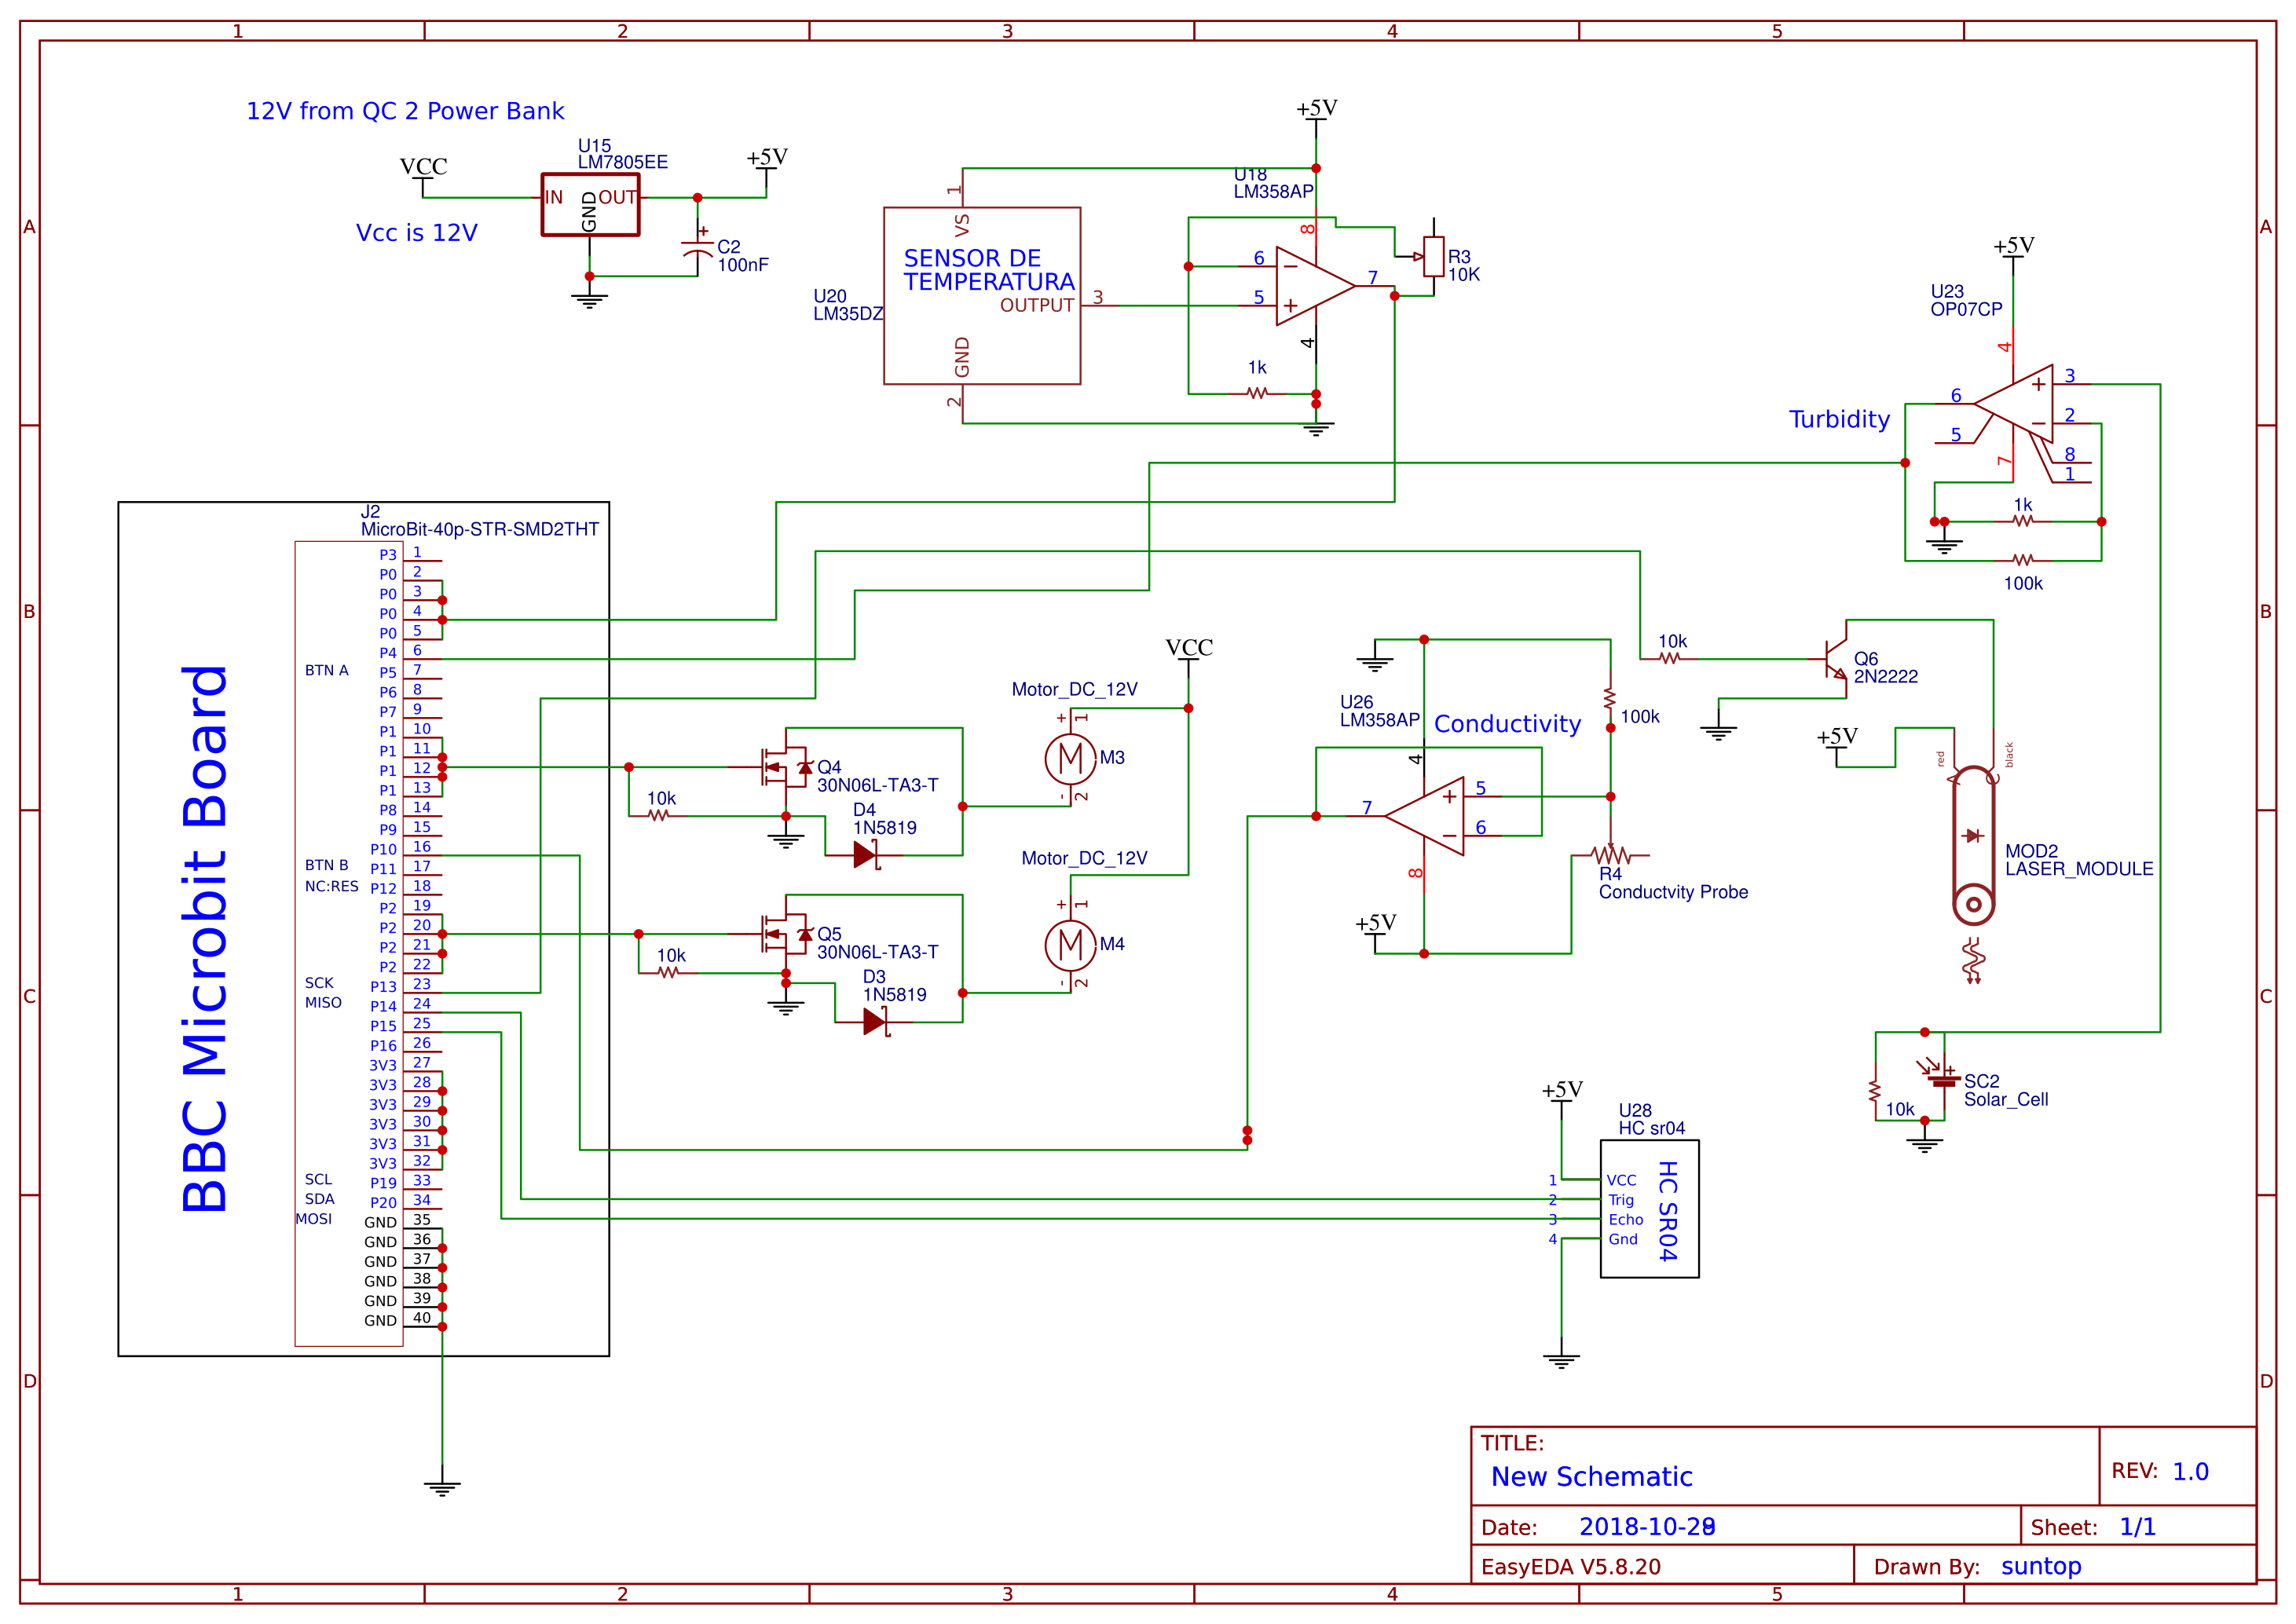
Step 2: Preparing the Hardware6 LEDs are removes from the microbit board according to the schematic to free up the COL2 and COL3 lines which also has ADC functions. Presence of LED would have interfered with analog sensing !
A 6x4 cm protoboard is soldered on the back of the microbit to break out the edge connector pads to pins. Additionally, 2 N-Ch MOSFETs are soldered just on the other side of the protoboard to drive those for P1 and P2 pins with PWM. This part will control the propeller fans.
Conductivity Sensor
Conductivity sensor is build from the scratch with aluminium heat sink, copper tape, insulation tape, tongue stick and super glue. The copper tape has 5 mm width and 50 mm area is exposed for touching water. A separation of 15 mm is kept in between the electrodes with a 15 mm wide heat sink in between them.
The electrode will be connected in series with a known resistor and a PWM signal will be applied, voltage drop across the electrode will be amplified by an opamp stage, then send to the ADC
For this particular sensor, cell constant, K = d/a = 15 mm / ( 5 mm * 50 mm ) = 1.5 cm / (0.5 cm * 5 cm) = 0.6 per cm
Conductivity = K/R = K*G, where R is the measured resistance of a water sample. This simple test yeilds 24.3 uS/cm conductivity (not calibrated, DC measurement).
Temperature Sensor
For sensing water temperature, LM35 temperature sensor IC is encapsulated inside a heat shrink tube to make waterproof and flexible with a cable tie support.
Micro gap between the IC and heat shrink tube is filled with glue to prevent water.
Turbidity Sensor
The main component of this sensor is LASER and a photovoltaic cell placed in a tube. For the tube part, an empty marker/sign pen and a 3 inch aluminium tube is used.
PV cell is placed (on the wall of the Al tube with glue) 90 degree to the laser beam.
Presence of particles ( fine sand, mud, dirt, pollutant, plankton ) will deflect the laser beam and PV (photo voltaic) cell will pick up that beam. Higher turbidity will generate more current in the PV cell.
All signals are amplified to increase resolution with Opamps before feeding to the ADC.
System Power
The Waterbot requires different power rails for different parts. 12 Volts for the propeller fans & 5 Volts through micro-USB for Microbit (although Microbit runs @ 3.3 Volts which is generated with on board voltage regulator) and other components like the Opamps, Laser, Sensors etc.
The most compact way to get 12 Volts is to use a QC 2.0 (or higher) compliant power bank with this hack or this product.
Then, adding an LM7805 with micro-USB can provide 5 Volts for the rest of the circuit.
Putting it altogether
Creating Accounts on nRF Cloud and Mbed
Go to https://os.mbed.com/account/signup and create a free account or login with existing account.
Go to https://nrfcloud.com and create an account.
Login to mbed account and go to https://os.mbed.com/platforms/ to select BBC Micro:bit as platform.
Go to following link and Import to Mbed Compiler
https://os.mbed.com/users/suntopbd/code/uBit_BLE_UART_Waterbot/
If everything is done properly, Mbed should appear like this on web browser :-
- Board Setting : BBC micro:bit (default)
- Click "Compile" to compile the code and generate hex file
Warning : Do not update "BLE_API" and "NRF51822" folders
Code Tips 1 :
ticker.attach(periodicCallback, 5);
Ticker is a thing in MBED that calls a function periodically, here it will call "periodicCallback" every 5 seconds, which means data will be send every 5 seconds to the cloud. If you wish to send data every 1 minute or 60 seconds
write this line :
ticker.attach(periodicCallback, 60);
Code Tips 2:
while (true)
{
ble.waitForEvent();
val = ain.read_u16();
/// bla bla your code
}
Inside the while(true) {} loop with in int main(void){} is the place to write your program code.
Following BLE API must be kept running for BLE to work continuously.
ble.waitForEvent();
The following code fetch ADC data and keep it on val variable.
val = ain.read_u16();
Code Tips 3:
The blePrintf() API sends UART data over BLE. It only accepts String or char array. Therefore, before sending Numerical value, it must be converted to String
void periodicCallback(void)
{
 blePrintf("Temperature: ");
 blePrintf(result);
 blePrintf("\r\n");
}
Useful Code Examples with MBED
See details here: https://os.mbed.com/docs/latest/reference/drivers.html
Writing a DigitalPin :
#include "mbed.h"
DigitalOut pin1 (P0_2); // microbit edge connector 1
int main()
{
    while(1)
        {
          pin1 = 1;    //same as digitalWrite (D7, HIGH)
          wait (0.5);  //same as delay(500)
          pin1 = 0;    //same as digitalWrite (D7, LOW)
          wait (0.5);  //same as delay(500)
        }
}
Reading a Digital Pin :
#include "mbed.h"
DigitalIn buttonA (P0_17); // On Board Push Switch A
int main()
{
 int sw_state = 0;
     while(1)
         {    sw_state = buttonA.read(); // same as x = digotalRead(3)
          if (sw_state)
                 {
                  // do something
                 }
         else
                 {
                  // do something else
                 }
         }
}
Flashing hex on Micro:bit
Connect micro:bit to PC with an USB cable and copy the hex file to micro:bit.
Installing nRF Cloud Gateway
- Go to Google Play store and Install nRF Gateway app.
- Turn on Bluetooth on the android device and run the app
- Login with previously created ID and Password for nRF cloud account.
- Keep the micro:bit nearby
Establish Connection to the Cloud
To establish the connection login from both the app and the remote terminal is required. This way both sides are connected to the cloud and exchange data.
Step 6: Device OperationUnfortunately, lack of access to swimming pools/water bodies makes it difficult for me to test the bots full autonomous operation
Action VideoA video on bathtub will be added asap, stay tuned !
Possible Area of Applications- Water Treatment Facility Monitoring
- River Pollution Monitoring
- Detecting Contamination Hot spots
- Water Pollution Data Mapping
- Scientific Research Data Collection
Due to the unavailability of standard sensors and limited funding, some un-calibrated sensors are developed with generic electronic components for demonstration purpose. Also, lack of 3D printer access and technical support (mechanical engineering/chemistry/programming) makes this design far from the envisioned version. So, there is scope for improvement :
- Proper mechanical design to sustain stress, shock and turbulence
- Installation of real water quality sensors
- Powerful propellers to work against strong stream
- GPS capabilities for data mapping
- Submarine capabilities with underwater camera
- Autonomous and Manual control
- Water Sample retrieval capability for further lab test
- pH Sensor, Dissolved Gas Sensor, Radioactivity sensing
- Mini on board Lab for checking Microbes
- Amphibious design, underwater anchoring during storm
- AI based camera to survey marine life
- Internet connectivity through satellite
- Independent and sufficient solar energy generation
- Long term research on ocean
- BBC Micro:bit Schematic
- Float to String Conversion
- Mbed BLE API
- BLE Beacon
- BLE UART
- Magnetometer
- PID Controller
- Water Quality Parameters
- Turbidity
- Water Turbidity Measurement
- Water Conductivity Measurement
- Micro:bit IoT connectivity
- 12V Supply from QC Power Bank


_3u05Tpwasz.png?auto=compress%2Cformat&w=40&h=40&fit=fillmax&bg=fff&dpr=2)
Comments
Please log in or sign up to comment.