Hot Air Balloon is a risky and challenging sport testing your navigational skills. If you lost in the balloon, this device will help you to track on GPS as well as will tell about the accurate altitude of your balloon. It is also helpful when you launch your own weather balloon Satellite and it is difficult to find it. It is the most difficult part of whole process, so you have to keep this device in balloon carriage to keep it tracked.
Here we will first of all acquire data from the sensor and then transmit it through wifi board ESP8266. The process is simple.
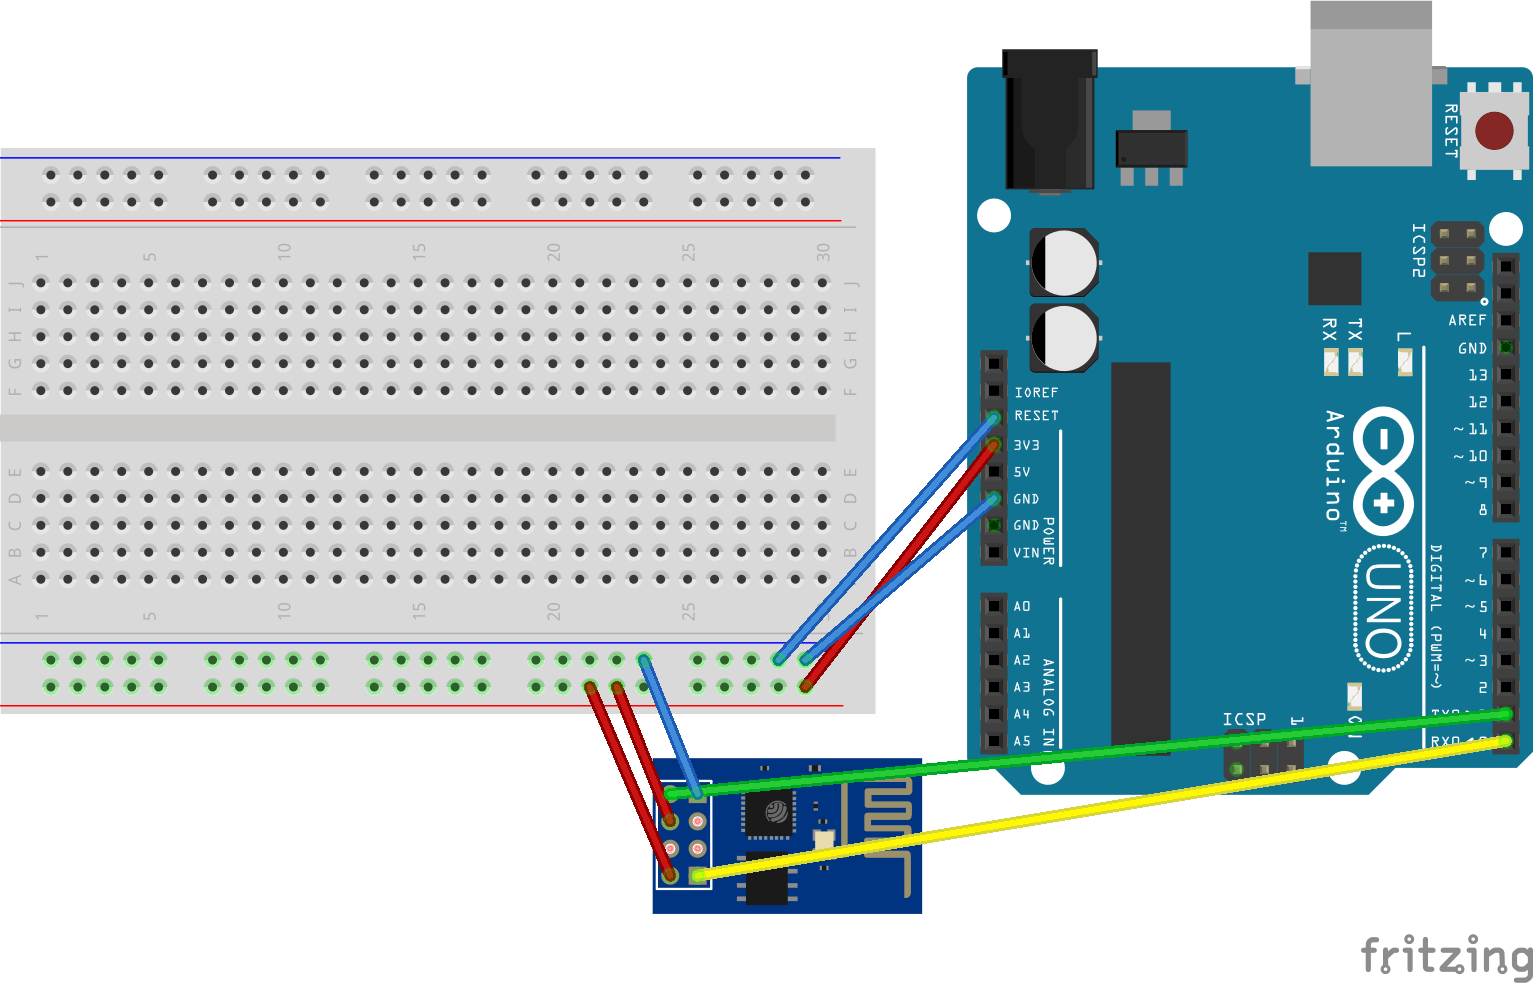
Step 1: Adding Wifi To Arduino UNO- Connect your UNO to ESP 8266 as shown in circuit diagram above.
- Connect the Arduino’s 3v3 (3.3V) output to ESP8266. The ESP8266 works with 3.3V and not 5V, so this is necessary.
- Connect the RES or RESET pin, When you ground the reset pin, the Arduino works as a dumb USB to serial connector, which is what we want to talk to the ESP8266.
- Connect the RXD pin of the Arduino to the RX pin of the ESP8266.
- Connect the TXD pin of the Arduino to the TX pin of the ESP. When we want two things to talk to each other over serial, we connect the TX pin of one to the RX of the other (send goes to receive and the opposite). Here we do not have the Arduino talk to the ESP8266 though, our computer is talking to it via the Arduino.
- Connect GND and VCC.
Finally CH_PD connects.
Step 2: In Arduino IDEIn the Arduino IDE, you don’t need to choose a board, as we’re not uploading anything to the ESP8266. Just choose the right port in the Tools menu and go to Tools → Serial Monitor. Then simply set your baud rate to 115200 (the default ESP8266 firmware uses it) and your line endings to Both NL & CR.
And since we talked about the CH_PD pin, remember that if you want to flash the ESP8266 you should connect the GPIO0 pin.
Step 3: Connecting DPS310We are doing I2C connection here as per the circuit Diagram.
Step 4: Installing Infineon DPS310 LibrariesLink: https://github.com/Infineon/DPS310-Pressure-Sensor
To install the DPS310 pressure sensor library in the Arduino IDE, please go now to Sketch > Include Library > Add .ZIP Library... in the Arduino IDE and navigate to the downloaded .ZIP file of this repository. The library will be installed in your Arduino sketch folder in libraries and you can select as well as include this one to your project under Sketch > Include Library> IFX_DPS310.
Step 5: Arduino Libraries to Communicate with Google MapsLink: https://github.com/witnessmenow/arduino-google-maps-api


_ztBMuBhMHo.jpg?auto=compress%2Cformat&w=48&h=48&fit=fill&bg=ffffff)


Comments
Please log in or sign up to comment.