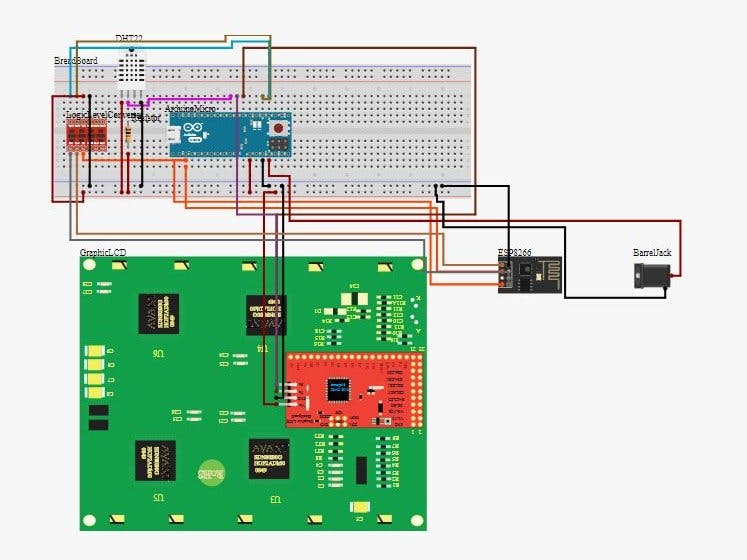
// Include Libraries
#include "Arduino.h"
#include "DHT.h"
#include "ESP8266.h"
#include "dweet.h"
#include "GraphicLCD.h"


// Pin Definitions
#define DHT_PIN_DATA	4
#define GRAPHICLCD_PIN_RX	3
#define GRAPHICLCD_PIN_TX	2


// Global variables and defines

// ====================================================================
// vvvvvvvvvvvvvvvvvvvv ENTER YOUR WI-FI SETTINGS  vvvvvvvvvvvvvvvvvvvv
//
const char *SSID     = "WIFI-SSID"; // Enter your Wi-Fi name
const char *PASSWORD = "PASSWORD" ; // Enter your Wi-Fi password
//
// ^^^^^^^^^^^^^^^^^^^^^^^^^^^^^^^^^^^^^^^^^^^^^^^^^^^^^^^^^^^^^^^^^^^^
// ====================================================================


// These Dweet tokens have been auto generated for you.
char* const inputToken  = "36b7d7a2-8bfa-11e7-b3d8-424f06f8d21b_input";
char* const outputToken = "36b7d7a2-8bfa-11e7-b3d8-424f06f8d21b_output";

// object initialization
ESP8266 wifi;
Dweet dweet( &wifi, inputToken, outputToken);
DHT dht(DHT_PIN_DATA);
GraphicLCD graphicLCD(GRAPHICLCD_PIN_RX,GRAPHICLCD_PIN_TX);


// define vars for testing menu
const int timeout = 10000;       //define timeout of 10 sec
char menuOption = 0;
long time0;

// Setup the essentials for your circuit to work. It runs first every time your circuit is powered with electricity.
void setup()
{
    // Setup Serial which is useful for debugging
    // Use the Serial Monitor to view printed messages
    Serial.begin(9600);
    while (!Serial) ; // wait for serial port to connect. Needed for native USB
    Serial.println("start");

    dht.begin();
    wifi.init(SSID, PASSWORD);
    menuOption = menu();

}

// Main logic of your circuit. It defines the interaction between the components you selected. After setup, it runs over and over again, in an eternal loop.
void loop()
{


    if(menuOption == '1') {
    // DHT22 - Test Code
    // Reading humidity in %
    float dhtHumidity = dht.readHumidity();
    // Read temperature in Celsius, for Fahrenheit use .readTempF()
    float dhtTempC = dht.readTempC();
    Serial.print(F("Humidity: ")); Serial.print(dhtHumidity); Serial.print(F(" [%]\t"));
    Serial.print(F("Temp: ")); Serial.print(dhtTempC); Serial.println(F(" [C]"));

    }
    else if(menuOption == '2') {
    // GraphicLCD - Test Code
    // The LCD Screen will display the text of your choice at the location (30,50) on screen. Counting from the top left corner: 30 pixels to the right and 50 pixels down
    graphicLCD.setX(30);                     // 1. sets left-right indent for text to print. Change the value in the brackets (1 - left, 164 - right) for a different indent.
    graphicLCD.setY(50);                     // 2. sets top-bottom height for text to print. Change the value in the brackets (1 - top, 128 - bottom) for a different height.
    graphicLCD.print("Circuito.io Rocks!");  // 3. prints the text in the brackets. Modify the text to get your own unique print.
    delay(1000);                               // 4. waits 1000 milliseconds (1 sec). Change the value in the brackets (1000) for a longer or shorter delay in milliseconds.
    graphicLCD.clear();                      // 5. wipes the screen
    delay(1000);                               // 6. waits 1000 milliseconds (1 sec). Change the value in the brackets (1000) for a longer or shorter delay in milliseconds.
    }
    else if (menuOption == '3') {

    //SET DWEETS

    dweet.setDweet("DemoKey", "DemoValue"); // replace with your own (key, value) pairs to dweet your data
    dweet.sendDweetKeys();


    //GET DWEETS
    dweet.receiveDweetEvents();

    if(!strcmp(dweet.getValue() , "DemoEventName"))
    {
        Serial.println("DemoEventName received!");
        // Do something
    }
    }

    if (millis() - time0 > timeout)
    {
        menuOption = menu();
    }

}


// Menu function for selecting the components to be tested
// Follow serial monitor for instrcutions
char menu()
{

    Serial.println(F("\nWhich component would you like to test?"));
    Serial.println(F("(1) DHT22"));
    Serial.println(F("(2) GraphicLCD"));
    Serial.println(F("(3) IOT"));
    Serial.println(F("(menu) send anything else or press on board reset button\n"));
    while (!Serial.available());

    // Read data from serial monitor if received
    while (Serial.available())
    {
        char c = Serial.read();
        if (isAlphaNumeric(c))
        {
            if(c == '1')
    			Serial.println(F("Now Testing DHT22"));
    		else if(c == '2')
    			Serial.println(F("Now Testing GraphicLCD"));
    		else if(c == '3')
    			Serial.println(F("Now Testing IOT"));
            else
            {
                Serial.println(F("illegal input!"));
                return 0;
            }
            time0 = millis();
            return c;
            }
        }
    }


_PnKPri8a6q.jpg?auto=compress%2Cformat&w=48&h=48&fit=fill&bg=ffffff)


_3u05Tpwasz.png?auto=compress%2Cformat&w=40&h=40&fit=fillmax&bg=fff&dpr=2)


Comments
Please log in or sign up to comment.