Well this is my first Project on Hackster. I have been playing with Particle Photons for a few years now, but everything has always been typically bench top tinkering. So this one I have finished and deployed so I thought I would share it with the community. There is already plenty of other Garage Door Openers listed on Hackster already, so this is my version.
Goals:I set out to build a Garage Door Controller that could be operated from a smartphone. I dislike carrying around more than I need to, so I was trying to eliminate the need for carrying house keys or a standalone garage opener. I had also just received my delivery of the Photon Argon and Xenon which had onboard Mesh Communications so I thought I would pair them up with the Blynk iOS application and create a solution.
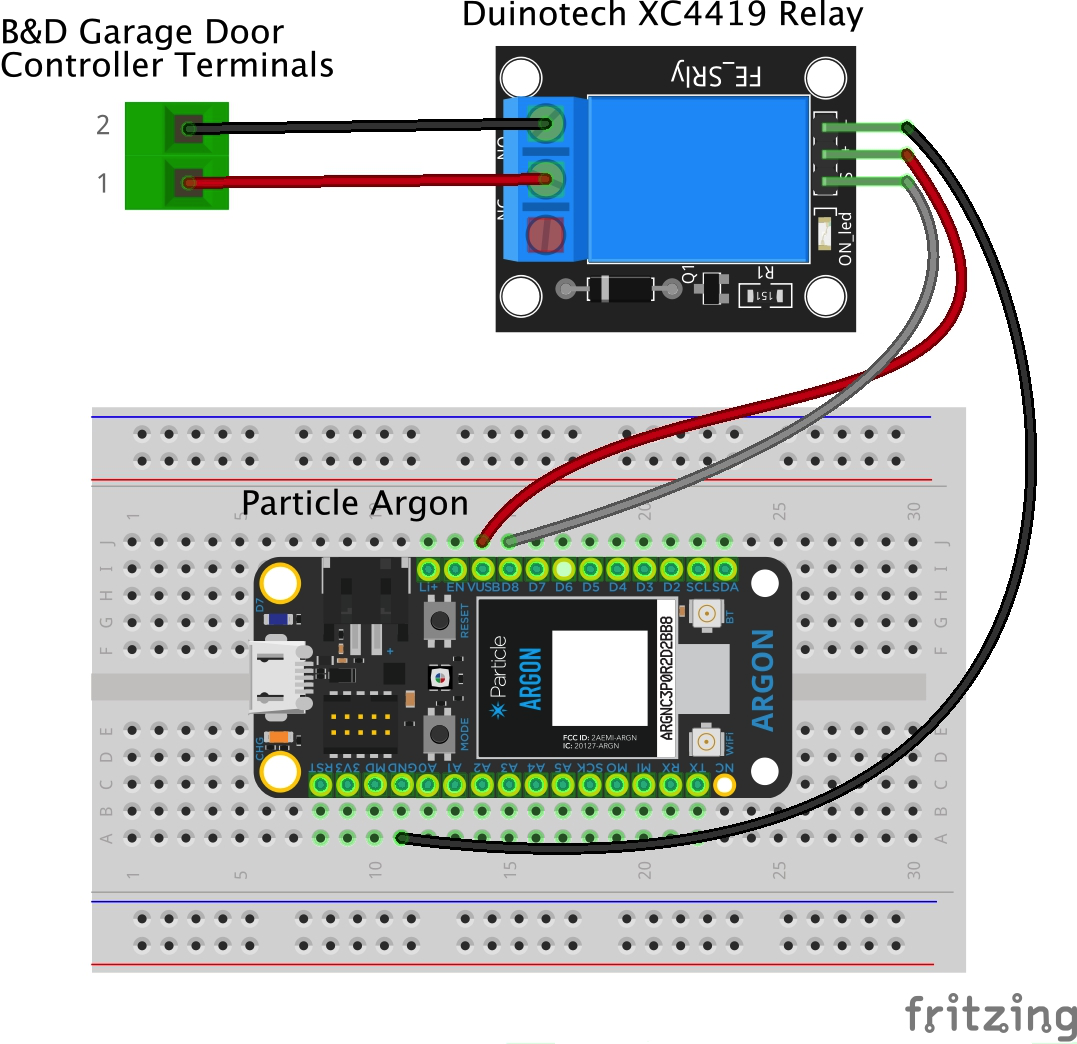
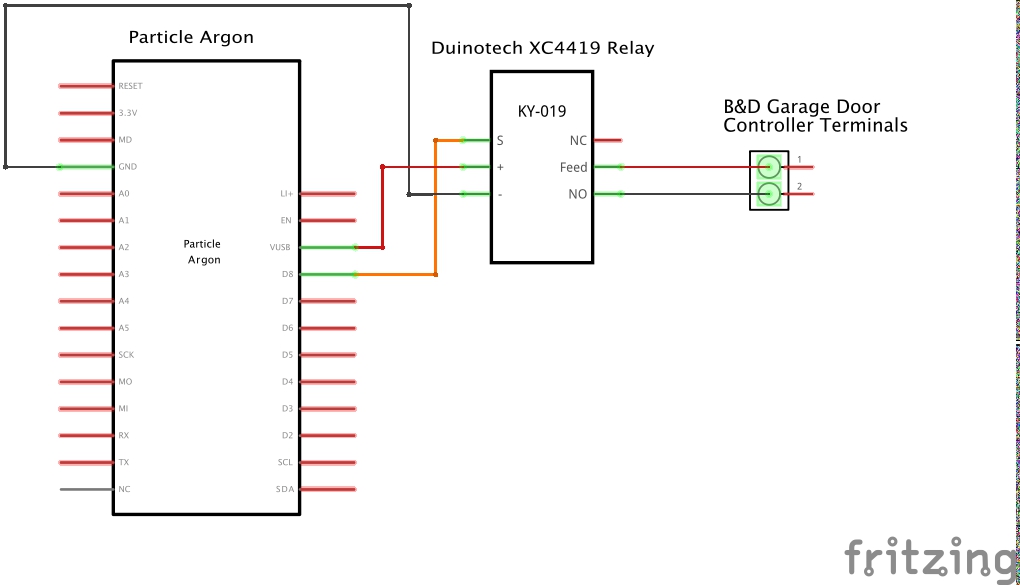
Hardware Build - Part 1 : Main ControllerThe first item to construct was the Main Controller that opens/closes the Garage Door. The style of Garage Door I have requires a contact closure across a N/O contact on the back of the B&D Garage Door Controller. A Particle Argon is powered up at 5Vdc by USB. The 5Vdc Relay is powered up from the VUSB pin and GND pins. The output to turn the relay on/off is output from the D8 pin. See Figure 1 below.
The programming for the Argon was done on the Particle Web IDE interface. More on that below. The Argon communicates via WiFi back to my home WiFi router to connect to the Particle Cloud. The signal strength for the WiFi was borderline so the external antenna was connected. Shown in Figure 2.
To connect the whole system to my smartphone (an iPhone in my case) the Blynk App was used. More details on configuring Blynk is discussed further in this project however Figure 3 shows a screen shot of the interface on the iPhone.
The next step was to design a nice looking case to house the hardware and make it fit nicely up along side the existing Garage Door Controller on the ceiling. Autocad Fusion 360 was used to do this. All of the equipment sits in the base with a cutout for the wiring to pass through to the terminals on the Relay Board. To make it compact the relay sits below the Argon Board and standoffs were designed to make everything mount up together. The next step was to make a lid with a cutout for the USB cable to pass through. To finish it off the Particle logo was cut into the top of the lid. A render of the enclosure is below in Figure 4.
The case was then printed up on my Snapmaker 3D printer and the first part of the assembly was conducted. See Figure 5 below.
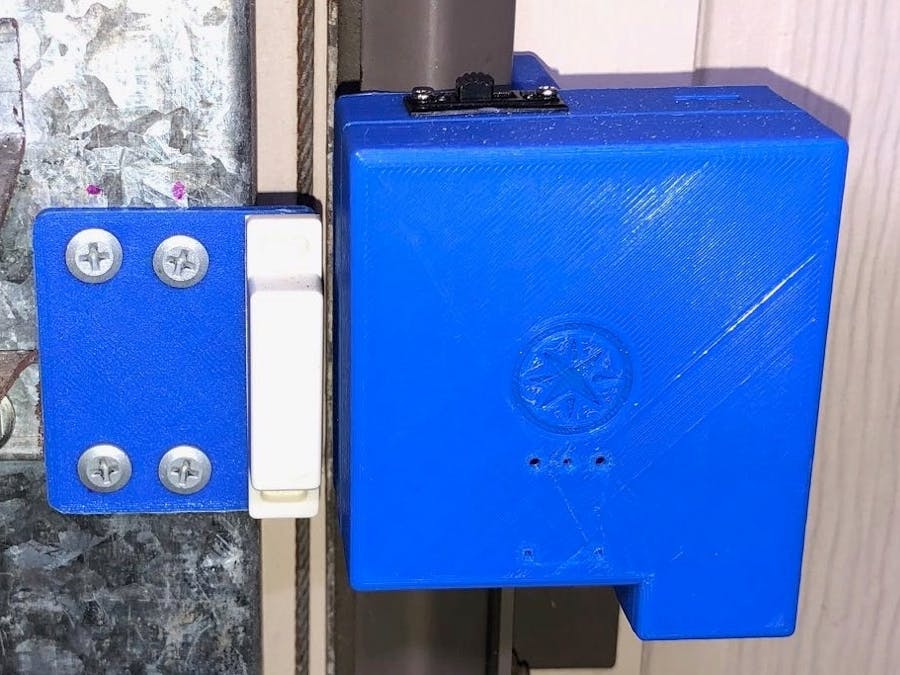
The N/O wiring from the relay was then wired to the Garage Door Terminals and the whole thing was mounted up and secured using one of the existing housing screws. The installed product is below.
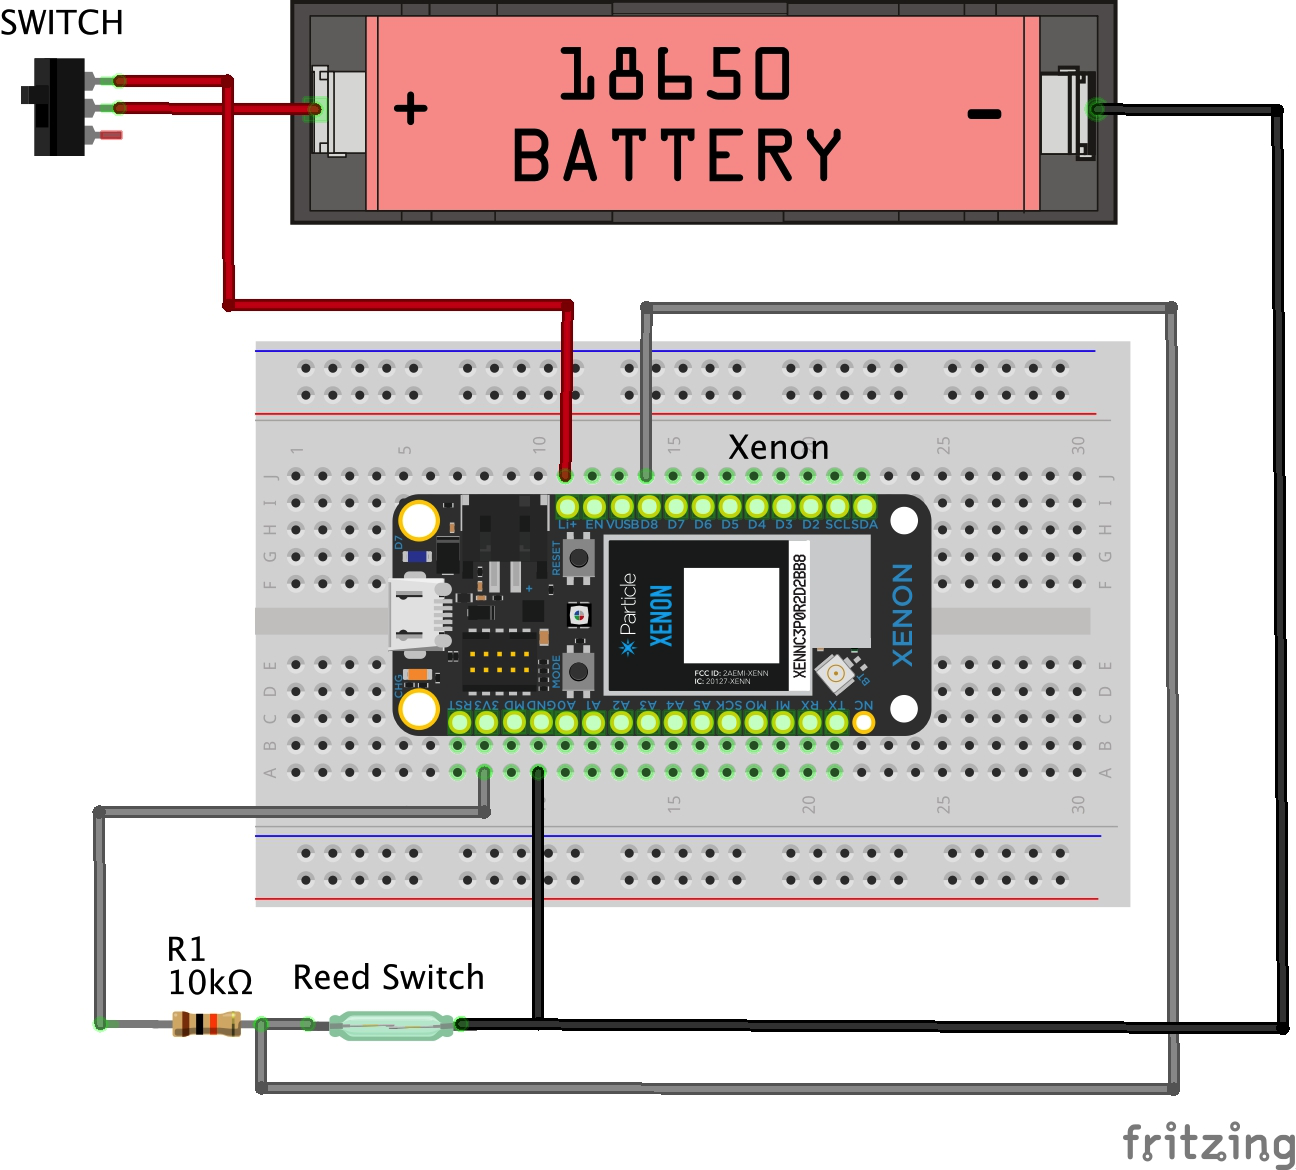
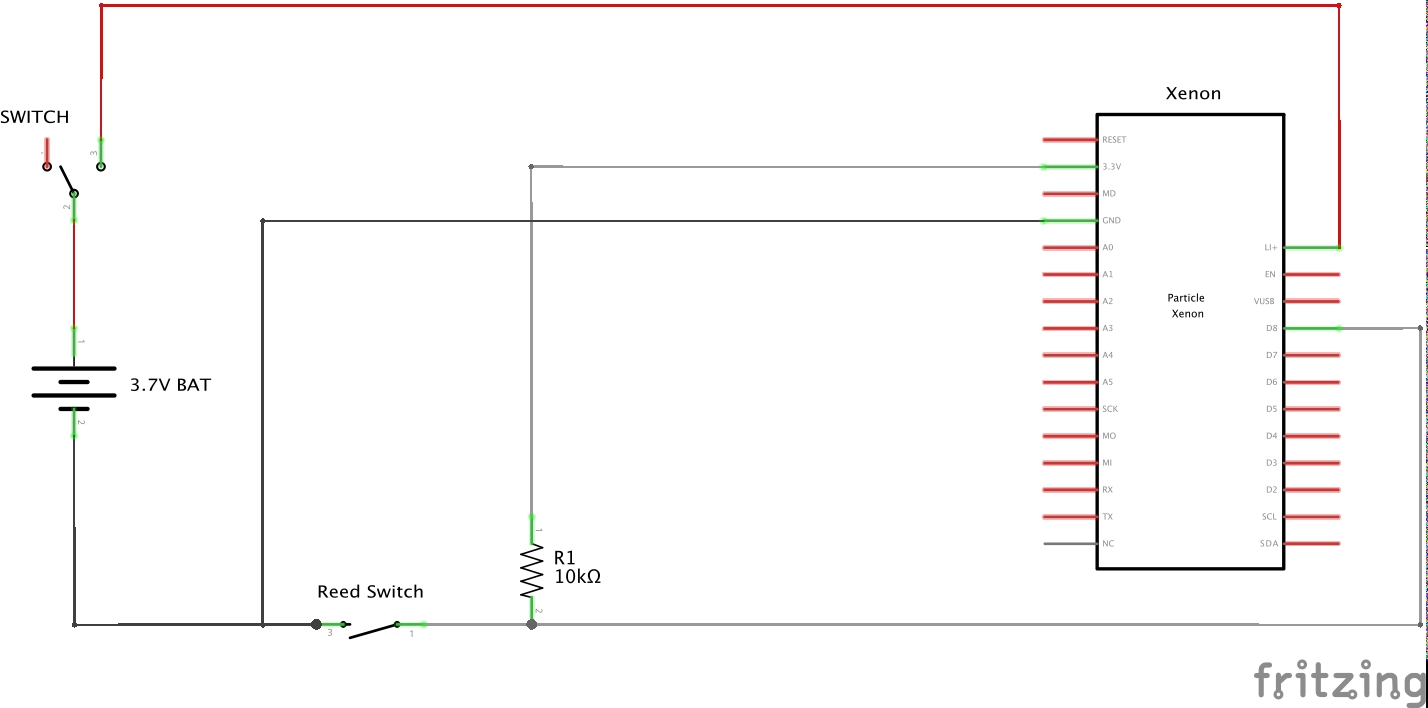
Originally I was intending to run physical wiring from a Magnetic Reed Switch mounted on the roller door and wire it back to the Argon, to confirm the closed state of the roller door. The whole aspect of installing the wiring in a tidy fashion is a pain so I was looking for a wireless solution. After the Particle team released a firmware update that introduced the low power sleeping capabilities of the Particle Xenon I set out to build a box of tricks that houses a Particle Xenon and a Magnetic Reed Switch with an onboard battery. The Lithium Ion Rechargeable Battery is an 18650 cell, 3.7Vdc, 2600mAh. I don’t have good data on how long the battery will last but the system has been installed for over a month now and charge levels have only dropped to only 4.0V. The new Mesh devices from Particle (Argon, Xenon, Boron) have battery charging circuitry built onto the boards so battery levels can be monitored. If levels drop below 3.5Vdc a Blynk Notification is sent to the phone informing you that a recharge of the battery is required. A Portable USB battery pack can then be used to plug into the USB port on the Xenon to recharge the 18650 cell. To conserve power, the Xenon put itself to sleep 20 seconds after the limit switch detects that the door is closed. It then wakes up on a rising edge of the limit switch. To ensure battery monitoring is also kept up to date, if the garage door hasn’t opened for 8hours the Xenon will wake itself up for 20seconds which is long enough to report back and update battery voltage levels. We’ll see how this goes but I am hoping that I only have to re-charge the wireless limit switch every 2-3 months depending on how much the door is used. A simple on/off switch is installed and wired to the Li+ pin on the Xenon with the negative terminal of the battery connected to the GND pin. This switch is mainly used to wake-up the Xenon by cycling the power to it, if it has to be re-flashed for some reason. The only other connection in the circuit in Figure 7 below is the Reed switch and 10kΩ pull-up resistor connected to the 3V3, GND and D8 pins.
The next step was then to power up Autocad Fusion 360 again and design a case to house all the gear shown above in Figure 7. I opted to mount the reed switch inside the enclosure with the magnetic pickup operating through the thin 1mm plastic side walls of the case. Cut-outs in the enclosure were included in the design to access the USB socket on the Xenon, mount the On/Off slide switch and some recesses for clipping the lid on to the base. The signature Particle logo was cut into the lid and we are finished with enclosure designs. A render of the wireless limit switch enclosure is below in Figure 8.
This second case was then printed up on my Snapmaker 3D printer and the parts were assembled. Below is a photo of the first parts going into position prior to the battery and wiring being installed. It shows the reed switch mounted on the side which allows the wiring to be all contained within the enclosure. The Magnetic pickup mounted to the roller door is strong enough to operate from the outside through the 1mm plastic casing.
The final connection of all the wiring was then undertaken. Not the prettiest wiring solution, but functional. In Figure 10 the pull up resistor for the reed switch input is under the black heat shrink on the left on top of the reed switch. You will notice that I have an antenna connected to the “BT” antenna connection on the Xenon. The Bluetooth and Mesh share the same radio so you can achieve extra range on your mesh connections if required. In my case I have installed the antenna but have not enabled it in the software. I have had no mesh connection issues over the short 6metre distance between the two devices so I will most probably remove this antenna for use on other projects.
The next step was to mount everything on to the slide rails of the garage door and mount the magnet onto the roller door. Lastly place the lid on the case to hide it all away and turn the switch on. Job done.
The programming for both the Argon and Xenon boards was done via the Particle Build Web IDE which uses the C++ programming language. Links to the code for the two.ino files for each board is included under the code section of this project. The file garagedoormaster.ino is loaded to the Argon and the file garagedoorlimit.ino is loaded to the Xenon.
1.1 Details for the ArgonThe Argon controls the relay which bridges out two terminals on the Garage Door itself to open and close the door. The open/close commands come from the user who actuates the open/close button on the Smartphone App. If the button is held high then the output D8 goes high else the D8 output will be low.
The Argon also receives data from the Xenon via the Mesh Subscribe command on Line 126. The myHandler function on Line 71 processes the data that is being sent. In this case 4 pieces of data are being sent on Mesh from the Xenon. The Status of the Booleans GarageClosed, GarageOpen, the value of the BattVoltage and the integer value for BattCharging. See lines 65 to 103.
The Particle Cloud and Blynk clouds have limits on how often you can communicate with them. If you make too many outgoing messages to them then they will simply terminate your connection for a period of time. Line 135 is an example where an update is only performed once the if is executed when the Publish Interval of 10seconds passes.
The Battery Voltage on the Xenon is displayed at a real value on the Blynk display. Lines 169 to 201 are configured to changed the text on the Blynk label depending upon if the Battery is charged, requires recharge or is charging. This is changed by using the Blynk.setProperty(V4, "label", "Batt Charged") command. The colour of the number displayed for the Battery Voltage is also changed depending on the voltage. Green for Ok, Orange for Low and Red for recharge. If the Battery Voltage drops below 3.5V a notification is sent to the smartphone using the Blynk.notify command on Line 215.
The GPS location of the smartphone running the Blynk app is used in a couple of ways. If you drive off and leave the geo fence boundary with the garage door open, Blynk will send you a notification and also send you an Email. I have also added in the requirement for the garage open/close button to only function when the smartphone is within the geo fence location. Depending upon the status of your location the colour of the Open/Close Button in the Blynk App also switches from Green to Orange. The Geo Fencing is a crude calculation to establish your proximity to the centre point that you specify in the geofencelat and geofencelong declarations. Change these values to match your location. The calc is nothing more than looking at your proximity to this centre point to see if both lat and long are within +/-0.001 degrees of each. ie. Within a square approx. 0.2km2 in size. Nothing super accurate here. Depending upon where you are you may want to refine the +/- 0.001 value.
In summary the code on the Xenon performs 4 functions. Monitoring Battery Voltage, Monitoring limit switch status, Publishing Mesh Messages containing the data back to the Argon and controlling its own sleep/wake functionality. The first 3 have already been discussed above. The Xenon puts itself to sleep when the Garage door has been closed for 20seconds. Whilst asleep it monitors the D8 input and if it see this go high then the Xenon will wake for another 20 seconds before putting itself to sleep again. The Sleep timer also has a 28800 second (8hrs) timeout where the Xenon will wake itself every 8 hours. This has been added for updating the battery voltage back to the Argon every 8 hours if the door hasn’t opened and closed. Hence when the Xenon is asleep it does not publish Mesh messages. I did have troubles with the trigger on the System.sleep command.
Blynk is a handy App that allows you to interact with your IoT devices directly from your smart phone without having to develop any apps directly on the App Store or Play store. Within Blynk you can create displays on your phone in the app that allows you to display data, trends, write data and a multitude of other widgets that are receiving/transmitting directly from the Particle devices. At the top display are two LED’s that change colour depending upon the status of the limit switch on the Xenon. The large Button in the middle is used to operate the relay on the Argon. If your phone is within the geo boundary it will be green. If your smartphone is outside the geo boundary the button is not functional and will be orange. The Battery Voltage is displayed at the bottom of the display. The labels and text colour on the battery voltage change depending on certain conditions previously discussed. The Notification symbol on the bottom left is simply a handle which allows Blynk Notifications to be used. The GPS label typically displays the lat/long co-ordinates (I have removed these for privacy) of the smartphone. The GPS widget is required if you want to pass GPS lat/long data back to the Argon. The Email icon on the bottom left is a handle that enables Email notifications to be used.
Each of the widgets when placed require certain settings to be configured. Below is an outline of each of these settings for each widget together with some screen shots.
That sums up the whole project. Setting up the Mesh Comms. took some time only because I had a typo on the Mesh Publish/Subscribe name between the Xenon and Argon. I went around in circles for a few days before realising. Doh. The biggest time burden for sure was designing and drafting the cases. This was the first few times I had used the Fusion 360 software, but I am slowly getting more productive at using it. All in all, I am happy with the outcome. My biggest wishlist for this whole project would be to have the functionality of the Blynk app on my smartwatch. Thanks for reading.
PlanetJARK.
EOF.


_zhWsCcSEcl.jpg?auto=compress%2Cformat&w=48&h=48&fit=fill&bg=ffffff)



_t9PF3orMPd.png?auto=compress%2Cformat&w=40&h=40&fit=fillmax&bg=fff&dpr=2)


Comments
Please log in or sign up to comment.