


Hardware components | ||||||
 |
| × | 1 | |||
Software apps and online services | ||||||
 |
| |||||
| ||||||
| ||||||
| ||||||
| ||||||
| ||||||
The Adafruit Feather HUZZAH ESP8266 is a nice board to get started with ESP8266. It can be programmed in Arduino, NodeMCU Lua or Micropython. We will be using the NodeMCU Lua firmware for this simple project, because it is simple to learn and what most NodeMCU compatible boards and modules come preloaded with.
Pre-requisitesThis project requires that you are already familiar with following :
- Building firmware using the NodeMCU online build service
- Flashing the firmware using PyFlasher or esptool.
- Programming NodeMCU using ESplorer IDE
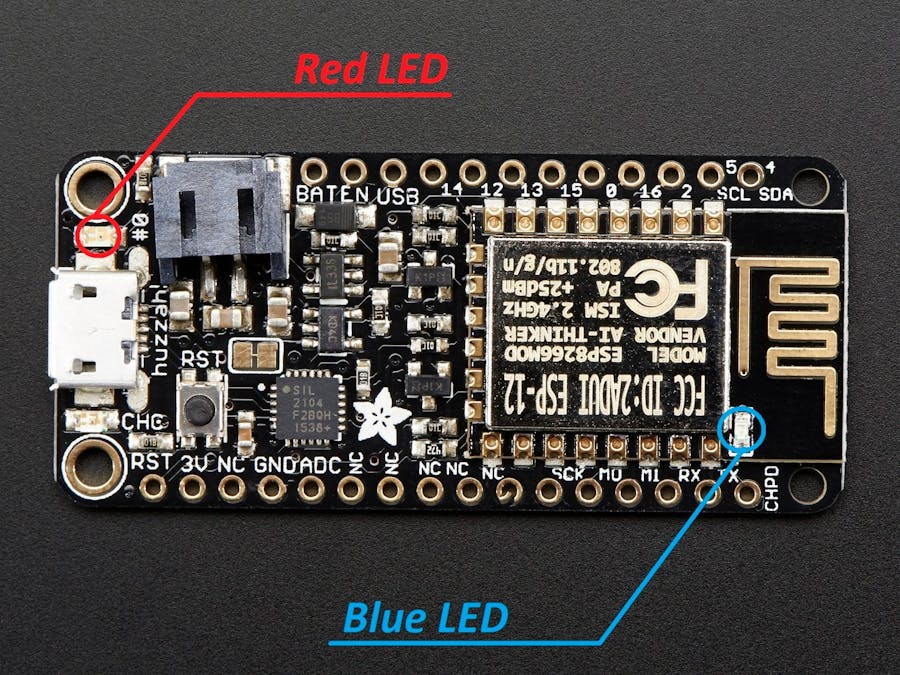
Adafruit feather Huzzah ESP8266 has 2 LEDs that can be controlled by GPIO :
- Red LED connected to GPIO #3 (pin #0 marking on board)
- Blue LED connected to GPIO #4 (pin #2 marking on board)
Now, one important thing to note is that these both LEDs are connected in reverse. Meaning that we need to make the gpio pin LOW in order to turn on the LED and gpio pin HIGH to turn off the LED. This also means that if you apply a PWM signal with 70% duty cycle, then LED will actually feel the signal as 30% (=100 - 70) duty cycle.
Frontend of our Web ApplicationWe will create a simple but decent webpage that will have a radio button choice to turn On / Off the Red LED and a slider to change the Brightness of Blue LED. The choices selected on this webpage would be sent back to our ESP8266 node using the GET Method for HTML forms.
The HTML page will look like this :
The name of radio button tag is "gpio3" and name of range (slider) tag is "gpio4"
<input type="radio" id="ON" name="gpio3" value="ON" checked> <label for="ON">ON</label> <br>
<input type="radio" id="OFF" name="gpio3" value="OFF"> <label for="ON">OFF</label> <br>

.....

<input type="range" min="0" max="1023" value="512" class="slider" id="gpio4" name="gpio4">
And hence, when we submit this form by clicking on "Change Now", the GET response would be sent at the end of the URL like
http://<ip of your NodeMCU>/?gpio3=ON&gpio4=321You can find this HTML page in attached codes. It is a simple page with very basic CSS styling and no JavaScript. You can go ahead and create a UI of your choice, but keep the HTML page file size as small as possible, because this page would be ultimately hosted by NodeMCU only, which has only few KBs of RAM available.
Backend of our Web ApplicationAs mentioned at the beginning of this article, we will be programming our ESP8266 board using NodeMCU firmware, which uses Lua scripting language. It is event driven approach and you will require to understand basics of callback functions.
First connect NodeMCU to Your Wi-Fi Hotspot using the following lines. If you are successfully connected, then status value below will show 5 and you will get IP address assigned to your NodeMCU. We will use this IP only to connect to our web app.
-- connect to WiFi access point
wifi.setmode(wifi.STATION)
wifi.sta.config("accesspointname","yourpassword")
wifi.sta.connect()
tmr.delay(1000000) -- wait 1,000,000 us = 1 second
print(wifi.sta.status())
print(wifi.sta.getip())
Let's initialize our hardware first. Note that Toggle_switch and PWM_duty are the state variables storing the states of Red and Blue LEDs respectively. And Hence, whenever we change the state of these LEDs, we will also update these state variables accordingly.
RedLED = 3 -- declare LED pins
BlueLED = 4

Toggle_switch = false           -- state variable storing the state of Red LED
gpio.mode(RedLED, gpio.OUTPUT)
gpio.write(RedLED, gpio.HIGH)   -- Turn off the LED at start up.

PWM_clock = 500
PWM_duty = 512                    -- state variable storing the duty cycle value.
pwm.setup(BlueLED, PWM_clock, PWM_duty)
pwm.start(BlueLED)
pwm.setduty(BlueLED, PWM_duty)     -- set to 50% duty cycle at start up.
Then create a TCP server
server = net.createServer(net.TCP)-- create TCP serverStart listening to port 80 :
if server then
    server:listen(80, client_connected)-- listen to the port 80
end
If a client is connected to http port 80, then call the function client_connected. this function will call receiver function for a "receive" and print the IP and port of the connected client.
function client_connected (conn)
    conn:on("receive", receiver)
    print(conn:getpeer())
end
function receiver does a lot of things, it contains the core logic of this project. First it extracts the GET string from the entire HTTP request.
first_line_end = string.find(data, "\r")
GET_response = string.sub(data, 1, first_line_end)
print(GET_response)
if this GET response contains the words "gpio3" and "gpio4", then it will process the name-value pairs and change the state of the LEDs accordingly and send the HTML page updated with latest state values at the end.
The name1=value1&name2=value2 pairs are separated using the Lua string pattern "%w+=+%w+". read more here for Lua string pattern matching.
Here the meaning of the character w in string pattern means any Alphanumeric character. And hence names and values of any form elements must have alphanumeric characters only, for this string matching logic to work.
words = {}
keyz= {}
valuez = {}

for w in (GET_response):gmatch("%w+=+%w+") do
    table.insert(words, w)
end

for i = 1, #words do
    local equalsign = string.find( words[i], "=" )
    --print(equalsign)
    local tempkey = string.sub(words[i], 1, equalsign - 1 )
    local tempvalue = string.sub(words[i], equalsign + 1, string.len(words[i]) )
    --print(tostring(tempkey).."=>"..tostring(tempvalue))
    keyz[#keyz + 1] = tempkey
    valuez[#valuez + 1] = tempvalue
end

for i = 1, #words do
    print(tostring(keyz[i]).." => "..tostring(valuez[i]) )
end

local k1 = tostring(keyz[1])
local v1 = tostring(valuez[1])
local k2 = tostring(keyz[2])
local v2 = tonumber(valuez[2])

if v1 ~= nil then
    if v1 == "ON" then
        gpio.write(RedLED, gpio.LOW)
        Toggle_switch = true
        print("Turned ON")
    elseif v1 == "OFF" then
        gpio.write(RedLED, gpio.HIGH)
        Toggle_switch = false
        print("Turned OFF")
    else
        print("Wrong value for GPIO3")
        -- it is just a placeholder statement, as we don't need to do anything.
    end
end

    if v2 ~= nil then -- not equal to operator.
        if v2 >= 0 and v2 <= 1023 then
            PWM_duty = 1023 - v2
        end
    end

    pwm.setduty(BlueLED, PWM_duty)
    PWM_duty = pwm.getduty(BlueLED)

SendHTML(sck, Toggle_switch,(1023 - PWM_duty))
else if the GET response contained only "GET / ", which means that this client has connected for the first time, then just send the HTML page with current states
elseif string.find(data, "GET / ") then
    SendHTML(sck, Toggle_switch,(1023 - PWM_duty))
else also send the HTML page with current states, you can change it to something else of your wish.
else
    SendHTML(sck, Toggle_switch,(1023 - PWM_duty))
end
Now, let's have detailed look at the function SendHTML.
SendHTML stores our HTML page. However, HTML page can't be stored in Lua code directly, first it needs to be converted to a Lua string. That is the following line in HTML script
<body style="font-family: 'Segoe UI'">looks liks this in a Lua string.
"<body style=\"font-family: 'Segoe UI'\">\r\n"we need to add ' \ ' (backslash character - escape character in Lua string) before each " (double quote) character within the HTML statement, because double quote is used for enclosing strings in Lua, just like C.
No worries, I have attached a python script that will read your html script file and save it to a lua file. Read more here for file operations in python.
After running this python script, change the first line from
htmlstring = htmlstring.."<!DOCTYPE html>\r\n"to
htmlstring = "<!DOCTYPE html>\r\n"After this conversion from HTML to Lua is done. change the following lines from
htmlstring = htmlstring.."<input type=\"radio\" id=\"ON\" name=\"gpio3\" value=\"ON\" checked> <label for=\"ON\">ON</label> <br>\r\n"
htmlstring = htmlstring.."<input type=\"radio\" id=\"OFF\" name=\"gpio3\" value=\"OFF\"> <label for=\"ON\">OFF</label> <br>\r\n"

.....

htmlstring = htmlstring.."<td style=\"width: 200px\"> <input type=\"range\" min=\"0\" max=\"1023\" value=\"512\" class=\"slider\" id=\"gpio4\" name=\"gpio4\"> </td>\r\n"
To
if (switch_val) then
    htmlstring = htmlstring.."<input type=\"radio\" id=\"ON\" name=\"gpio3\" value=\"ON\" checked> <label for=\"ON\">ON</label> <br>\r\n"
    htmlstring = htmlstring.."<input type=\"radio\" id=\"OFF\" name=\"gpio3\" value=\"OFF\"> <label for=\"ON\">OFF</label> <br>\r\n"
else
    htmlstring = htmlstring.."<input type=\"radio\" id=\"ON\" name=\"gpio3\" value=\"ON\"> <label for=\"ON\">ON</label> <br>\r\n"
    htmlstring = htmlstring.."<input type=\"radio\" id=\"OFF\" name=\"gpio3\" value=\"OFF\" checked> <label for=\"ON\">OFF</label> <br>\r\n"
end

......

htmlstring = htmlstring.."<td style=\"width: 200px\"> <input type=\"range\" min=\"0\" max=\"1023\" value=\""..tostring(duty_val).."\" class=\"slider\" id=\"gpio4\" name=\"gpio4\"> </td>\r\n"
This was required, so that the latest state variables are reflected at client's end, whenever the user changes the current state.
".." is the string concatenation character in Lua
At last SendHTML sends the HTML page
sck:send(htmlstring)Alright, now upload this code to your ESP8266 NodeMCU using the Esplorer or any other IDE of your choice. And open the IP address of your NodeMCU in address bar of the web browser. You will get a web page as per the video below.
VideoFinal Thoughts- After you have completed your customization and tried it out, you can add the same code to init.lua file located in root filesystem, so that your web server automatically starts after reboot, and it will not require to upload this code each time your NodeMCU is rebooted. (if this file doesn't exist, then create it)
- Refer the suggestions mentioned here for creating or editing init.lua file.


Comments
Please log in or sign up to comment.