In this project, you will learn to make IoT based Pulse Oximeter using NodeMCU ESP8266, MAX30100, and Blynk Application. in today’s project, we can monitor those values from anywhere in the world using the Blynk IoT cloud platform.
Components Required
To make this IoT based Pulse oximeter you will need the NodeMCU ESP8266 Development board. A 0.96″ SSD1306 OLED Display, MAX30100 Pulse oximeter sensor, few jumper cables, and breadboard. You can buy all these components from the Amazon link provided below.
Materials:- ESP8266
- Pulse Oximeter Max30100
- OLED Display
- BreadBoard
- Jumpers
The sensor has two LEDs, one emitting red light, the other emitting infrared light. Infrared light is required for pulse rate. But, Both red light and infrared light are required for measuring Sp02 levels in the blood.
When the heart pumps the blood, the oxygen level is increased because there is more blood. But, when the heart rests, there is a decrease in oxygenated blood. Hence, the pulse rate is determined by getting the time between the rise and fall of oxygenated blood.
The oxygenated blood absorbs more infrared light and passes more red light. But, deoxygenated blood absorbs red light and passes more infrared light. Basically, the MAX30100 sensor reads the absorption levels for both light sources and stores them in a buffer that can be read via I2C pins.
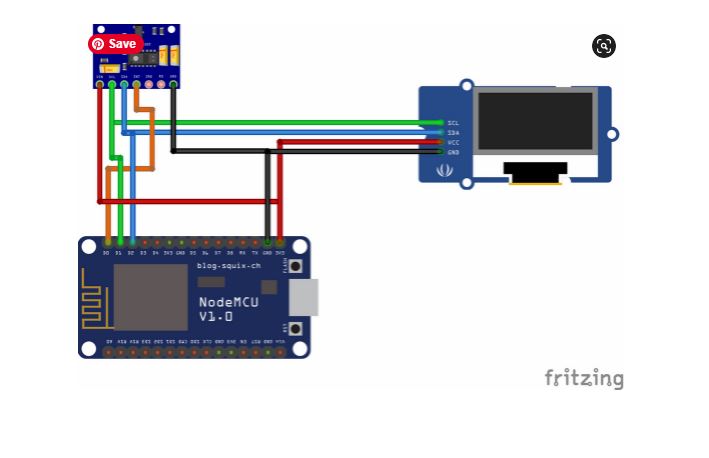
Interfacing MAX30100 & OLED Display with ESP8266Circuit:- follow the circuit diagram to make your connections.
Now download this blink applicationfrom the play store/App store available for both Android and iOS. Sign up to the Blynk IoT cloud using your email address and password.
Now, click on the new project give your project a name. I am giving the “IoT pulse oximeter” select the NodeMCU board and then set the connection type as WiFi. Finally, click on create button.
The Blynk Authentication token will be sent to your email address. We will need it later on programming.
Tap on the plus (+) icon on your main screen and add two gauges then we will add two value display widgets.
One will show you the BPM values and others will show you the oxygen level (Sp02). For BPM We’ll select the virtual pin V1 and we’ll set the value from 0 to 130 you can also set the colors for this gauge. Now we’ll set the Value Display. we’ll add the same values in the value display also because they both will act the same.
Now we’ll do for the oxygen level. we’ll select the virtual V2 pin and we’ll select the values from 0 to 100 give it some color I’m giving blue and we’ll set the one-second refresh rate. we will do the same for value display settings with the same pin that is V2 same values 0 to 100 & one-second refresh rate and color.
Code : IoT Pulse Oximeter//nextpcb
#include <Wire.h>
#include "MAX30100_PulseOximeter.h"
#define BLYNK_PRINT Serial
#include <Blynk.h>
#include <ESP8266WiFi.h>
#include <BlynkSimpleEsp8266.h>
#include "Wire.h"
#include "Adafruit_GFX.h"
#include "OakOLED.h"
#define REPORTING_PERIOD_MS 1000
OakOLED oled;
char auth[] = "--------------------"; // Authentication Token Sent by Blynk
char ssid[] = "--------"; //WiFi SSID
char pass[] = "--------"; //WiFi Password
// Connections : SCL PIN - D1 , SDA PIN - D2 , INT PIN - D0
PulseOximeter pox;
float BPM, SpO2;
uint32_t tsLastReport = 0;
const unsigned char bitmap [] PROGMEM=
{
0x00, 0x00, 0x00, 0x00, 0x01, 0x80, 0x18, 0x00, 0x0f, 0xe0, 0x7f, 0x00, 0x3f, 0xf9, 0xff, 0xc0,
0x7f, 0xf9, 0xff, 0xc0, 0x7f, 0xff, 0xff, 0xe0, 0x7f, 0xff, 0xff, 0xe0, 0xff, 0xff, 0xff, 0xf0,
0xff, 0xf7, 0xff, 0xf0, 0xff, 0xe7, 0xff, 0xf0, 0xff, 0xe7, 0xff, 0xf0, 0x7f, 0xdb, 0xff, 0xe0,
0x7f, 0x9b, 0xff, 0xe0, 0x00, 0x3b, 0xc0, 0x00, 0x3f, 0xf9, 0x9f, 0xc0, 0x3f, 0xfd, 0xbf, 0xc0,
0x1f, 0xfd, 0xbf, 0x80, 0x0f, 0xfd, 0x7f, 0x00, 0x07, 0xfe, 0x7e, 0x00, 0x03, 0xfe, 0xfc, 0x00,
0x01, 0xff, 0xf8, 0x00, 0x00, 0xff, 0xf0, 0x00, 0x00, 0x7f, 0xe0, 0x00, 0x00, 0x3f, 0xc0, 0x00,
0x00, 0x0f, 0x00, 0x00, 0x00, 0x06, 0x00, 0x00, 0x00, 0x00, 0x00, 0x00, 0x00, 0x00, 0x00, 0x00
};
void onBeatDetected()
{
Serial.println("Beat Detected!");
oled.drawBitmap( 60, 20, bitmap, 28, 28, 1);
oled.display();
}
void setup()
{
Serial.begin(115200);
oled.begin();
oled.clearDisplay();
oled.setTextSize(1);
oled.setTextColor(1);
oled.setCursor(0, 0);
oled.println("Initializing pulse oximeter..");
oled.display();
pinMode(16, OUTPUT);
Blynk.begin(auth, ssid, pass);
Serial.print("Initializing Pulse Oximeter..");
if (!pox.begin())
{
Serial.println("FAILED");
oled.clearDisplay();
oled.setTextSize(1);
oled.setTextColor(1);
oled.setCursor(0, 0);
oled.println("FAILED");
oled.display();
for(;;);
}
else
{
oled.clearDisplay();
oled.setTextSize(1);
oled.setTextColor(1);
oled.setCursor(0, 0);
oled.println("SUCCESS");
oled.display();
Serial.println("SUCCESS");
pox.setOnBeatDetectedCallback(onBeatDetected);
}
// The default current for the IR LED is 50mA and it could be changed by uncommenting the following line.
//pox.setIRLedCurrent(MAX30100_LED_CURR_7_6MA);
}
void loop()
{
pox.update();
Blynk.run();
BPM = pox.getHeartRate();
SpO2 = pox.getSpO2();
if (millis() - tsLastReport > REPORTING_PERIOD_MS)
{
Serial.print("Heart rate:");
Serial.print(BPM);
Serial.print(" SpO2:");
Serial.print(SpO2);
Serial.println(" %");
Blynk.virtualWrite(V7, BPM);
Blynk.virtualWrite(V8, SpO2);
oled.clearDisplay();
oled.setTextSize(1);
oled.setTextColor(1);
oled.setCursor(0,16);
oled.println(pox.getHeartRate());
oled.setTextSize(1);
oled.setTextColor(1);
oled.setCursor(0, 0);
oled.println("Heart BPM");
oled.setTextSize(1);
oled.setTextColor(1);
oled.setCursor(0, 30);
oled.println("Spo2");
oled.setTextSize(1);
oled.setTextColor(1);
oled.setCursor(0,45);
oled.println(pox.getSpO2());
oled.display();
tsLastReport = millis();
}
}Now connect your ESP8266 NodeMCU board with your computer. Copy the above source code. first, enter the authentication token sent to you by the blink while configuring the app. Now, enter your WiFi name and your WiFi password. Finally, select the board that is NodeMCU 12 E-board and select the COM port, and upload the code.
Testing IoT Pulse OximeterThat’s all about IoT Based Pulse Oximeter Using ESP8266 & Blynk. So friends I hope you like this tutorial.
Please share it with your friends. If you face any problem with this project feel free to comment down below.


_1x_bGT19vVAby.png?auto=compress%2Cformat&w=40&h=40&fit=fillmax&bg=fff&dpr=2)

Comments
Please log in or sign up to comment.