"A book is a gift you can open again and again" - Anonymous
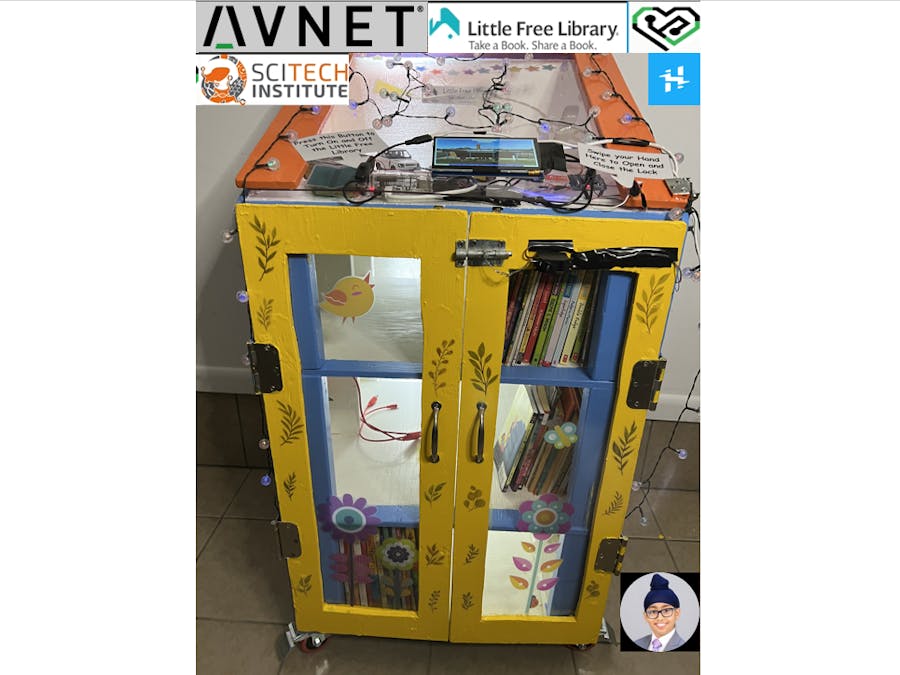
This gift, a book, is something that can be distributed among many people through the creation of a little library. When combined with ingenious technology, it has the potential to become an interactive and fun experience that can be cherished by the community as a whole. My project, the tech-enabled interactive free little library, has unlocked this potential.
My project uses STEAM (science, technology, engineering, art, mathematics) concepts to create an amazing experience for the user. My use of technology allows my little free library to:
- Provide 24/7 Book Access: solar panels and an innovative energy saving system allow the little library to be open and used 24/7, day or night
- Collaboration with key community partners: easy-to-use technology and intuitive overall experience allowed my little library to be deployed in my local elementary school
- Security: the library will only open if one answers the question and waves their hand on the gesture sensor. Additionally, the electronics on the little library are securely locked in the top compartment, separate from the compartment holding the books.
- Engagement: the interactive experience on LCD display allows students to experience STEM technology while getting their book
To fulfill these goals, the little free library is designed to work as below:
Step 1: Press Power Button
- When raspberry pi is turned off, the LiPO battery charges from the solar panel.
- When it is turned on through power button, the charged battery powers the raspberry pi
- This allows for optimal power saving and 24/7 reliable access.
Step 2: Answer Question
- Question is randomly chosen from list
- Asked on touchscreen lcd, allowing user to enter their choice
- Boosts confidence in user as they are able to answer question correctly, and increases engagement in the free little library as one obtains their favorite book
Step 3: Open Lock
- Lock on lower book compartment means that one cannot access the little library unless they complete instructions on screen, allows for tight security
- Swipe right over gesture sensor -> moves servo to the right, which unlocks the little library
- Exposes user to how sensor (electronics) can be used to automate mechanical tasks
- Interactive video on screen teaches users how to gesture in front of the sensor
Step 4: Access Books
- Now that lock is open, students can unlock doors and see which book they would like to take
- Book supply never runs low due to instant notifications in Blynk IoT app
Step 5: Close Lock
- Swipe left over gesture sensor -> moves servo to the left, which locks the little library
- Uses much of the same mechanisms as Step 3: Open Lock
Step 6: Thank you screen
- Thanks the user for visiting the little library
- Switches back to step 1 after one minute of inactivity
In addition to the user STEM interaction with the little library described above, there is a system to monitor the book supply in the little library shelves. A distance sensor is mounted on one end of shelf; the larger distance measured, the less books in the shelf. When the distance is over a threshold (20 inches), mobile notification is sent to little library maintainer reminding them to restock book supply.
Please find the demo video showing the little library in action below:
Now that we have seen how the little library works, let's build it and provide equitable access to literature for everyone!
When I brought the little library from my local elementary school to my garage, it had a lot of wear-and-tear over the years and was in desperate need of repair. I will cover how I repurposed the little library, and gave it an appealing look and feel.
1. Clean-UpThe first step was to clean out all the cobwebs and other such things in the little library.
Sanding is key to removing protruding from the old wood and making the surface smooth and safe for kids. To sand, I used a 1/4 sheet sander to reach the corners of the little library.
To repair the damages to the wood over-time, I applied wood putty (spackle) to the wood of the little library. This was color changing, so changed to paint color when I painted over it.
Note: have to let spackle dry overnight before proceeding to the next step
This was my first time using a jigsaw, but after a bit of a practice I was able to cut inlets in the doors of the little library and the top hood so that I could mount the acrylic on the opening.
This allows for the books and electronics to be visible to the passersby, rather than hidden behind the door. This also shows the kids how the electronics works.
I applied about 3 coats of primer and then applied about 4-5 coats of Behr ultra paint to give the library a shiny and neat finish. I sanded the library between each coat (of course after each coat dried).
I cut the acrylic slightly larger than the opening using the jigsaw, and then I used construction adhesive (CA) to mount the acrylic on the opening. Make sure to erase all air bubbles between the acrylic and wood so that the adhesion is successful.
Used an electronic screwdriver and drill to mount wheels on the little library (for transportation), locks on the little library (one to keep the electronics secure, another that will be opened and closed by electronics to allow students to securely access books), and hinges (to connect doors to little library).
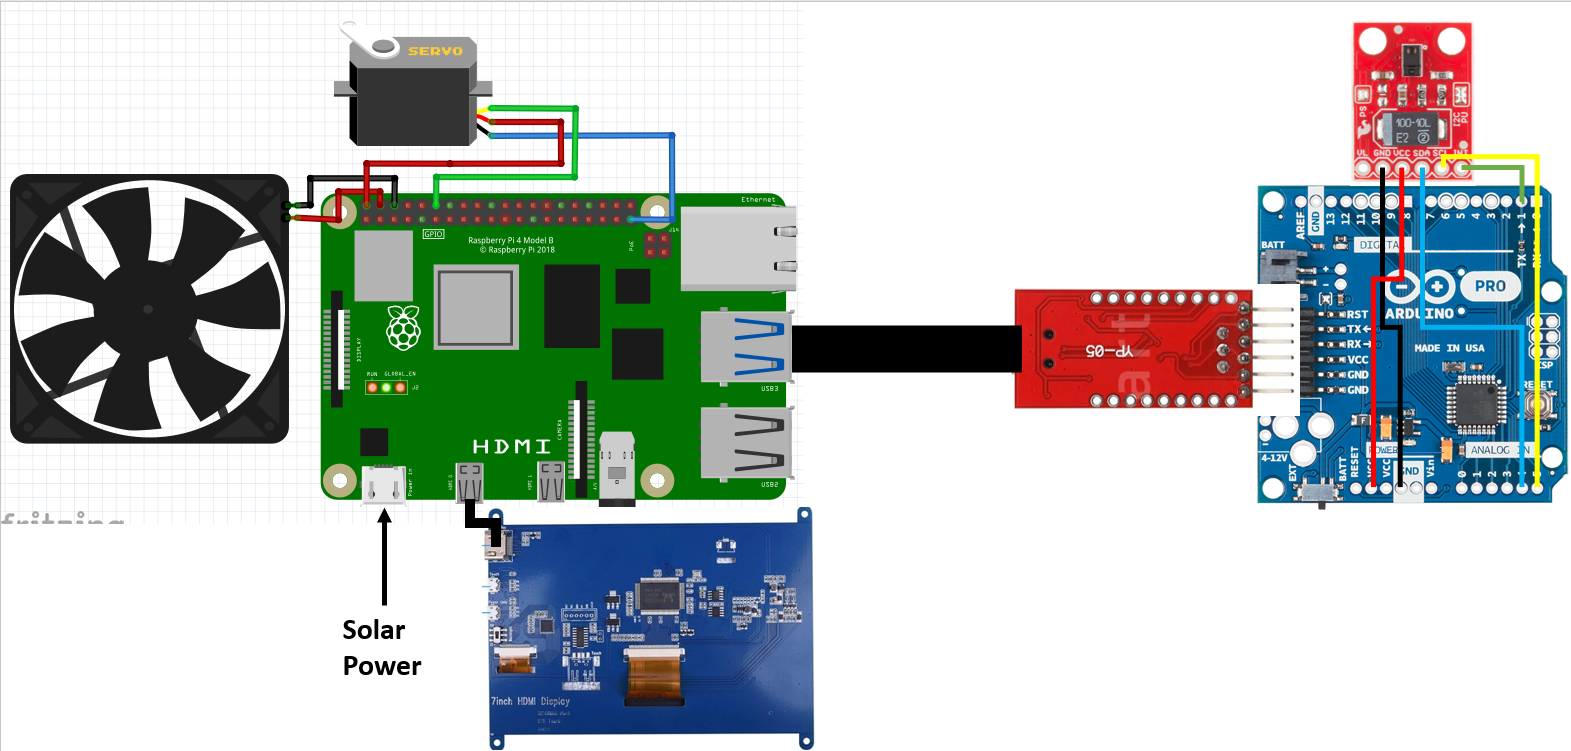
8. Connecting & Attaching the ElectronicsConnect electronics as shown on schematic, and mount them as shown in the demo video.
9. Uploading CodeLog into the Raspberry Pi, clone the GitHub repo and then enter this command in terminal:
python3 little_library_display.pyTest that everything is working (display is good, lock opens and closes, etc.) and make changes as needed
10. AutostartOnce everything is working, follow this tutorial to set the script to start once the Raspbian GUI boots up (once the power button is pressed): https://learn.sparkfun.com/tutorials/how-to-run-a-raspberry-pi-program-on-startup/all#method-2-autostart
11. Connect Electronics used in Book Supply MonitorDistance Sensor (HC-SR04) to ESP32 connection
TRIG PIN --> Pin #5
ECHO PIN --> Pin #18
VCC --> 5V Pin
GND --> GND Pin
12. Set up template for Blynk IoTIn Blynk IoT, create template, and then virtual pin for Distance as in screenshot below:
Then customize mobile app layout in Blynk IoT mobile app as you wish, here is a photo of my mobile dashboard for reference:
Then replace the #define variables with the ones in your template. Connect the ESP32 to your PC and upload the book_monitor arduino sketch. Then connect the ESP32 to the raspberry pi on the little library.
Power on the Raspberry Pi and check that the STEM user interaction experience and the book supply monitoring are both working.
The project is complete!!! Thanks for reading about my tech-enabled free little library, an ingenious innovation that will encourage and raise awareness about STEM and reading for the generations to come!!!


_3u05Tpwasz.png?auto=compress%2Cformat&w=40&h=40&fit=fillmax&bg=fff&dpr=2)
Comments
Please log in or sign up to comment.