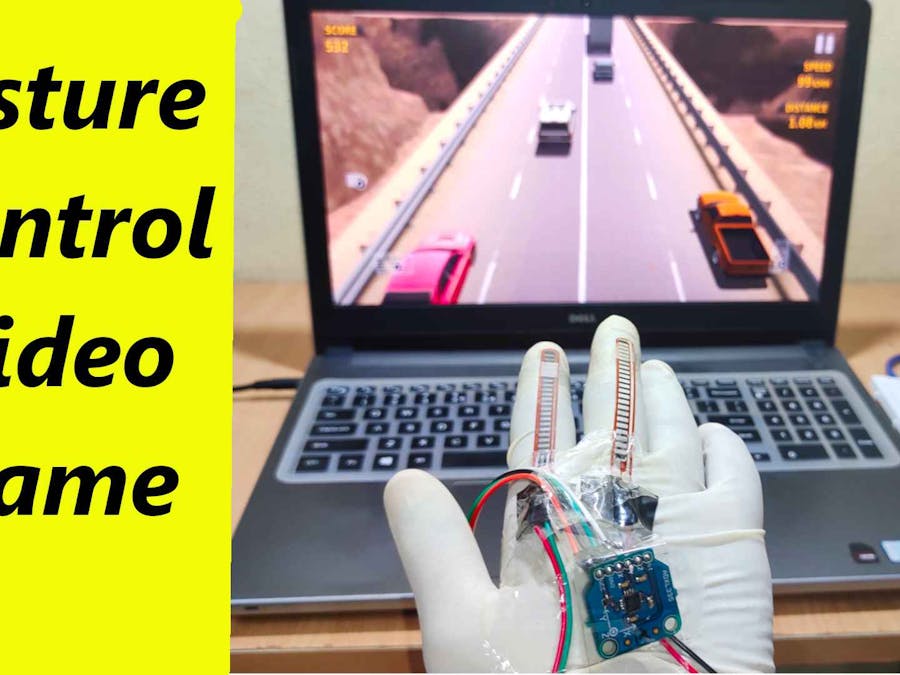
Playing games on mobile or PC is always fun. But we can make that fun even double with adding Arduino gesture control to video game. In this tutorial we will play video game with Arduino Leonardo. You can play any games you want, But for this tutorial I will be playing Traffic Racer Car Game. You can control accelerator & brake with your finger gesture (Bending & Relaxing). For moving car left or right, you have to tilt your hand left or right respectively to control it. To sum up, you are playing video game with your own gesture control via Arduino Leonardo or you can say we are controlling computer with hand gestures. So let’s get started.
Components Required:- Arduino Leonardo,
- Flex sensor,
- Accelerometer sensor (ADXL335),
- 56k ohms Resistor,
- Breadboard,
- Jumper Wire.
For playing android games in PC, You will need to download BlueStacks, It is well known emulator. Install it. Login with your existing gmail account so you can access PlayStore service. And Search for a game “Traffic Racer”. Install it & we are going to play it via Arduino Leonardo.
Game Setting:We have installed game successfully. Now we have to edit keyboard control for game. Change keys for control as mention below
Accelerator – “W”
Brake – “S”
Move Right – “R”
Move Left – “L”
Same keys we will be entered in Arduino code.
Circuit for Arduino Game Controller:Placement of Sesnor:
Keep ADXL335 acceletrometer cross on the hand (x & y face right and left). So that we can use x and y both the direction by moving hand right or left side.
After connecting circuit. Go to Files → Examples → Basics → AnalogReadSerial
// the setup routine runs once when you press reset:
void setup() {
// initialize serial communication at 9600 bits per second:
Serial.begin(9600);
}
// the loop routine runs over and over again forever:
void loop() {
// read the input on analog pin 0:
int sensorValue = analogRead(A0);
// print out the value you read:
Serial.println(sensorValue);
delay(1); // delay in between reads for stability
}
Upload the code.
Flex Sensor 1 (Acceletor):
int sensorValue = analogRead(A0);Open Serial Monitor to note down the values. A0 is connected to accelerator, so bend the flex sensor and observe how much values changes. Its value increasing above 450 every time I bend the flex sensor.
Flex Sensor 2 (Brake):
Upload same code again, now change analog pin number to A1.
int sensorValue = analogRead(A1);Similarly observe values in serial monitor and note it down.
ADXL335 X & Y direction acceleration:
Change analog pin number A4 then A5, Watch at serial monitor how much values changed when tilting hand right or left, this is how you should calibrate ADXL335 sensor for left and right gesture.
Code for Arduino Game Controller://RoboticaDIY.com
#include "Keyboard.h"
void setup() {
Serial.begin (9600);
// initialize control over the keyboard:
Keyboard.begin();
}
void loop() {
int accelerator = analogRead(A0); //Flex Sensor 1
int brake = analogRead(A1); //Flex Sensor 2
int x = analogRead(A4); // ADXL335 x
int y = analogRead(A5); // ADXL335 y
if (accelerator > 450 ){
Keyboard.write('W');
delay(10);
}
if (brake > 400 ){
Keyboard.write('S');
delay(10);
}
if (x <330){ //RIGHT
Keyboard.press('R');
delay(250);
Keyboard.releaseAll();
}
if (y <380){ //LEFT
Keyboard.press('L');
delay(250);
Keyboard.releaseAll();
}
}Reading analog pin and storing it to variable accelerator, brake, x & y.
int accelerator = analogRead(A0);
int brake = analogRead(A1);
int x = analogRead(A4);
int y = analogRead(A5);
If accelerator value is greater than 450, keyboard will write “W”, it means car will move forward with speed.
if (accelerator > 450 ){
Keyboard.write('W');
delay(10);
}
when “brake” flex sensor bend its value increases more than 400 as a result keyboard writes “S”, which causes car to stop and reduce speed.
if (brake > 400 ){
Keyboard.write('S');
delay(10);
}
Moving hand right side or tilting right side changes x value and if it is less 330, it will write “R”, move car right side. Similarly it is done for left gesture.
if (x <330){
Keyboard.press('R');
delay(250);
Keyboard.releaseAll();
}
if (y <380){
Keyboard.press('L');
delay(250);
Keyboard.releaseAll();
}I hope you enjoyed playing with Arduino Leonardo game. For latest update please like and subscribe my YouTube Channel. Till then Keep Learning Keep Making.
Recent Posts- How to Make Gesture Control Game with Arduino Leonardo April 16, 2020
- Slap Virtually with Arduino Leonardo – Fun Project April 14, 2020
- Raspberry Pi 4 Data Logger- DHT11/DHT22 Sensor Data Logger April 12, 2020
- ESP8266- Blynk Plot Sensor Readings in Live Charts & Export CSV File April 10, 2020
- ESP8266 Home Automation System by using Nodemcu Relay & Blink App April 8, 2020


Comments
Please log in or sign up to comment.