IntroductionI made this project for my father on Father's Day. He bikes to his work every morning. There are a lot of cars on the road so I wanted to make biking safer. Cars have Direction Indicators, I wanted to give my dad's bike Direction Indicators too. To light up the right direction indicator just push the button on the right side of your handlebar, to light up the left direction indicator just push the button on the left side of your handlebar. I hope you like my project & you want to build yourself one too. This project is an intermediate project, because you need to find out yourself how to wire the LED's.
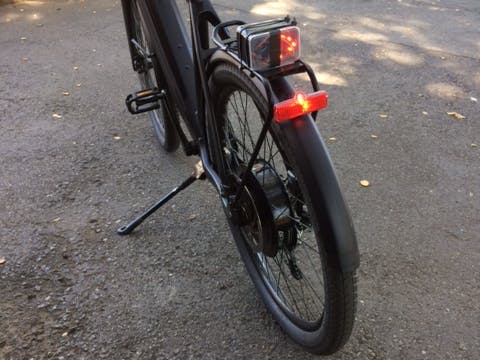
Step 1; DesignI wanted to put the led direction indicators at the luggage carrier. At this place the direction indicators will be good to see if you're in a car. I wanted to attach the Arduino behind the lamp and the push buttons (to make the indicators light up) to the handlebar.
Step 2; MaterialsYou need:
- Small Plastic Boxes (I used one which perfectly fits my breadboards)
- 10 LED's (I used red ones)
- A power bank or another USB connection on/for your bike
- A USB cable (for your Arduino)
Step 3; Building- Drill four holes into one of the boxes
- Put the LED's into two 170 tie breadboards at the same manner as I did;
- Make sure you can still close the box
- Wire it all up. Push your cables through the holes. Make sure you keep track of your cables. I labeled each hole (Right Direction Indicator Ground, Left Direction Indicator Ground, etc). I put a drinking straw in the middle to make it neater.
- Make sure you can still close it.
- Get a new box and drill 5 holes into it
- Put your 55 tie breadboard into it
- Turn around your Led box and put the box with the 55 tie breadboard on top of it.
- Get the wires from the box beneath and push them through the four holes. Keep the fifth hole free. Wire this up too and make sure you have three wires left for the whole box beneath; Ground, + Left, and + Right. Push these 3 cables through the fifth hole, these are going to the Arduino.
- I put a rubber band around the two boxes to keep them together
- Get a new box for the Arduino
- Drill 1 hole for the wires into it
- Drill another hole for the USB cable
- Make sure you can close the box and put the USB Cable into the Arduino.
- Now it's time to make the push buttons
- The one for the right side of the handlebar
- The one for the left side of the handlebar
- Now put all the wires into the Arduino
- Make sure you can still close it
- I put the push buttons to pin 2 & 3
- Now attach it to the bike
- The push buttons to the handlebar
- The Arduino behind the lamp
- The direction indicator box at the luggage carrier
Improvements/upgrades- Make the push buttons more stable
- Make direction indicators at the front of your bike too


_ztBMuBhMHo.jpg?auto=compress%2Cformat&w=48&h=48&fit=fill&bg=ffffff)


Comments