


Hardware components | ||||||
| × | 1 | ||||
 |
| × | 1 | |||
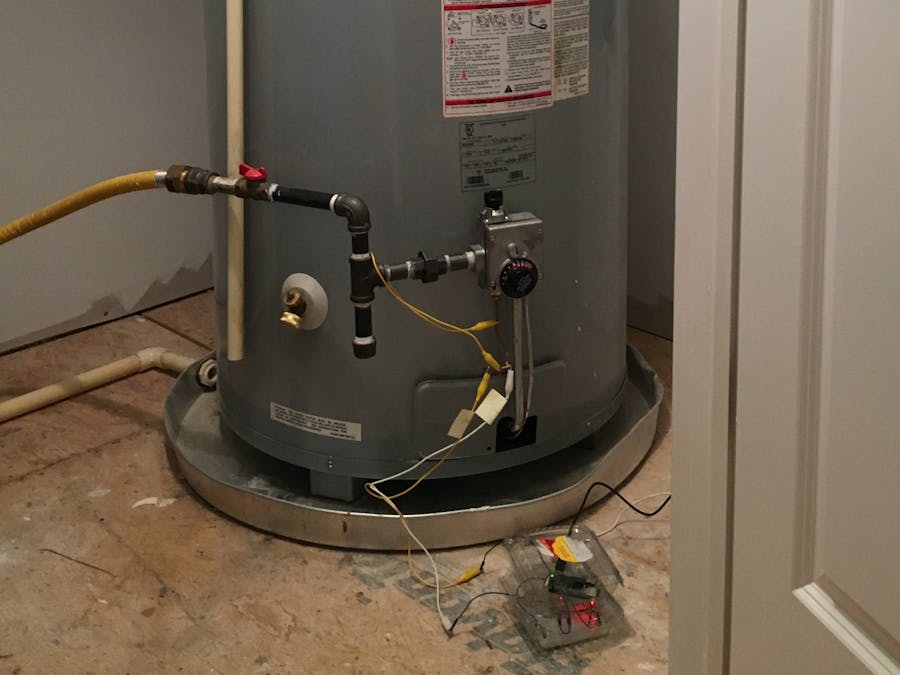
Traditional gas hot water heaters maintain a pilot light 24x7. This pilot light heats a thermocouple which generates a small voltage (up to 30 millivolts). This voltage is used by the hot water heater thermostat to hold open a gas valve. If the pilot light blows out, the voltage stops and the gas valve is automatically closed.
In my hot water heater, the pilot light blows out occasionally. Since this only happens around 3 times per year, I don't want to replace the expensive hot water heater. I tried replacing the thermocouple, but this did not solve the problem.
My solution: monitor the voltage generated by the thermocouple. If it falls to zero, send texts and emails so I can relight the pilot light. Remember, there is no danger of gas leak here, because the gas valve will get closed whenever the thermocouple voltage drops to zero.
OverviewA Raspberry Pi Zero WH will be used to send emails & texts when the pilot light goes out. Because the Raspberry Pi does not have a way to measure voltage, an Arduino Nano is used to monitor the voltage from the thermocouple.
Arduinos have analog-to-digital converters (ADCs) that can read a voltage and convert it to a number between 0 and 1023. In this project, the Arduino reads the voltage from the thermocouple and communicates this value to the Raspberry Pi. The Raspberry Pi receives the voltage reading and interprets it. If the value is too low, we assume the pilot light has gone out and send notifications.
Step 1: Prepare your Raspberry PiGet the Raspberry Pi up and running on your network (you can check my other project for instructions for doing this).
Create a Python program that will receive voltage readings from the Arduino. The program will loop and send notifications when the voltage reading is too low. Source code is attached.
Step 2: Prepare your ArduinoI bought cheap Chinese Arduino Nanos, so it took some trial and error to get these working with my Windows 10 computer.
Load the Arduino with a sketch to measure the voltage on its input pin every 30 seconds. The Arduino can measure voltage between 0 and a reference voltage. One can select 1.1V or 5V as the reference voltage. Because the thermocouple only outputs at most 30 millivolts, we will use the 1.1V reference voltage for greater resolution. The Arduino ADC outputs 0 for 0V and 1023 for 1.1V. As mentioned, the thermocouple is outputting at most 30 millivolts, so the reading will be 28 or less.
Step 3: Connect the Arduino to the Voltage SourceThe thermocouple sends voltage to the hot water heater thermostat via a coaxial wire. The outside of the wire is positive.
Cut the wire about 5 inches away from the hot water heater thermostat. Cut the outside of the coaxial wire back a little so that the middle wire is accessible. Do not destroy whatever insulation is painted on the middle wire. We don't want the middle wire short circuiting to the outside of the coaxial wire.
Connect the wire so that it supplies the positive voltage to the hot water heater thermostat and to the Arduino input pin. I used input pin A0. The negative side of the voltage source should be connected to the Arduino's ground, as well as the negative side of the hot water heater thermostat.
I used 1 foot long wires with alligator clips on the ends to make the connections.
Our sketch running on the Arduino will transmit the voltage number from the ADC to the Raspberry Pi. The Arduino will send the signal as output from its digital pin 9.
Arduinos send signals at +5V. The Raspberry Pi can only receive a 3V input. Therefore, between the Arduino and the Raspberry Pi, there must be a voltage divider. This reduces the voltage from 5V to about 2.8V.
A voltage divider is a system of resistors that reduce the input voltage.
The output voltage is determined by the the voltage divider relationship.
One cannot use a single resistor to reduce the voltage because when no current is flowing, the voltage on both sides of the resistor will be Vin (5V). Using a voltage divider will reduce the voltage even in the no-current situation.
The ground wires of everything must be connected. See the connection diagram.
Step 5: Arduino Transmits the Voltage MeasurementEvery 30 seconds the Arduino sketch gets the voltage measurement from the ADC and transmits the number to the Raspberry Pi. I decided to use a primitive, single-wire signaling system from Arduino pin 9 to Raspberry Pi pin 16.
Step 6: Raspberry Pi Receives the Voltage MeasurementThe Raspberry Pi uses a Python program with an infinite loop to listen for rising edges on pin 16. When a rising edge is detected, it is assumed that the Arduino has begun transmitting a number.
Signaling System
Transmit a two digit number (ex: "12"). Each digit is preceded by a positive pulse received on pin 16. Subsequent positive pulses separated by less than 20 milliseconds (ms) increment the value of this digit. A pause over 40ms indicates that this digit is complete, and the next digit begins. Another pause over 40ms indicates that the second digit is complete. The entire two-digit number is now complete.
In the Python code running on the Raspberry Pi, the number received from the Arduino is returned from the method that interprets the signals from the Arduino. Other Python code decides whether or not a notification needs to be sent. Then, the code returns to waiting on the next rising edge on pin 16.
Step 7: Send the NotificationIf the voltage is too low, increment the low count. A low count is maintained to prevent false alarms. If the low count reaches 5, then the voltage has been low for 5 measurements. Each measurement is 30 seconds apart. Send the notification and reset the low count. Notifications are sent using smtplib and a Gmail account. A timestamp is stored in the Python code when the notification is sent. The next notification will not be sent for 6 hours.
To send text alerts, I used a feature that most cell providers provide: the ability email a text to their users. Ex: for Verizon: 5555555555@vtext.com sends a text to that number.
Gmail
I created a new Gmail account to use for sending the notifications. At first, I configured the security settings on this Gmail account to allow 'less secure' access, so the Python code could send emails. However, after a few months, Gmail may disable this less-secure access. I discovered that Gmail prefers users to use app passwords.
Setting up an app password
https://support.google.com/accounts/answer/185833
Connect the Arduino to the hot water heater thermocouple wire and to the Raspberry Pi via the voltage divider. (The top part of my voltage divider uses two resistors that total 550 ohms—because those are the resistors that I had on hand.) Power on the Arduino and it will begin measuring the voltage and sending signals to the Raspberry Pi every 30 seconds.
- Create a script that kicks off your Python program.
- Edit the root crontab to automatically run your script at boot time. Edit the directory paths as appropriate for your Raspberry Pi and where you have the Python program saved.
- To edit the crontab:
sudo crontab -e - Add a line to run your 'kick-off' script when the Raspberry Pi is rebooted:
@reboot sh /home/pi/hotwater/run_HotWaterNotifier.sh >> /home/pi/hotwater/logs/HotWaterNotifier.log 2>&1 - To run manually (before you have the crontab setup)
First execute the process (execute your run_HotWaterNotifier.sh script)
Then typectrl-Zto suspend your process
Then typebgonce or twice to send the process to the background
Typedisown, this lets the process keep running after you log off - To see if the process is still running
ps aux | grep -i HotWater
The Raspberry Pi may go for long periods without communicating on the wireless network. This can cause your home router to drop the Raspberry Pi off the home network. When it is time for the Raspberry Pi to notify about a hot water disruption, it may not be able to because it is not on the network.
To solve this, I have the Raspberry Pi ping my home router every minute.
- Edit your user crontab:
crontab -e - Add a line to run the ping command every 1 minute:
* * * * * /bin/ping -c 5 192.168.1.1 > /dev/null 2>&1


Comments
Please log in or sign up to comment.