


Hardware components | ||||||
_ztBMuBhMHo.jpg?auto=compress%2Cformat&w=48&h=48&fit=fill&bg=ffffff) |
| × | 1 | |||
 |
| × | 1 | |||
Software apps and online services | ||||||
 |
| |||||
A rotary encoder is an incremental electromechanical component with a shaft that converts the angular position or motion of a shaft or axle to digital code. The output of incremental encoders provides information about the motion of the shaft, which is typically further processed in processor / controllers into information such as speed, distance, and position.The shaft has unlimited 360 degree rotation.
- Model: SN-360
- Type: Incremental Encoder
- Cycles per revolution (CPR): 20
- Working voltage: 0 – 5V
- Material: PCB + Brass
- Weight: 10g
- Size: 32 x 19 x 30mm
To do this tutorial, you will need as following below:
Arduino 360 Degree Encoder2. Arduino Uno Board and USB Cable3. Female-Male Jumper Wires
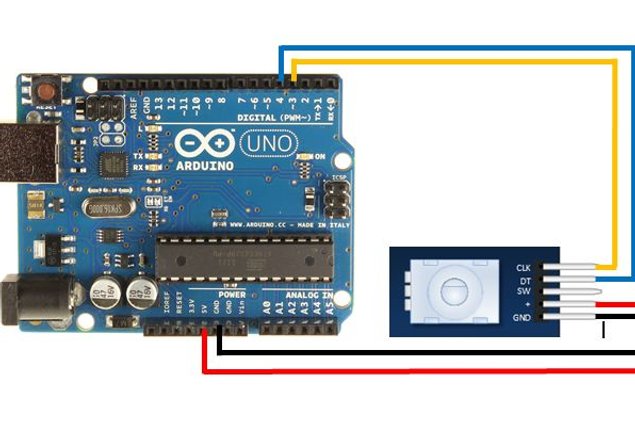
Step 2: Pinout Details- CLK : Pin A
- DT : Pin B
- S : No push switch connection
- + : Power
- GND : Grounding
Connect Arduino 360 Degree Encoder to Arduino Uno as following :
- VCC to 5V
- GND to GND
- CLK to D3
- CLK to D4
and then connect Arduino Uno to your PC.
Step 4: Sample Source CodeAfter you have succesfully uploaded it into you Arduino Uno Board. Go to tools > Serial Monitor and you will see "BEGIN" printed on the serial monitor. Now, you can start to rotate your encoder's shaft and see the output printed on the serial monitor.
Step 6: ResultWhen you rotate the shaft clockwise, serial monitor will print
Rotate ClockwiseEncoder Count: 1
Rotate Clockwise Encoder Count: 2
When you rotate clockwise, serial monitor will print
Rotate CounterclockwiseEncoder Count: 0
Rotate Counterclockwise Encoder Count: -1
You can feel a small “clicks” as you turn the encoder.


Comments
Please log in or sign up to comment.