


Hardware components | ||||||
 |
| × | 1 | |||
 |
| × | 2 | |||
 |
| × | 1 | |||
 |
| × | 1 | |||
 |
| × | 1 | |||
 |
| × | 1 | |||
 |
| × | 1 | |||
 |
| × | 1 | |||
 |
| × | 1 | |||
Software apps and online services | ||||||
| ||||||
 |
| |||||
 |
| |||||
.png?auto=compress%2Cformat&w=48&h=48&fit=fill&bg=ffffff) |
| |||||
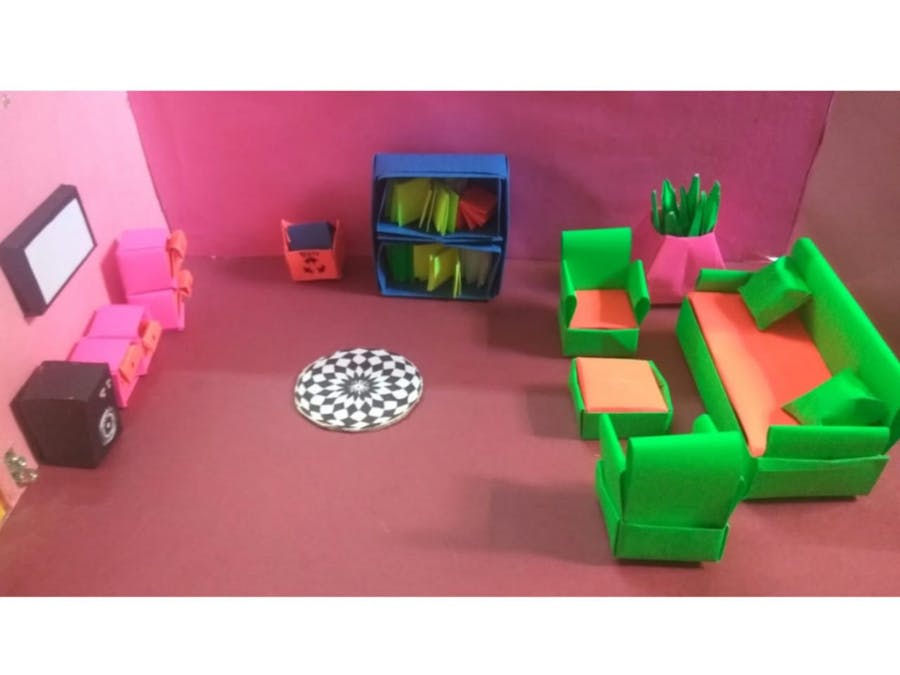
Ever dreamed of living in a fully automated home? A house which can be controlled right up at your fingertips or through the sound of your voice no matter which part of the world you are in. A residence which sends you security alerts right to your mobile phone in case someone breaks in. A dwelling which makes you carefree whether or not you’d turned the lights off.
Today, I’ll show you a prototype through which you can create, design and build a dream home to suit your needs. So, let’s get started!
2. Demonstration:View the working prototype of the Integrated Home Automation here:
Program and Alerts:
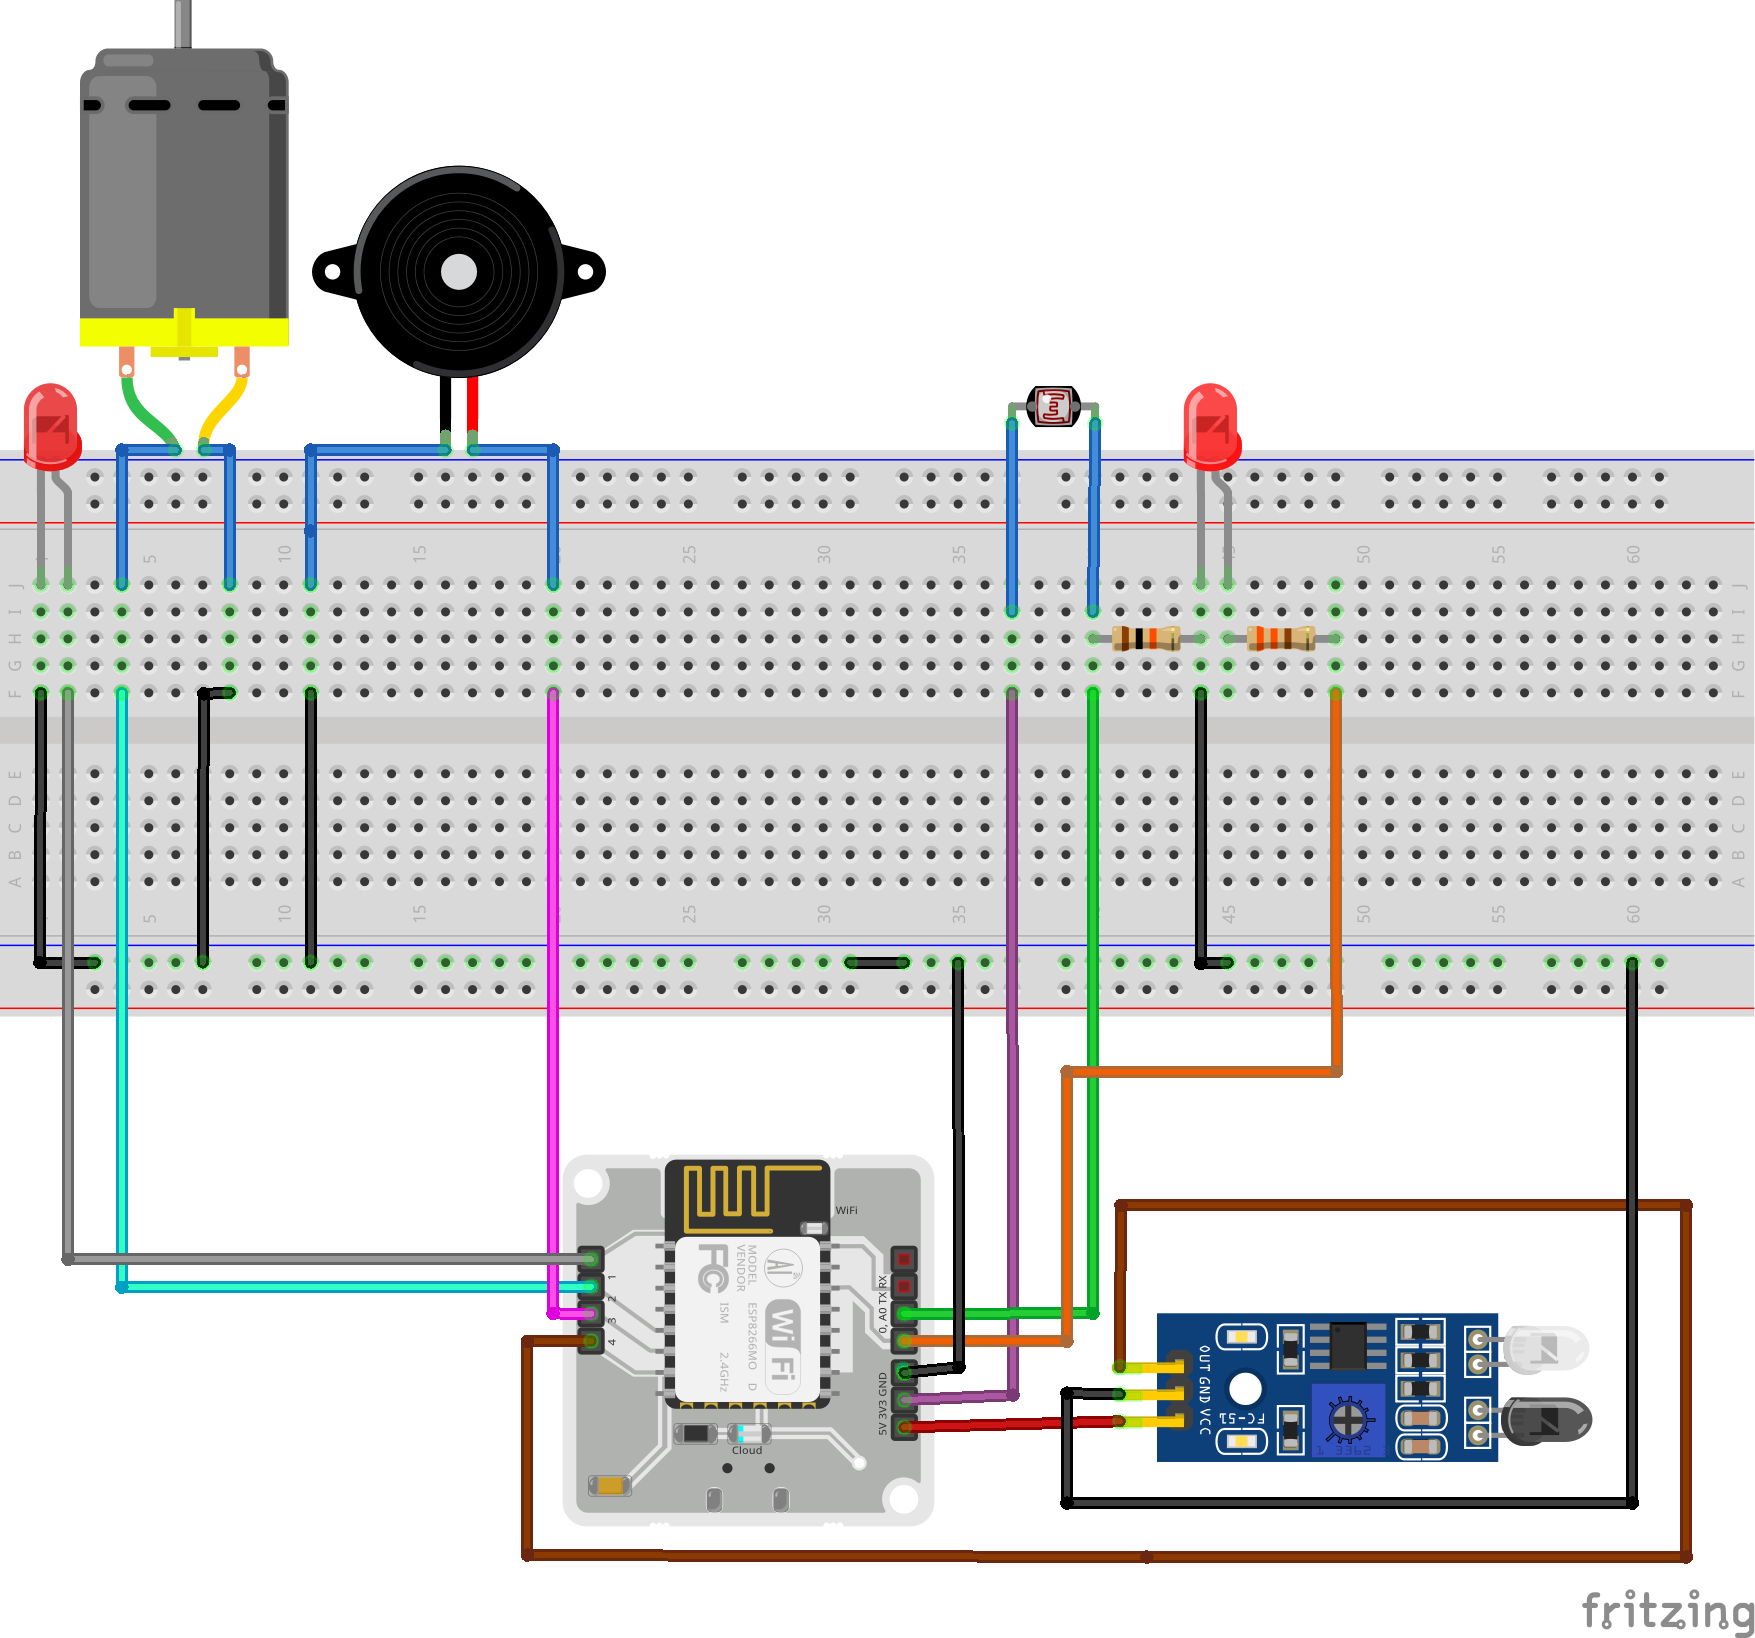
Hardware Setup:
- Connect the anode(longer pin) of the LED to pin 1 of the Bolt WiFi module.
- Connect the positive of DC Motor to pin 2 of the module.
- Connect the positive of the Buzzer to pin 3 of the module.
- Connect the negative from each device to the common ground as shown in the figure.
Software Setup:
Before heading on to our first step of creating an interface, we will have to configure some settings on the Bolt Cloud. So let's get started!
- Login to your Bolt Cloud Account. Click on the Products tab and click on '+ Add Product'.
- Select Connection as Output Devices and Data Collection method as GPIO
- Click on 'Configure this product' and configure the Hardware Settings as shown above and save it.
- Click on the Code option now. Give the file name as 'home_automation' and choose the file extension as html. Type in the code (given in the next section) and hit the save button.
We will learn to code the interface in the next section.
4. Creating an interfaceIn this section, I'm going to help you design an interface website using HTML, Javascript and CSS which can also be used an an application on your mobile phone.
Clicking on the "Light on" button will turn on the light in your room. Similarly the "Light off" turns the light off. The "Fan on" and "Fan off" button will power on and power off your motor respectively. The "Alarm On" button turns on the buzzer to create a distress signal. It can be turned off using the "Alarm Off" button. The "Automated Light" turns off all the other lights and changes its intensity according to the brightness in the surroundings.
The final look can be seen below:
The code for the same is shown below:
<!DOCTYPE html>
<html>
    <head>
        <title>Smart Home Interface</title>
		<script type="text/javascript" src="https://cloud.boltiot.com/static/js/boltCommands.js"></script>
        <script>
        setKey('{{ApiKey}}','{{Name}}');
        </script>
		<style>
		body
		{
		background:url("https://images.unsplash.com/photo-1522444195799-478538b28823?ixlib=rb-1.2.1&ixid=eyJhcHBfaWQiOjEyMDd9&auto=format&fit=crop&w=334&q=80");
		background-size: cover;
		background-repeat:no-repeat;
		background-position:center;
                margin: 0px;
                padding: 0px;
        }
		.space { margin-top: 120px; }
		div
		{
		background-color:#ffffff;
		width: 420px;
		display: flex;
		justify-content: center;
		align-items: center;
		opacity: .8;
		}
		h3
		{
		font-size:22px;
		font-family: "Times New Roman", cursive, sans-serif;
		</style>
    </head>
<body>
<center>
<div class="space"></div>

<div><br>
 <center>
<h3>Experience Automation <br> at your fingertips!</h3></center>
</div>

<br><br><br>
<input type="button" value="Light On" onClick="digitalWrite(1, 'HIGH');" />
<input type="button" value="Light Off" onClick="digitalWrite(1, 'LOW');" /> <br> <br>
<input type="button" value="Fan On" onClick="digitalWrite(2, 'HIGH');" />
<input type="button" value="Fan Off" onClick="digitalWrite(2, 'LOW');" /> <br> <br>
<input type="button" value="Alarm On" onClick="digitalWrite(3, 'HIGH');" />
<input type="button" value="Alarm off" onClick="digitalWrite(3, 'LOW');" /> <br> <br>
<input type="button" value="Automated Light" onClick="digitalWrite(1, 'LOW');" /><br><br>
<br/><br/></center>

</body>
</html>
Description for the code:
<!DOCTYPE html> is used to indicate that the code is written in HTML format.
The HTML tags mark the the start and end of the HTML file.
The title tag defines the title of our web page which is shown at the tab in a browser.
A predefined JavaScript is imported to our HTML code which configures and sets the API key and Device Name of our WiFi Module. It also provides the functionality to read and write the on and off value for our devices.
The style tag helps us to personalize the appearance and feel of our web page through CSS. It sets the background images, the spacing, the font and all related settings.
The body tag contains the actual content of our interface. It contains the design of our buttons and their call to action commands.
5. Setting up the Voice Module:For this project, I've made use of the Google assistant in our smartphones paired up with the IFTTT service to manage the trigger commands and act in accordance with them.
Download the IFTTT app from Google Playstore or head on to the IFTTT website from here. Sign up following the instructions as shown. Now;
For app:
Click on the '+' button in the top right corner.
For website:
Head on the ifttt.com/create and follow the common steps as shown below.
Follow the same procedure for all the other commands as well. Replace the URL's pin with 2 for fan and 3 for Buzzer and state HIGH or LOW respectively. To find your device's API, login to your Bolt Cloud account and head to the API tab. Select the Enable and copy the API. For Device ID you can copy the ID from the Devices tab.
Explaination for the setup:
'IFTTT' stands for If This then That and works exactly as it sounds. It is a service that creates chains of simple conditional statements, called applets. It is triggered by changes that occur within other web services such as Gmail, Google Assistant, Button Press etc. If a trigger is detected it will act on it as you programmed above.
Here our voice command- 'Lights On' is detected by the microphone of our phone, which is then picked up and analyzed by the Google Assistant. As the trigger action is detected, a web request is made by Webhooks to GET the web page as requested from the URL inputted by the user. Then, it sends a response in the JSON format. The cloud decodes the response that the digital pin's voltage has to be set up HIGH or LOW which turns the device On or Off.
6.Setting the alerts:Before moving onto unraveling more features, I'd recommend to setup the alert system for the project. For ease of access, I've made use of the most popular mediums of alert - SMS, Whatsapp and Email.
For SMS and Whatsapp, we would require the assistance of a third party application. Twilio smartly helps us integrate our trigger to send an automated message through any of its channel. Sign up and obtain the SID, AUTH_TOKEN and mobile numbers for SMS and Whatsapp respectively.
For Email, we make use of the Simple Mail Transfer Protocol (SMTP) module. No third party application is required but you would be required to turn on the Less secure app access which can be done from here.
7. Automated LightA light which changes its intensity according to the brightness in our surroundings. How cool is that? The light will be glowing with its full intensity in dark and dim off gradually as the morning rises with its radiant rays shining across our halls. Plus it will also send us a message if the light in the surrounding has increased or decreased suddenly thus indicating the presence of someone in the room. So, let's start building!
How does this work?
To make an automated light, we require a sensor which can detect changes in the intensity of light. A Light Dependent Resistor(LDR) is designed for the very purpose. It changes its resistance in accordance with light's intensity- more the light more is the value of its resistance and vice versa.
The Bolt Module can monitor voltage change with the help of its A0 (analog pin). Now, to convert this change in resistance into a change in voltage, we make use of the Voltage Divider Circuit. Hence, the LDR pulls up a voltage proportional to the change in resistance.
The LDR has a range of values from 0-255 while a LED has a range from 0 to 1024. To synchronize these changes we follow a 4:1 mapping. We set the value of LED to be 255 - (intensity_value_of_LDR/4), following an inverse mapping. Hence, darker the surroundings, the LED will glows brightly than ever!
Anomaly Detection:
This project implements the Z-score analysis method to detect any anomalies in the behavior of the light intensity in the surroundings.
Z-score is calculated as shown above:
- Mean is the average of last Frame size's(r) values.
- Z-score is equal to Multiplication Factor (c) * Square root of Mean of variation of last Frame size's Values.
- The thresholds are set as the Z score added or subtracted to the current value
Through this mathematical formula, we calculate the threshold values, as to which values of light intensity fall into the standard region and which values cause an anomaly. If a point is detected outside this regions, an alert is sent through SMS, indicating a sudden increase or decrease in the value of light intensity.
We obtain the Multiplication Factor and Frame size by hit and trial method. More c means larger range of bound and more r means a change in the pattern of detection.
Hardware Setup:
- Connect one pin of the LDR to pin 3V3 and the other end to pin A0 of the the Bolt WiFi module.
- Connect a 10k ohm resistor (brown, black, orange, gold) between the legs of LDR and cathode(shorter) leg of the LED.
- Connect 300 ohm (orange, orange, brown, gold) between the anode(longer) pin of LED and pin 0 of module as shown in the figure.
- Connect the cathode(shorter) pin to the GND of the module.
SoftwareSetup:
For this section we play around a little with Python. We have to create 2 Python files. First, we will create a configuration file for our main program named conf.py and code it as shown below:
SSID = 'You can find SSID in your Twilio Dashboard'
AUTH_TOKEN = 'You can find  on your Twilio Dashboard'
FROM_NUMBER = 'This is the no. generated by Twilio. You can find this on your Twilio Dashboard'
TO_NUMBER = 'This is your number. Make sure you are adding +91 in beginning'
API_KEY = 'This is your Bolt Cloud account API key'
DEVICE_ID = 'This is the ID of your Bolt device'
FROM_WHATSAPP= 'whatsapp: followed by the whatsapp no. generated by Twilio. You can find this in the Programmable SMS's Whatasapp Beta tab'
TO_WHATSAPP= 'whatsapp: followed by your whatsapp number. Make sure you are adding +91 in beginning'
FRAME_SIZE = 10
MUL_FACTOR = 6
The benefit of creating a separate file is that the user can edit these credentials in here and it will be applied to all our files integrated with an alert system.
The main program is named automated_led.py and coded as shown below:
#importing_the_necessary_packages
import conf, json, time, math, requests, statistics
from boltiot import Sms, Bolt

#defining function to calculate the upper and lower bounds by Z score analysis
def compute_bounds(history_data,frame_size,factor):
    if len(history_data)<frame_size :
        return None

    if len(history_data)>frame_size :
        del history_data[0:len(history_data)-frame_size]
    Mn=statistics.mean(history_data)
    Variance=0
    for data in history_data :
        Variance += math.pow((data-Mn),2)
    Zn = factor * math.sqrt(Variance / frame_size)
    High_bound = history_data[frame_size-1]+Zn
    Low_bound = history_data[frame_size-1]-Zn
    return [High_bound,Low_bound] #returns the upper and lower bound

#importing configurations from the conf.py file
mybolt = Bolt(conf.API_KEY, conf.DEVICE_ID)
sms = Sms(conf.SSID, conf.AUTH_TOKEN, conf.TO_NUMBER, conf.FROM_NUMBER)
history_data=[] #list to store the data sensed by LDR


while True:
    response_ldr = mybolt.analogRead('A0') #reading response from analog pin connected to LDR
    ldr_data = json.loads(response_ldr) #response is decoded from the JSON format
    if ldr_data['success'] != 1: #for errors
        print("There was an error while retrieving the data.")
        print("This is the error:"+ldr_data['value'])
        time.sleep(10)
        continue

    try:
        sensor_value = int(ldr_data['value'])
    except Exception as e:
        print("There was an error while parsing the response: ",e)
        continue

    print("LDR sensor value is:" + str(sensor_value)) #prints LDR value on screen
    print(response_ldr)

    led_value_1 = int(sensor_value/4)
    if led_value_1 > 255:
        led_value_1 = 255
    led_value = 255 - led_value_1 #calculating intensity of LED in accordance with LDR
    response_led = mybolt.analogWrite('0', led_value) #setting instensity as calculated from above"""
    print("Automated LED value is: "+str(led_value)) #printing value of LED on screen
    print(response_led)

#invoking function to calculated and return the bounds
    bound = compute_bounds(history_data,conf.FRAME_SIZE,conf.MUL_FACTOR)
    if not bound:
        required_data_count=conf.FRAME_SIZE-len(history_data)
        if(required_data_count!=0 and required_data_count!=1):
            print("Not enough data to compute Z-score. Need ",required_data_count," more data points")
        history_data.append(int(ldr_data['value'])) #appends to list of input data
        time.sleep(10)
        continue

    try:
        if sensor_value > bound[0] : #if sensor value is greater than Higher bound
            print ("The light level increased suddenly. Sending an SMS.")
            #sends SMS as programmed
            response = sms.send_sms("Someone turned on the lights")
            print("This is the response ",response)
        elif sensor_value < bound[1]: #if sensor value is lesser than Lesser Bound
            print ("The light level decreased suddenly. Sending an SMS.")
            #sends SMS as programmed
            response = sms.send_sms("Someone turned off the lights")
            print("This is the response ",response)
        history_data.append(sensor_value) #appends to list of input data
    except Exception as e:
        print ("Error",e)
time.sleep(10)Isn't security a concern for all? All your valuables, your comic books and your video games lie in your apartment. What if someone were to tamper with your door lock and enter your home. You can have a CCTV camera but it won't be able to give you live notifications and the damage will be done. To overcome this dilemma, I present to you this simple Intrusion Alert Safety System.
How does this work?
Whenever someone opens the door it passes through the field of view of the PIR sensor. It detects the infrared radiation emitted by it and causes a positive differential change between its two halves. This change is picked up by the Bolt WiFi module which then sends out the alerts right into our mobile phones.
HardwareSetup:
- Connect the VCC of the IR sensor to the 5V of the Bolt Module.
- Connect the GND of the IR sensor to the GND of the Bolt Module.
- Connect the OUT/DATA of the IR sensor to pin 4 of the Bolt Module.
Note: You can make use of a PIR sensor with the same connections as shown.
SoftwareSetup:
Create a python file named intruder_alert_system.py and code it as shown below:
import conf, json, time, requests #importing the required packages
from boltiot import Sms, Bolt
import smtplib
from email.mime.text import MIMEText
from email.mime.multipart import MIMEMultipart

#configuring the email settings
email = 'Your_email_id'
password = 'Your_email_password'
send_to_email = 'Recipient's_Email '
subject = 'Intrusion'
message = 'Someone Entered!'

msg = MIMEMultipart()
msg['From'] = email
msg['To'] = send_to_email
msg['Subject'] = subject

msg.attach(MIMEText(message, 'plain'))

#SMS configuration
sms = Sms(conf.SSID, conf.AUTH_TOKEN, conf.TO_NUMBER, conf.FROM_NUMBER)
#Whatsapp configuration
sms_whatsapp= Sms(conf.SSID, conf.AUTH_TOKEN, conf.TO_WHATSAPP, conf.FROM_WHATSAPP)

while True:
    response = requests.get('http://cloud.boltiot.com/remote/your_api_key/digitalRead?pin=4&deviceName=your_device_id') #getting response from PIR sensor
    data=json.loads(response.text) #decoding the response obtained in JSON format
    print(data)
    sensor_value = int(data['value'])
    if sensor_value == 1: #Sensor picked up reading
        print("Motion Detected!")
        print("Sending SMS...")
        server = smtplib.SMTP('smtp.gmail.com', 587)
        server.starttls()
        server.login(email, password)
        text = msg.as_string()
        server.sendmail(email, send_to_email, text) #Email Delivered
        sms.send_sms("Intruder Alert!") #SMS sent
        sms_whatsapp.send_sms("Intruder Alert!") #Whatsapp Successful
        server.quit()
    elif sensor_value ==0:
        print("SENSOR IS READY")
time.sleep(5)While resting in your comfortable lounge, you can experience the power of automation right at your fingertips and your through your voice commands. You can have fun with your personal automated light by running the automated_led.py
When you leave your home for your daily obligations, you can run the intruder_alert_system.py, wandering carefree in the wild knowing your personal system will alert you of any break-ins.
The final integrated circuit and all the codes are given below.


Comments
Please log in or sign up to comment.