


Hardware components | ||||||
 |
| × | 1 | |||
 |
| × | 1 | |||
 |
| × | 1 | |||
 |
| × | 1 | |||
Software apps and online services | ||||||
| ||||||
 |
| |||||
| ||||||
Android Things makes developing connected embedded devices easy by providing the same Android development tools, best-in-class Android framework, and Google APIs that make developers successful on mobile.
It is aimed to be used with low-power and memory constrained Internet of Things (IoT) devices, which are usually built from different MCU platforms. As an IoT OS it is designed to work as low as 32–64 MB of RAM. It will support Bluetooth Low Energy and Wi-Fi.
Let's get started with Hello World! (a.k.a blink)
Go to the Google Android Things website by click here. Select the CONSOLE section.
Sign in with your Google ID in the following page.
Select CREATE A PRODUCT.
Type your Product Name. Select SOM as Raspberry Pi 3 (SOM = System On Module). Give a Product Description. Hit CREATE. In the following page, select FACTORY IMAGES.
Click the CREATE BUILD CONFIGURATION. It creates a new field Build configuration list.
Click the Download build and wait for the download.
And you will get a .zip file like this:
Unzip/extract the zip using 7zip.
It will take 1 min to extract.
After the extraction, you will get .img file (a.k.a OS image file).
Next burn the image to SD card.
We are using Etcher (Etcher is an open source project by resin.io).
Connect SD card to Computer via a SD card Reader and open Etcher.
Select image and select SD Card and hit Flash. Wait for it. After the Flash, unplug the SD Card Reader and insert it into our Raspberry Pi 3.
Connect Raspberry Pi 3 to a Ethernet via RJ 45 cable and power it up with 5v adapter.
Note: We are not using a display/HDMI monitor because the latest Android Things preview does not support most display units, also we are not going to use it in this project.
Open your router panel or use a mobile app to obtain IP Address of Raspberry Pi.
Now here our Local IP is 192.168.0.22.
2. Setup Android StudioFirst Download Android studio (Stable) or use Preview version.
Note: Stable version can be also use used for Android things development but preview version comes with a inbuilt Android things Development option.
After downloading, install and open Android Studio.
Start a new project by clicking Start a new Android Studio Project.
And click Finish to build.
Wait for the build.
3. Let's Code Android (Java)After the build, open the Gradle:
Add the development preview dependencies.
By adding this:
provided
After that, open Main Activity source file (Java):
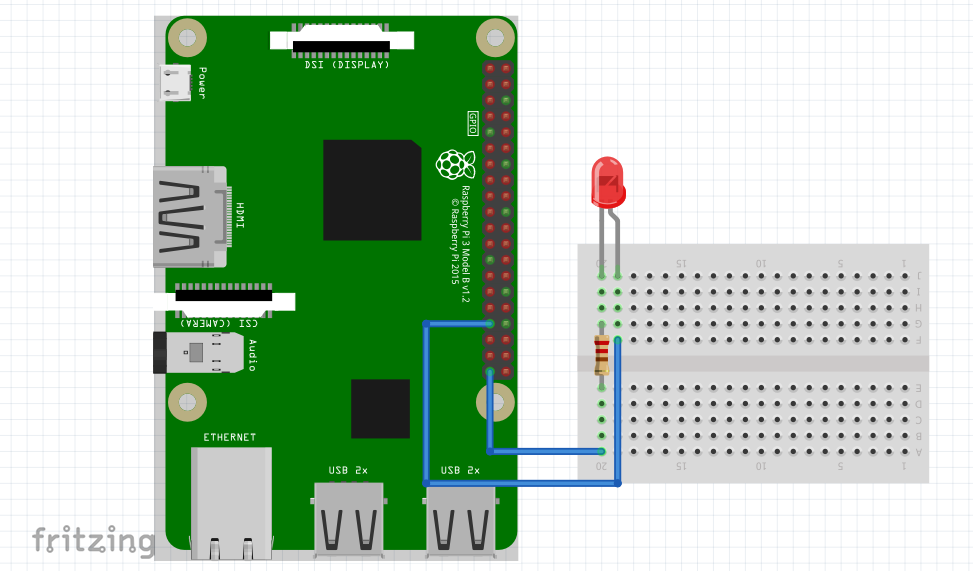
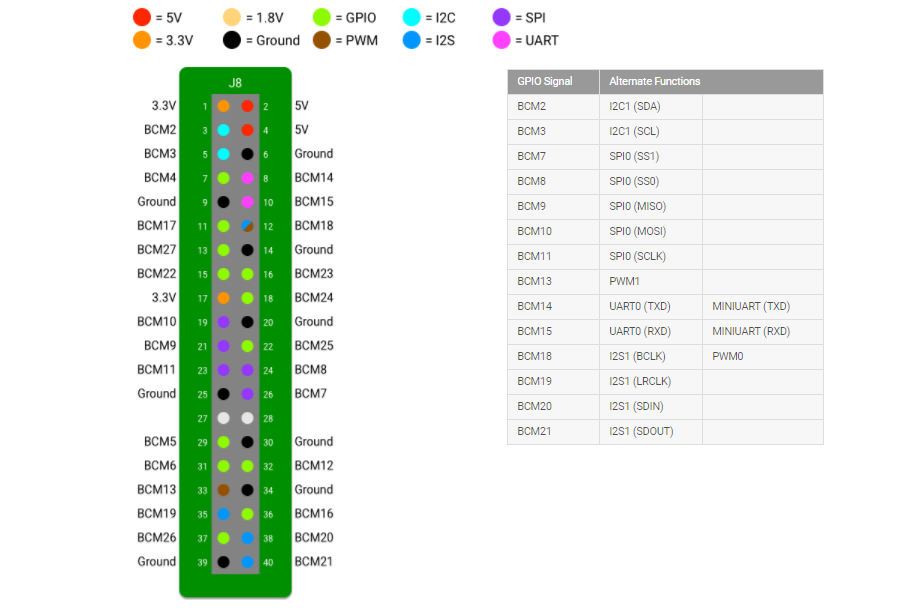
In the main class, add the initialize LED variable and delay variable by adding this code and we are using BCM13 pin to connect our LED.
private static final String TAG = MainActivity.class.getSimpleName();
private static final int INTERVAL_BETWEEN_BLINKS_MS = 500;
private static final String GPIO_PIN_NAME = "BCM13";
// Physical Pin #33 on Raspberry Pi3
private Handler mHandler = new Handler();
private Gpio mLedGpio;
Next add a GPIO connection to the board:
 // Step 1. Create GPIO connection.
 PeripheralManagerService service = new PeripheralManagerService();
 try {
 mLedGpio = service.openGpio(GPIO_PIN_NAME);
 // Step 2. Configure as an output.
 mLedGpio.setDirection(Gpio.DIRECTION_OUT_INITIALLY_LOW);
// Step 4. Repeat using a handler.
 mHandler.post(mBlinkRunnable);
    } catch (IOException e) {
        Log.e(TAG, "Error on PeripheralIO API", e);
    }
}
In OnCreate method, we are initialize our variable that we need. Add OnDestory method for our application:
protected void onDestroy() {
 super.onDestroy();
// Step 4. Remove handler events on close.
 mHandler.removeCallbacks(mBlinkRunnable);
// Step 5. Close the resource.
 if (mLedGpio != null) {
 try {
 mLedGpio.close();
        } catch (IOException e) {
            Log.e(TAG, "Error on PeripheralIO API", e);
        }
    }
}
We need to close session that we are opened in the OnCreate method. After that make our program runnable by adding the Runnable method.
private Runnable mBlinkRunnable = new Runnable() {
 @Override
 public void run() {
 // Exit if the GPIO is already closed
 if (mLedGpio == null) {
 return;
        }
try {
 // Step 3. Toggle the LED state
 mLedGpio.setValue(!mLedGpio.getValue());
// Step 4. Schedule another event after delay.
 mHandler.postDelayed(mBlinkRunnable, INTERVAL_BETWEEN_BLINKS_MS);
        } catch (IOException e) {
            Log.e(TAG, "Error on PeripheralIO API", e);
        }
    }
};
In the runnable code we are set our code ready to run.
After inserting all the code, you can also get some error. That is because you didn't add the packages that we used in our code. Let's add them clicking Alt + Enter or copy paste the packages.
import android.app.Activity;
import android.os.Bundle;
import android.os.Handler;
import android.util.Log;
import com.google.android.things.pio.Gpio;
import com.google.android.things.pio.PeripheralManagerService;
import java.io.IOException;
All set. If you want to be rid of all the coding, just clone my GitHub Repo:
https://github.com/salmanfarisvp/AndroidThings.git
Or click here to download the code.
4. Setup the Raspberry with LEDIn Android things the pinout is different than the Raspbian.
After the wiring, let's run our program.
5. Run the ProgarmmeBut we need a connection between the Android Things device (Raspberry Pi) with our Android Studio for Upload and Debug our programs.
Yeah, we have ADB tool (Android Debug Bridge). It will act as a bridge between our Android machine (phone/things) and development platform (Android Studio) and help us Upload and Debug our program.
So next we need to set ADB in between Raspberry Pi (running on Android) and Android Studio. In Windows, open Android => SDK => Platform-tools.
You can see the adb.exe file here, but we can't directly access it. So open a command prompt or PowerShell and get in the folder and just type code on command prompt or PowerShell.
adb connect <raspberry pi ip>
We got the RPi IP from the first step. And you'll get a response after the connection is established.
connected to ip:5555
Now just upload the program by clicking the green triangular button.
Hit Run.
You can see the Raspberry Pi on the listed of devices. Just click OK for running our program.
Yeah, we did it. You just completed Android Things Hello World program. If anything goes wrong, please let me know in the comment section.
Thank you.


Comments
Please log in or sign up to comment.