According to Wikipedia:
“Waste management or Waste disposal is all the activities and actions required to manage waste from its inception to its final disposal. This includes among other things, collection, transport, treatment and disposal of waste together with monitoring and regulation. It also encompasses the legal and regulatory framework that relates to waste management encompassing guidance on recycling etc.”
One of the major issues in waste management is to collect the waste at right time, also it's really a headache for waste management agencies. Waste management agencies are collecting waste from household/industry once in a month, so sometimes the waste bin will be full before the collection time or sometimes, such as during vacations the bin is not going to get filled and still the agency will come for collecting the waste it will waste their fuel.
Why use a smart waste bin? (Solution)As a solution for the problem in waste management that I mentioned above we have:
When the bin is full, it will notify the waste management agency as well as us, so it will help the agency avoid the waste of fuel also make it possible for them to create a better map of collecting waste from citizens.
The network of sensors enabled smart bins connected through the IoT network generates a large amount of data, which is further analyzed and visualized at real time to gain insights about the status of waste around the city. The scope for the future work of this system can be implemented on various places like bus stops, railway stations etc.
How it's working:Smart Waste Bin is Powered by Cayenne and NodeMCU.
Cayenne: Easily enable your company's microcontrollers, gateways, sensors, and other devices for the Internet of Things.
NodeMCU: NodeMCU is an open source IoT platform. It includes firmware which runs on the ESP8266 Wi-Fi SoC from Espressif Systems, and hardware which is based on the ESP-12E module.
So you want to build one of your own! Let's get started!
1. Set up CayenneFirst create a Cayenne Account.
And log in to your account:
Click Add new:
In the list menu select Device/Widget:
In the menu select Bring Your Own Things:
Note: In here we are using NodeMCU and it's not listed in here, that's why we are selecting Bring Your Own Things.
Save MQTT USERNAME, MQTT PASSWORD, CLIENT ID in a Note (important).
2. Setup NodeMCU/ESP8266Download Arduino IDE and Open Arduino IDE and Set Set additional Board URL: File => Preference (Ctrl + Comma)
In Additional Boards Manager, click add and paste the URL there: http://arduino.esp8266.com/stable/package_esp8266com_index.json
And click "OK".
Download Board Definitions
Open Board Manager by going to:
Tools => Board => Boards Manger
Open Boards Manager and search for NodeMCU:
Note: It only appears if you set the NodeMCU Board URL (1.1)
Download Cayenne library
Click here to Download Cayenne library or Clone from here. After that Open library Manager:
Sketch => Include library => Add .ZIP LibraryAnd select ZIP file that we downloaded (Cayenne library file).
Select Our Board and Port
Open Board: Tools => Board => NodeMCU ESP-12E
Select Port in same menu (in my case, I have Port-3).
Note: Only the boards appear when you download the Board definitions.
3. CodeUpload the code to NodeMCU by connecting to your computer.
#include <CayenneMQTTESP8266.h>
char ssid[] = "wifi name";
char password[] = "wifi password";
char username[] = "mqtt user name";
char mqtt_password[] = "mqtt password";
char client_id[] = "mqtt client id";
#define trigPin D2
#define echoPin D5
int green = D6;
void setup()
{
 Cayenne.begin(username,mqtt_password,client_id,ssid,password);
pinMode(green,OUTPUT);
pinMode(trigPin, OUTPUT);
pinMode(echoPin, INPUT);
Serial.begin(115200);
digitalWrite(green,HIGH);
}
void loop(){
 Cayenne.loop();
long duration, distance;
digitalWrite(trigPin, LOW);
delayMicroseconds(2);
digitalWrite(trigPin, HIGH);
delayMicroseconds(10);
digitalWrite(trigPin, LOW);
duration = pulseIn(echoPin, HIGH);
distance = (duration/2) / 29.1;
Serial.println(distance);
Cayenne.virtualWrite(3,distance);
delay(1000);
}
CAYENNE_IN(1)
{
  digitalWrite(green,!getValue.asInt());
}
Note: Add the WiFi name and password in the code, also add MQTT username, password, client ID from the Cayenne dash board.
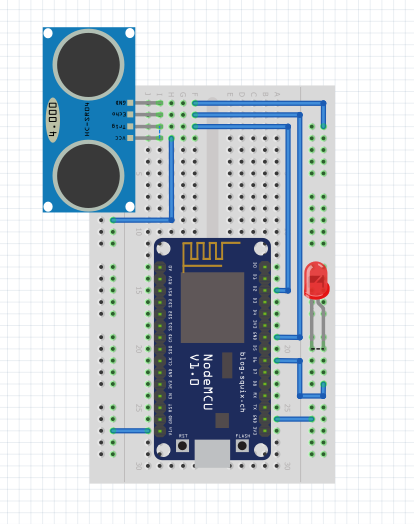
4. Connect the ModulesIn here we are using Hc-Sr04 ultarsonic sensor and a LED.
Connect the ultrasonic sensor and led like the diagram.
5. Open the Cayenne DashboardClick Add new and Select Device/Widget.
Under the Custom Widgets select Gauge:
Set a Name and select your Device:
Set Channel "1" and Min value to "0" and Max value to "1000". And click Add Widget. Also set LED like this.
You can now see your Waste Bin data and Notification LED In Dashboard.
6. Set a Trigger Notification
Select Trigger:
Drag and Drop Device in if and then box.
Select Ultrasoinc Sensor (office waste Bin).
And set parameters like this also make you to change to your email. And Save it. Also set LED notification when the Sensor value Below 10 (like this).
7. Let's TryAttach the SEBi to your Waste Bin, and fill some waste:
After the Bin is is filled check the notification LED and your Mail:
SEBi
Video Demo:Thank You.


Comments
Please log in or sign up to comment.