


Hardware components | ||||||
 |
| × | 1 | |||
 |
| × | 1 | |||
 |
| × | 1 | |||
Software apps and online services | ||||||
 |
| |||||
In this project, I will show you how to control an LED using a browser with the help of a web server. Follow the steps to make to your own web server and enjoy.
1. Setup NodeMCU in Arduino IDEOpen Arduino IDE.
1.1 Set additional Board URL
File => Preference (Ctrl + Comma)
In Additional Boards Manager, click add and paste the URL there: http://arduino.esp8266.com/stable/package_esp8266com_index.json
And click "OK".
1.2 Download Board Definitions
Open Board Manager by going to Tools => Board => Boards Manger.
Open Boards Manager and search for NodeMCU.
It only appears if you set the NodeMCU Board URL (1.1)
Note: Only .CC IDE is supported for downloading the Additional Boards. Install the latest version of our board.
1.3 Download ESP8266WiFi library
Open library Manager: Sketch => Include library => Manage Libraries
*Search for ESP8266WiF library:
1.4 Select Our Board and Port
Open Board: Tools => Board => NodeMCU ESP-12E (in my case, I have ESP12-E module)
Select Port in same menu (in my case, I have Port-3).
Note: Only the boards appear when you download the Board definitions (1.2).
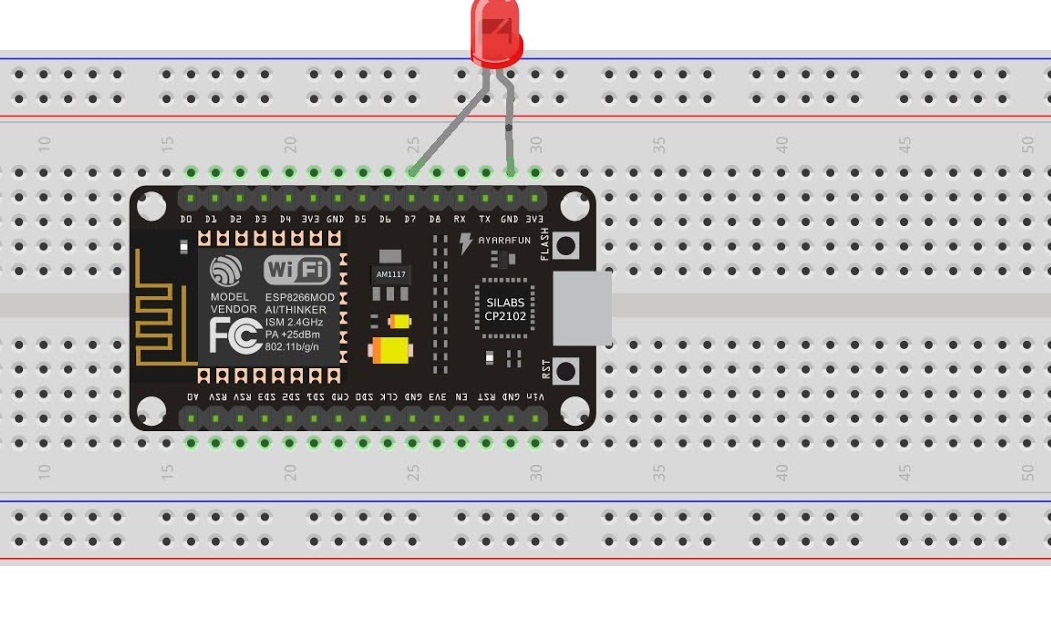
2. Connect the PartsIn this project, we are using a BreadBoard and LED, that's all.
2.1. First Connect the NodeMCU to BreadBoard
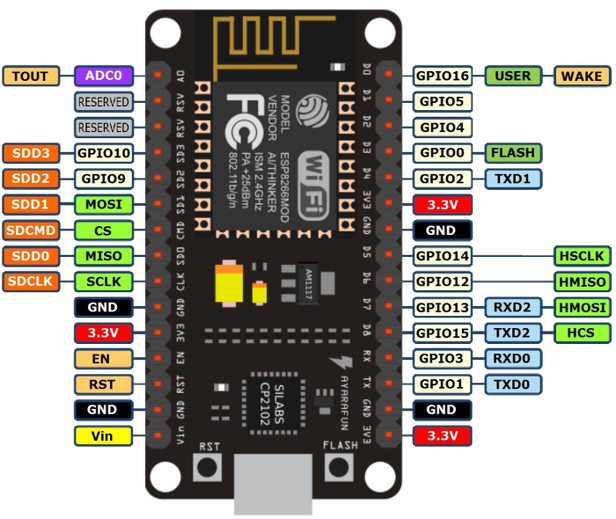
2.2 Connect an LED in Pin "D7" and "Ground" in NodeMCU using BreadBoard
2.3 Connect a Micro-USB cable to NodeMCU
All set; let's start coding.
3. Upload CodeCopy/paste this code and upload it to NodeMCU just by clicking Upload Button in Arduino IDE.
#include <ESP8266WiFi.h>
const char* ssid = ""; //wifi ssid / wifi name
const char* password = ""; //wifi password
int ledPin = 13; // GPIO13
WiFiServer server(80);
void setup() {
 Serial.begin(115200);
 delay(10);
 pinMode(ledPin, OUTPUT);
 digitalWrite(ledPin, LOW);
 // Connect to WiFi network
 Serial.println();
 Serial.println();
 Serial.print("Connecting to ");
 Serial.println(ssid);
 WiFi.begin(ssid, password);
 while (WiFi.status() != WL_CONNECTED) {
   delay(500);
   Serial.print(".");
 }
 Serial.println("");
 Serial.println("WiFi connected");
 // Start the server
 server.begin();
 Serial.println("Server started");
 // Print the IP address
 Serial.print("Use this URL to connect: ");
 Serial.print("http://");
 Serial.print(WiFi.localIP());
 Serial.println("/");
}
void loop() {
 // Check if a client has connected
 WiFiClient client = server.available();
 if (!client) {
   return;
 }
 // Wait until the client sends some data
 Serial.println("new client");
 while(!client.available()){
   delay(1);
 }
 // Read the first line of the request
 String request = client.readStringUntil('\r');
 Serial.println(request);
 client.flush();
 // Match the request
 int value = LOW;
 if (request.indexOf("/LED=ON") != -1)  {
   digitalWrite(ledPin, HIGH);
   value = HIGH;
 }
 if (request.indexOf("/LED=OFF") != -1)  {
   digitalWrite(ledPin, LOW);
   value = LOW;
 }
// Set ledPin according to the request
//digitalWrite(ledPin, value);
 // Return the response
 client.println("HTTP/1.1 200 OK");
 client.println("Content-Type: text/html");
 client.println(""); //  do not forget this one
 client.println("<!DOCTYPE HTML>");
 client.println("<html>");
 client.print("<body style='background: #00979C'>");
 client.println("<h1 align ='center'>");
 client.println("<font-color='red'>");
 client.println("FoxLab");
 client.println("</font>");
 client.println("</h1>");
 client.println("<bg color ='#00ff00'>");
 client.println("</bg>");
 client.println("<p align ='center'>");
 client.print("Led is Now: ");
 client.println("</p>");
 if(value == HIGH) {
   client.println("<p align ='center'>");
   client.print("On");
   client.println("</p>");
 } else {
   client.println("<p align ='center'>");
   client.print("Off");
   client.println("</p>");
 }
 client.println("<br><br>");
 client.println("<p align ='center'>");
 client.println("<a  href=\"/LED=ON\"\"><button>Turn On </button></a>");
 client.println("<a  href=\"/LED=OFF\"\"><button>Turn Off </button></a><br />");
 client.println("</p>");
 client.println("<p>");
 client.println("<marquee direction='right'>");
 client.println("Developed by Salman Faris ");
 client.println("</marquee>");
 client.println("</p>");
 client.println("</body>");
 client.println("</html>");
 delay(1);
 Serial.println("Client disonnected");
 Serial.println("");
}
Upload to our NodeMCU board.
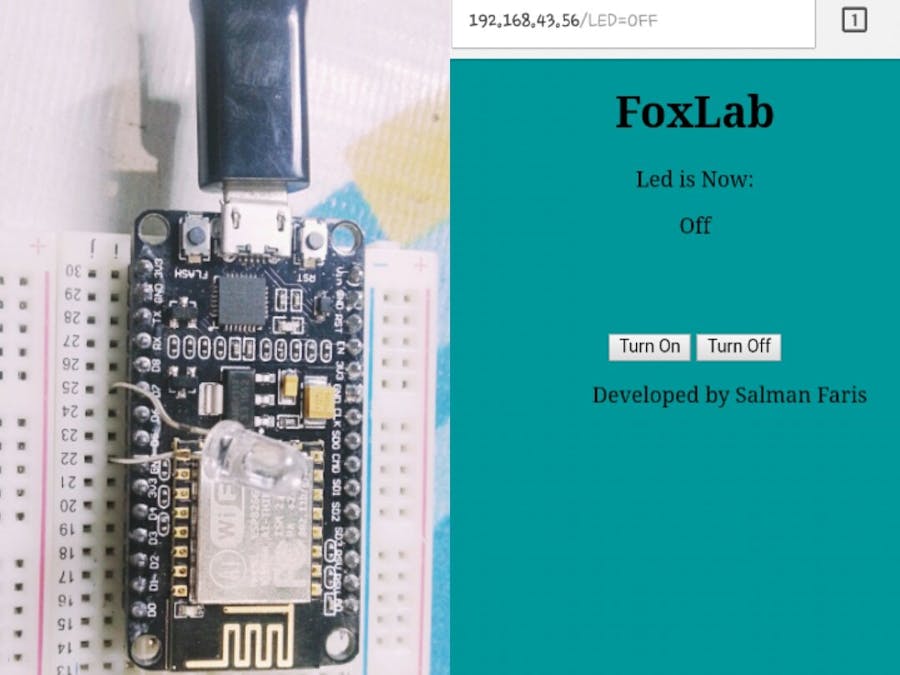
4. Open Web Server pageAfter uploading the code, open Serial Monitor to obtain IP address.
Open Web-Browser and put IP Address as URL.
Note: Both the computer/mobile and NodeMCU must be in the same network; only then will the page open.
That's all. You've now just tried "Hello World" in IoT. I'll upload more projects soon.
Happy New Year!
Thank you!


Comments
Please log in or sign up to comment.