Shafin Kothia
Published

Water Level Monitor Using Raspberry Pi and OLED display

A Water level monitor with oled display display the percentage of bucket filled

BeginnerFull instructions provided1 hour2,311
Water Level Monitor Using Raspberry Pi and OLED display

Things used in this project

Hardware components

Raspberry Pi 3 Model B
Raspberry Pi
×1
Buzzer
Buzzer
Buzzer
×1
Ultrasonic Sensor - HC-SR04 (Generic)
Ultrasonic Sensor
×1
0.96" OLED 64x128 Display Module
ElectroPeak 0.96" OLED 64x128 Display Module
Oled Display
×1
Jumper wires (generic)
Jumper Wires
×1

Story

Read more

Schematics

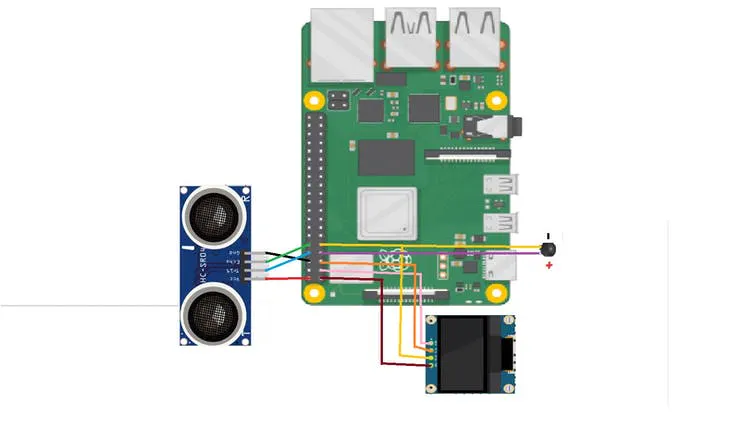
Circuit Diagram

Code

ultrasonic_water_level_with oled display.py

Python
Copy and paste it in Thonny Python Ide
import time

import Adafruit_GPIO.SPI as SPI
import Adafruit_SSD1306

from PIL import Image
from PIL import ImageDraw
from PIL import ImageFont
import RPi.GPIO as GPIO
import time


# Raspberry Pi pin configuration:
RST = 24
# Note the following are only used with SPI:
DC = 23
SPI_PORT = 0
SPI_DEVICE = 0

TRIG = 14
ECHO = 15
i=0

dist_from_base =  10 #Write the distance from the sensor to the base of the bucket
GPIO.setmode(GPIO.BCM)
GPIO.setup(TRIG ,GPIO.OUT)
GPIO.setup(ECHO,GPIO.IN)
GPIO.setup(4 ,GPIO.OUT)


# 128x32 display with hardware I2C:
disp = Adafruit_SSD1306.SSD1306_128_64(rst=RST)


# Initialize library.
disp.begin()

# Clear display.
disp.clear()
disp.display()

width = disp.width
height = disp.height
image = Image.new('1', (width, height))

draw = ImageDraw.Draw(image)

draw.rectangle((0,0,width,height), outline=0, fill=0)


padding = 2
shape_width = 20
top = padding
bottom = height-padding
# Move left to right keeping track of the current x position for drawing shapes.
x = padding
# Draw an ellipse.


# Load default font.
font = ImageFont.load_default()

# Some other nice fonts to try: http://www.dafont.com/bitmap.php
#font = ImageFont.truetype('Minecraftia.ttf', 8)
GPIO.output(TRIG, False)
print("Starting.....")
time.sleep(2)

while True:
    
    GPIO.output(TRIG, True)
    time.sleep(0.00001)
    GPIO.output(TRIG, False)

    while GPIO.input(ECHO)==0:
        pulse_start = time.time()

    while GPIO.input(ECHO)==1:
        pulse_stop = time.time()

    pulse_time = pulse_stop - pulse_start


    distance = pulse_time * 17150
    distance = round(distance)
    percentage = (distance * 100)/dist_from_base
    percentage = 100 - percentage
    percentage = round(percentage, 2)
    percentage = str(percentage)
    if distance > dist_from_base:
        distance = dist_from_base
    print(round(distance, 2));
    distance = str(distance)
    draw.text((x, top),    'Distance:',  font=font, fill=255)
    draw.text((x+60, top), distance, font=font, fill=255)
    draw.text((x+75, top), 'cm', font=font, fill=255)
    draw.text((x, top+ 20), 'percentage of bucket filled:', font=font, fill=255)
    draw.text((x, top+ 30), percentage, font=font, fill=255)
    draw.text((x+30, top +30), '%', font=font, fill=255)

    # Display image.
    disp.image(image)
    disp.display()
    distance = float(distance)
    time.sleep(1)
    disp.clear()
    draw.rectangle((0,0,width,height), outline=0, fill=0)

    if distance < 4:
        draw.text((x, top + 40),    'Water will overflow',  font=font, fill=255)
        print("Water will overflow")
        GPIO.output(4, True);
        time.sleep(0.5)
        GPIO.output(4, False);
        time.sleep(0.5)
        GPIO.output(4, True);
        time.sleep(0.5)
        GPIO.output(4, False);
        time.sleep(0.5)
    else:
        GPIO.output(4, False);
        # Write two lines of text.

Credits

Shafin Kothia

Shafin Kothia

5 projects • 12 followers
I am the manager of AIVersity and I make robotics projects and tutorials for people who started their wonderful journey in robotics and AI

Comments