Introduction:
Consider that you are living in an apartment shared between four working professionals with horrible work timing. You are hiring a cook on a monthly basis and forced to even pay for days when none of you guys are at home. With AWS IOT and Amazon Push Notification Service, you can now automate the process of hiring the cook on a daily basis based on presence detection using PIR sensor and sending a PUSH notification.
Concept:
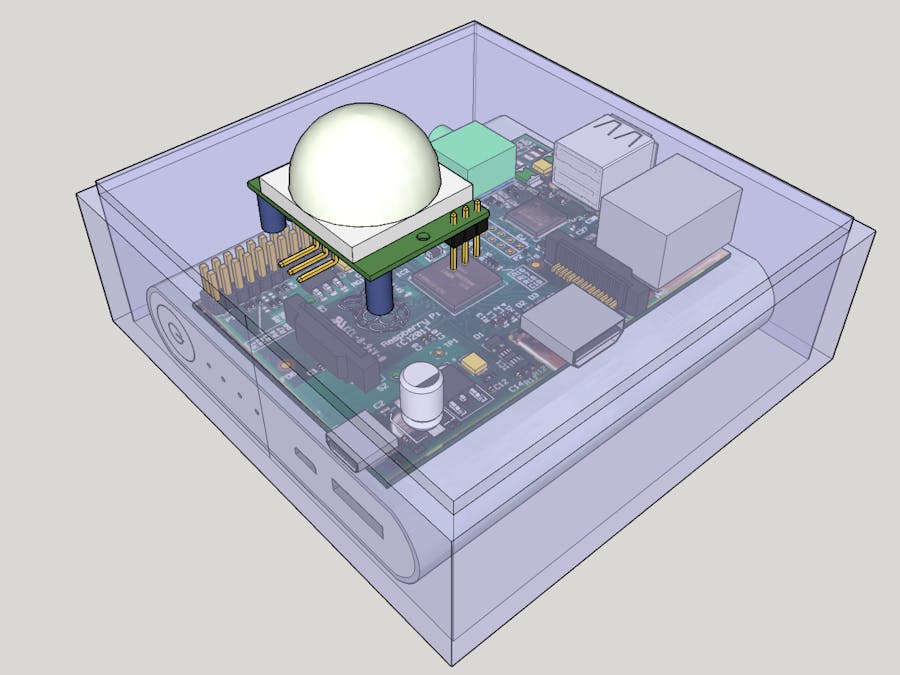
The concept is based on the premise that if anyone at my apartment is at home then there is a high probability that he will be in the living room watching TV. Hence detected easily using PIR sensor strategically placed on a slab as shown This however can be easily be made foolproof by placing multiple PIR sensor.
Platform Used:
AWS IOT and SNS: AWS IOT makes it convenient and secure to connect devices in a reliable manner. Here we use MQTT to authenticate and communicate with the AWS IOT Resources. MQTT is a machine to machine protocol used predominantly in IOT applications. AWS IOT acts as the MQTT broker with the python code on the Raspberry Pi 2 acting as the MQTT client enabling secure communication.
Setting up Raspberry Pi 2:
1. The following link provides a excellent reference for setting up rpi 2 from scratch:
https://www.raspberrypi.org/documentation/installation/installing-images/mac.md
2. Install pip:
sudo apt-get install python-pip
3. Install MQQT support rpi 2:
pip install paho-mqtt
Setting up AWS IOT and SNS:
After traversing through the getting started page click on create a resource
Now create a thing. All machines are considered things in AWS IOT and need authentication to communicate with the AWS IOT resources.
Name the resource appropriately and click create
After creating we can see that no certificate is attached so click on connect a device.
Even though we are using python in Raspberry Pi 2 we have to use NodeJs to generate the certificate files necessary for authentication. These are to store in the auth folder on the raspberry pi 2.
Download the certificate files and observe the json formatted structure shown which will be used when programming the client.
Setting up SNS is facsimile to setting up SNS for Intel Galileo Gen 2 as shown in my previous post The Virtual Postman.
Create a topic and Enter the topic name and Subject of the mail.
Now subscribe the mail address and verify it.
Once you clicked on the confirm subscription you can now receive push notifications
To test it let us publish a message testing it. Fill in the message and click on publish.
Yeah! I got my mail.
It's time to sync both AWS IOT and SNS with some rules
Now fill the details according to your preferences the most important among them is the topic filter which forces it to list to a particular topic.
Among the choose action drop down list box choose SNS.
The role name is then set.
Now every time we get a post, a push notification will be generated to the subscribed email.
Setting up certificates:
In addition to the certificates downloaded from AWS IOT console you also need to download the following file. The document structure should as shown:
curl https://www.symantec.com/content/en/us/enterprise/verisign/roots/VeriSign-Class%203-Public-Primary-Certification-Authority-G5.pem > rootCA.pem
Also use scp to transfer the files from Mac to Raspberry Pi 2.
Using MQTT Client for Debugging:
AWS IOT hosts an MQTT client to facilitate easy debugging. Lets check if what we hacked together is working. Click on MQTT client on the AWS IOT Console and choose the appropriate topic you want to listen to. Here it is topics/pir
The mqtt client shows the data obtained listening to the topics/pir.
The mqtt client on raspberry pi 2 publishes the PIR values.
Criterion:
Handling PIR values is trivial so when 1 is detected cook gets sent the hire message. However care should be taken not to spam the inbox. Hence appropriate checks are added to ensure that the invitation is sent only between 7 and 8.
Mission Accomplished :)


Comments
Please log in or sign up to comment.