

This was a project I built for Valentines Day 2018.
Features- Secret activation key
- 3 different light modes
- Toggle rotation ON/OFF
Use only salvaged or leftover parts on hand.
ComponentsThe list of components is more accurate than the picture of components. It's a common occurrence to add parts as the project progresses.
- 1x Arduino Nano
- 1x Geared DC Motor
- 1x RGBW LED Strip 12V
- 1x Power Adapter 12V
- 1x Barrel Jack
- 1x Rocker Switch [SPDT 125V/10A]
- 1x Slide Switch [SPDT 5V/0.3A]
- 1x Push Button [6x6x8mm]
- 1x Reed Switch [N/O 2x14mm]
- 1x Rare Earth/Neodymium Magnet [8x2mm]
- 1x Perfboard/Veroboard
- 3x Blue LED [3mm]
- 1x Green LED [3mm]
- 8x 1K Ohm Resistor [at least ~400 Ohm]
- 2x M3 Bolt [at least 16mm]
- 2x M3 Bolt [at least 10mm]
- 4x M3 Nut
- 1x M8 or 5/16" Threaded Rod [123mm]
- 3x M8 or 5/16" Nut
- 2x 608zz Bearing
- 1x Spring Coupler [5x8x25mm]
- 4x ZTX458 NPN BJTs (for RGBW strip)
- 1x RFP40N10 N-channel MOSFET
- 1x 220 Ohm Resistor (Series with motor)
- 1x 330 Ohm Resistor
- 1x 1N4001 Diode (Flyback protection)
- 4x Rubber Feet
- 2.54mm Male & Female Pin Headers
- Heatshrink Tubing
- Zip Ties
- Jumper Cables
- 3D Printed Parts
Here are the equipment and tools that I used, but only the ones with an asterisk (*) are absolutely mandatory.
- 3D Printer *
- Digital Calipers *
- Soldering Iron *
- Hot glue gun *
- Hacksaw*
- Heat gun
- Dremel
- PSU
- Multimeter
- Wire Cutter & Wire Stripper
- Hand Files
- 100 Grit Sandpaper
- Super Glue
The lamp shade is a single piece lithophane made of 3 connected images. The heart piece is a magnetic key. A geared DC motor rotates the lamp shade. For illumination, an RGBW LED strip is switched between 3 hard-coded modes.
Below are scans of my plans:
The geared DC motor was from a broken printer. It was exactly what I needed to rotate the lamp shade at a slow pace. The 5mm output shaft allowed me to use spare couplers I had for my 3D printer. The shaft was too long, so I trimmed it with a dremel.
I selected 3 photos to stitch together in GIMP. They were each cropped to 4:3 and placed side by side. The final canvas size was 5751 x 1438 pixels.
The stitched image was converted into a lamp shade using 3DPRock's online tool. It's crucial to go to the "Image Settings" tab and change the mode from negative to positive image.
Using Simplify3D, I obtained the gcode for the lampshade. For Lithophanes, I make sure to have 0% infill with >10 walls/shells/perimeters. I used a 0.16mm layer height. My lithophane took 22 hours to print on a direct extruder.
This was my first full assembly in Fusion 360.
The mid piece provided a shaft for the LEDs to wrap around, while covering the internals of the base. The LEDs remain stationary when the top rotates.
The base had to be split into two pieces because I needed to have access to the set screws on the coupler.
The heart key takes advantage of a friction fit.
Cross section of the assembly vs sketch:
Total Print Time: ~37 hours
- Lithophane: 22 hours
- Base A: 6 hours
- Middle: 3 hours 20 minutes
- Base B: 2 hours
- Top: 2 hours
- 3 Heart pieces: 30+20+20 = 1 hour 10 minutes
- Dovetails: 15 minutes
This did not include post processing and filament changes for multicolor prints.
I manually edited the gcode to insert code in between the layers where I wanted to swap filament.
G91                            ; Set coordinates to relative mode
G1 Z10                         ; Raise nozzle 10mm
G90                            ; Set coordinates to absolute mode
G1 X0                          ; Home X axis
M0 Click To Restart            ; Pause and wait for the user
G91                            ; Set coordinates to relative mode
G1 Z-10                        ; Return nozzle down 10mm
G90                            ; Set coordinates to absolute mode
An alternative is to use Marlin's advanced pause:
M600It takes care of parking the nozzle, retracting the first filament, and priming the nozzle with new filament.
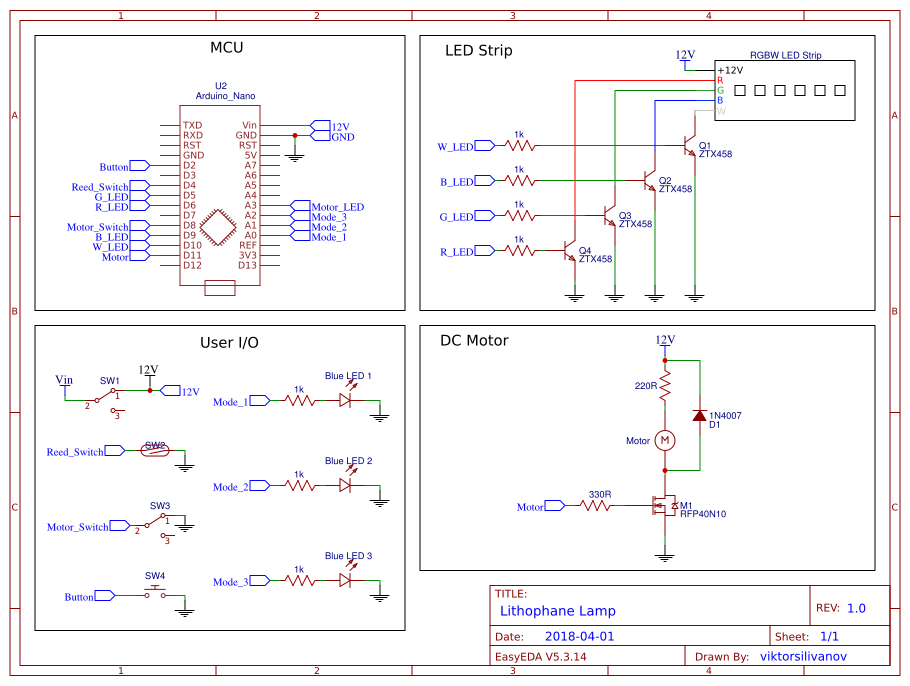
CodeThe code is simple. Just conditional logic for buttons and switches with some DAC control for LEDs.
The user can switch between these modes using the "Mode" button.
- Mode 1: Warm White
- Mode 2: Cool White
- Mode 3: Mood Lights
I was tight on time, so I had to hack together the electronics quickly.
Four ZTX458 NPN BJTs drive the LEDs. An RFP40N10 N channel MOSFET drives the motor.
Proper cable assembly went out the window as the clock counted down.
.
Not shown is that I added 4 thin rubber feet to keep the lamp from sliding.
ConclusionThe entire project took me 3 weeks from the inception to the handover. In retrospect, there were some questionable mechanical decisions, but it works to this day!
CAD models won't be published, but the code & schematics are included.


Comments
Please log in or sign up to comment.