

Hardware components | ||||||
 |
| × | 1 | |||
 |
| × | 1 | |||
 |
| × | 1 | |||
| × | 1 | ||||
Software apps and online services | ||||||
 |
| |||||
| ||||||
In this tutorial, we are going to interface an MQ2 Smoke Sensor with Surilli WiFi. The changing analog values from the MQ2 Smoke Sensor will be recorded in Excel using a tool named as "Tera Term."
What Is an MQ2 Smoke Sensor?The MQ series of gas sensors use a small heater inside with an electro-chemical sensor. They are sensitive for a range of gasses and are used indoors at room temperature. The MQ-2 Gas Sensor module is useful for gas leakage detecting in home and industry.
The MQ-2 smoke sensor is sensitive to smoke and to the following flammable gases:
- LPG
- Butane
- Propane
- Methane
- Alcohol
- Hydrogen
The resistance of the sensor is different depending on the type of the gas.The smoke sensor has a built-in potentiometer that allows you to adjust the sensor sensitivity according to how accurate you want to detect gas.
A0: Analog pin
D0: Digital pin
GND: Ground pin
VCC: Voltage pin
How Does It Work?The relationship between voltage and gas concentration is the following:
- The greater the gas concentration, the greater the output voltage.
- The lower the gas concentration, the lower the output voltage.
The output can be an analog signal (A0) that can be read with an analog input of the Surilli or a digital output (D0) that can be read with a digital input of the Surilli.
While in this project we will be using analog output.
Note: Don't touch the sensor. It will be very hot.
What is Tera Term?Tera Term is one of the more popular Windows terminal programs. It's been around for years, it's open source, and it's simple to use. For Windows users, it's one of the best options out there.
You can download any version of Tera Term from the link given below:
https://osdn.net/projects/ttssh2/releases/
I am using version v 4.103 for this project.
Making a ConnectionYou should initially be presented with a "Tera Term: New connection" pop-up within the program. Here, you can select which serial port you'd like to open up. Select the "Serial" radio button. Then select your port from the drop-down menu. (If this window doesn't open when you start Tera Term, you can get here by going to: File > New connection).
That'll open up the port. Tera Term defaults to setting the baud rate at 9600 bps (8-N-1). If you need to adjust the serial settings, go up to Setup > Serial Port. You'll see a window pop up with a lot of familiar looking serial port settings. Adjust what you need to and hit "OK".
The title of your Tera Term window should change to something like "COM##:9600baud" -- now that's a good sign.
That's about all there is to it. The blank window with the blinking cursor is where data is both sent (by typing it in) and received.
Tera Term Tips and TricksLocal Echo
It can be weird to type stuff in the window and not see it show up in the terminal. It's undoubtedly still flowing through the serial terminal to your device, but it can be difficult to type when you don't have any visual feedback for exactly what you're typing. You can turn on local echo by going to the Setup menu and selecting Terminal.
Check the Local echo box if you'd like to turn the feature on.
There are other settings to be made in this window as well. You can adjust the size of the terminal (the values are in terms of characters per row/column), or adjust how new-lines are displayed (either a carriage return, line feed, or both).
Clear Buffer and Clear Screen
If you want to clear your terminal screen you can use either the "Clear buffer" or "Clear screen" commands. Both are located under the Edit menu.
Clear screen will do just that, blank out the terminal screen, but any data received will still be preserved in the buffer. Scroll up in the window to have another look at it. Clear buffer deletes the entire buffer of received data -- no more data to scroll up to.
Shortcut KeysMenus are a pain! If you want to get really fast with Tera Term, remember some of these shortcuts:
- ALT+N: Connects to a new serial port.
- ALT+I: Disconnects from the current port.
- ALT+V: Pastes text from clipboard to the serial port (not CTRL+V).
- ALT+C: Copy selected text into clipboard (not CTRL+C).
- CTRL+TAB: Switch between two Tera Term windows.
- Surilli WiFi.
- MQ2 Smoke Sensor
- Connecting wires
- Arduino IDE software
- Tera Term Tool: This software will be used to read the values from DHT11 Sensor and then store these values in Excel
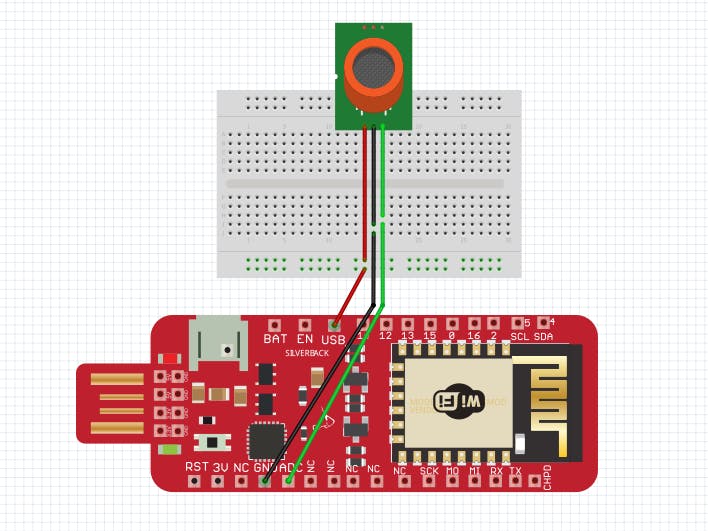
Connections between Surilli WiFi and MQ2 Smoke Sensor:
Surilli WiFi --> MQ2 Smoke Sensor
- USB Pin (5V) (Surilli WiFi) --> VCC Pin (MQ2 Smoke Sensor)
- A0 Pin (Surilli WiFi) --> A0 Pin (MQ2 Smoke Sensor)
- GND Pin (Surilli WiFi) --> GND Pin (MQ2 Smoke Sensor)
Make sure you have selected the right port, board and processor for the Surilli as shown in the picture below and it is programmable (compile and upload “Blink” from File>Examples>Digital>Blink onto your Surilli to check if everything is working fine).
Step 2: CircuitryThe circuitry is quite simple. Its mostly the programming. Follow the figure below to set up your hardware.
- Now you have completed setting up your hardware and Arduino IDE. Copy and paste the Arduino sketch given below into your Arduino IDE and hit upload.
- After the Arduino Code has been uploaded, open your "Tera Term" software, then click on "Serial". Against Serial, select the Port No by referring to your Arduino IDE Software and then click the "OK" button. After clicking on the OK button, the different analog values of MQ2 Smoke Sensor will start to appear on the black screen of your software.
- After that, click the "File" Tab on the upper part of the black screen of the software and select "Log". This will prompt you to save the analog values of MQ2 Smoke Sensor in a ".csv" format which is the extension for the Excel. Save the file with any name you want along with ".csv" and in the "Option" tab just below, check the "Time Stack" option. After that click "OK" and then you will have your values in the Excel File.
const int gasPin = A0; // GAS sensor output pin to Surilli WiFi analog A0 pin
void setup()
{
    Serial.begin(9600); // Initialize serial port - 9600 bps
}
void loop()
{
    Serial.println(analogRead(gasPin));
    delay(1000); // Prints value every 1 sec.
}
In my case, the analog values of MQ2 Smoke Sensor in Excel were recorded as follows:
Note: You can make the necessary changes / modifications in the Arduino code according to your requirements and see how it reacts to different values and logic.
That’s all for now. If you have any queries, visit surilli.io or contact our support.


Comments
Please log in or sign up to comment.