
Hardware components | ||||||
 |
| × | 1 | |||
| × | 1 | ||||
 |
| × | 1 | |||
 |
| × | 1 | |||
Software apps and online services | ||||||
 |
| |||||
| ||||||
In this tutorial, we will integrate our Surilli WiFi with MQ7 CO Gas Sensor. This MQ7 Gas sensor will help us monitor the levels of Carbon monoxide concentrations in the air. The changing values of CO concentrations will be stored in excel using a tool named "Tera Term."
Carbon monoxide (CO) is a very dangerous gas which is odorless, colorless, and tasteless, so it cannot be smelt, seen, or tasted.
Carbon monoxide is produced from the partial oxidation of carbon-containing compounds; it forms when there is not enough oxygen to produce carbon dioxide (CO), such as when operating a stove or an internal combustion engine in an enclosed space. In the presence of oxygen, including atmospheric concentrations, carbon monoxide burns with a blue flame, producing carbon dioxide. So it is really in enclosed spaces with partial oxidation of carbon products that creates the danger of carbon monoxide production in homes or in businesses.
Carbon monoxide poisoning is the most common type of fatal air poisoning in many countries. Being colorless, odorless, and tasteless, it is very hard to detect but highly toxic. Carbon monoxide is absorbed through breathing and enters the bloodstream through gas exchange in the lungs. CO combines with hemoglobin to produce carboxy hemoglobin, which usurps the space in hemoglobin that normally carries oxygen, but is ineffective for delivering oxygen to bodily tissues. This leads to oxygen deprivation, which can be deadly.
CO is measured in parts per million (ppm). To give you some perspective, the natural atmosphere is composed of 0.1 ppm. The average level in homes is 0.5-5 ppm. The level near properly adjusted gas stoves in homes and from modern vehicle exhaust emissions is 5-15 ppm. The exhaust from automobiles in Mexico City central area is 100-200 ppm. The amount of CO that can be created from the exhaust from a home wood fire is 5000ppm. Concentrations as low as 667 ppm may cause up to 50% of the body's hemoglobin to convert to carboxy hemoglobin. A level of 50% carboxy hemoglobin may result in seizure, coma, and fatality.
What Is MQ7 Gas Sensor?This carbon monoxide (CO) gas sensor detects the concentrations of CO in the air and ouputs its reading as an analog voltage. The sensor can measure concentrations of 10 to 10, 000 ppm.The sensor can operate at temperatures from -10 to 50°C and consumes less than 150 mA at 5 V.
Since this gas is considered toxic to humans at certain levels, concentration of CO is used to determine the air pollution in a given area.
There are two ways to read the output from the MQ-7. One is through the DOUT pin which gives a high when the concentration threshold is reached and low otherwise. Second is the AOUT pin gives varying voltage representing the CO concentration.
- A0 Analog output
- D0 Digital output
- GND Ground
- VCC Supply(5V)
- MQ7 Gas Sensor Module
- Surilli WiFi
- Connecting wires
- Arduino IDE software
- Tera Term Tool: This software will be used to read the values from MQ7 Gas Sensor and then store these values in Excel
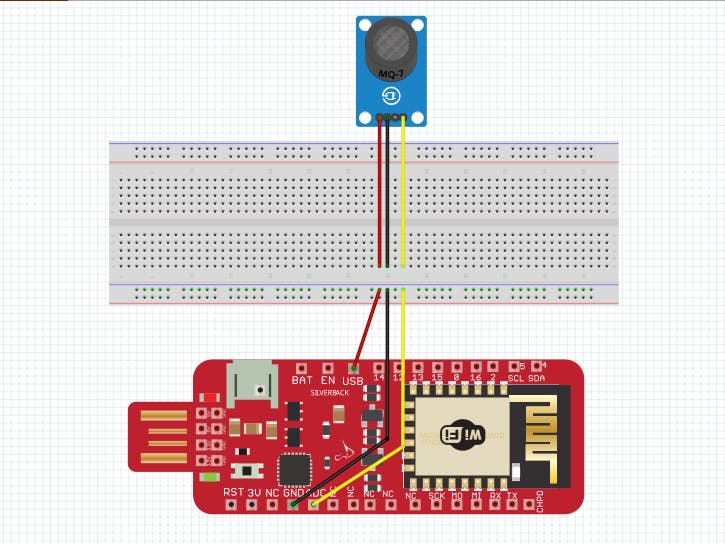
MQ7 Gas Sensor --> Surilli WiFi
- VCC PIN (MQ7 Gas Sensor) --> USB PIN (5V) (Surilli WiFi)
- GND PIN (MQ7 Gas Sensor) --> GND PIN (Surilli WiFi)
- AOUT PIN (MQ7 Gas Sensor) --> A0 PIN (Surilli WiFi)
Parts per million (PPM) is a unit of measurement used for expressing a very dilute concentration level of pollutants in the air, water and other fluids or one item in a million of anything of the same size. PPM is a volume-to-volume ratio.
Changes in temperature and pressure do not change the ratio of the volume of pollutant gas to the volume of air that contains it.
What is Tera Term?Tera Term is one of the more popular Windows terminal programs. It's been around for years, it's open source, and it's simple to use. For Windows users, it's one of the best options out there.
You can download any version of Tera Term from the link given below:
https://osdn.net/projects/ttssh2/releases/
I am using version v 4.103 for this project.
Making a ConnectionYou should initially be presented with a "Tera Term: New connection" pop-up within the program. Here, you can select which serial port you'd like to open up. Select the "Serial" radio button. Then select your port from the drop-down menu. (If this window doesn't open when you start Tera Term, you can get here by going to: File > New connection).
That'll open up the port. Tera Term defaults to setting the baud rate at 9600 bps (8-N-1). If you need to adjust the serial settings, go up to Setup > Serial Port. You'll see a window pop up with a lot of familiar looking serial port settings. Adjust what you need to and hit "OK".
The title of your Tera Term window should change to something like "COM##:9600baud" -- now that's a good sign.
That's about all there is to it. The blank window with the blinking cursor is where data is both sent (by typing it in) and received.
Tera Term Tips and TricksLocal Echo:
It can be weird to type stuff in the window and not see it show up in the terminal. It's undoubtedly still flowing through the serial terminal to your device, but it can be difficult to type when you don't have any visual feedback for exactly what you're typing. You can turn on local echo by going to the Setup menu and selecting Terminal.
Check the Local echo box if you'd like to turn the feature on.
There are other settings to be made in this window as well. You can adjust the size of the terminal (the values are in terms of characters per row/column), or adjust how new-lines are displayed (either a carriage return, line feed, or both).
Clear Buffer and Clear Screen
If you want to clear your terminal screen you can use either the "Clear buffer" or "Clear screen" commands. Both are located under the Edit menu.
Clear screen will do just that, blank out the terminal screen, but any data received will still be preserved in the buffer. Scroll up in the window to have another look at it. Clear buffer deletes the entire buffer of received data -- no more data to scroll up to.
Shortcut KeysMenus are a pain! If you want to get really fast with Tera Term, remember some of these shortcuts:
- ALT+N: Connects to a new serial port.
- ALT+I: Disconnects from the current port.
- ALT+V: Pastes text from clipboard to the serial port (not CTRL+V).
- ALT+C: Copy selected text into clipboard (not CTRL+C).
- CTRL+TAB: Switch between two Tera Term windows.
Make sure you have selected the right port, board and processor for the Surilli as shown in the picture below and it is programmable (compile and upload “Blink” from File>Examples>Digital>Blink onto your Surilli to check if every thing is working fine).
STEP 2: The CircuitryThe circuitry is very simple. It's mostly the programming. Follow the figure below to set up your hardware.
- Now you have completed setting up your hardware and Arduino IDE. Copy and paste the Arduino sketch given below into your Arduino IDE and hit upload.
- After the Arduino Code has been uploaded, open your "Tera Term" software, then click on "Serial". Against Serial, select the Port No by referring to your Arduino IDE Software and then click the "OK" button. After clicking on the OK button, the different values of CO concentrations will start to appear on the black screen of your software.
- After that, click the "File" Tab on the upper part of the black screen of the software and select "Log". This will prompt you to save the values of CO concentrations in a ".csv" format which is the extension for the Excel. Save the file with any name you want along with ".csv" and in the "Option" tab just below, check the "Time Stack" option. After that click "OK" and then you will have your values in the Excel File.
const int AOUTpin = 0; // The AOUT pin of the CO sensor goes into analog pin A0 of Surilli WiFi
int value;
void setup()
{
   Serial.begin(9600); // Sets the baud rate
   Serial.println("Date & Time, Air Quality PPM");
}
void loop()
{
  value= analogRead(AOUTpin); // Reads the analaog value from the CO sensor's AOUT pin
  Serial.print("CO value: ");
  Serial.println(value); // Prints the CO value
  delay(1000);
}
In my case, the values of CO concentrations in Excel were recorded as follows:
Note: You can make the necessary changes / modifications in the Arduino Code according to your requirements and see how it reacts to different values and logic.
That’s all for now. If you have any queries, visit surilli.io or contact our support.


Comments