

Hardware components | ||||||
 |
| × | 1 | |||
 |
| × | 1 | |||
 |
| × | 1 | |||
 |
| × | 1 | |||
 |
| × | 1 | |||
Software apps and online services | ||||||
 |
| |||||
In this tutorial, we will integrate Surilli Basic M0 with an LED and witness the blinking action of led through coding done in the Arduino Web Editor.
Hardware Required:- Surilli Basic M0
- LED x 1
- 100 ohms resistor (you can use any value of the resistor you want)
- Connecting wires
- Breadboard
- Arduino Web Editor
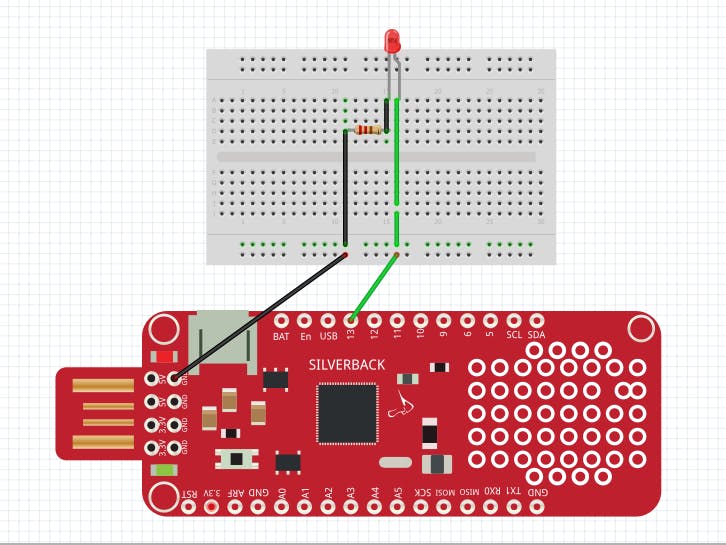
LED (Anode Pin) --> Surilli Basic M0 (PIN 13).
LED (Cathode Pin) --> Surilli Basic M0 (GND PIN).
Arduino Web Editor and the Create Platform:The Arduino Web Editor allows you to write code and upload sketches to any official Arduino board from your web browser (Chrome, Firefox, Safari and Edge). We recommend you to use Google Chrome.
This IDE (Integrated Development Environment) is part of Arduino Create an online platform that enables developers to write code, access tutorials, configure boards, and share projects. It is designed to provide users with a continuous workflow. Arduino Create connects the dots between each part of a developer's journey from inspiration to implementation which means you now have ability to manage every aspect of your project right from a single dashboard.
The Arduino Web Editor is hosted online, therefore it will always be up-to-date with the latest features and support for new boards.
This IDE or the Web Editor lets you write code and save it to the cloud, always backing it up and making it accessible from any device. It automatically recognizes any Arduino and Genuino board connected to your PC, and configures itself accordingly.
Note: An Arduino account is all you need to get started.
Arduino Web Editor Anatomy:After logging in, you are ready to start using the Arduino Web Editor. The web app is divided into three main columns.
The first column lets you to navigate between:
- Your Sketchbook: A collection of all your sketches (’sketch’ is what program / programs you upload on your board).
- Examples: Read-only sketches that demonstrate all the basic Arduino commands (built-in tab), and the behavior of your libraries (from the libraries tab).
- Libraries: Packages that can be included to your sketch to provide extra functionalities.
- Serial monitor: A feature that enables you to receive and send data to your board via the USB cable.
- Help: Helpful links and a glossary about the Arduino terms.
- Preferences: Options to customize the look and behavior of your editor, such as text size and color theme.
When selected, every menu items shows its options in a side panel (second column).
The third column, the code area, is the one you will use the most. Here, you can write code, verify it and upload it to your boards, save your sketches on the cloud, and share them with anyone you want.
What Boards Are Supported?The online IDE or the Web Editor automatically detects the kind of board and the port it is connected to without you having to individually select them.
It currently supports only Official Arduino/Genuino boards, and a few Certified and AtHeart boards. The full list of supported boards can be found out by clicking on the boards dropdown and hitting 'Select Other Board and Port'.
In this popup window you also have the freedom to select any board if you want to verify if your code works for a specific product, but you don't have it at hand. If the board you have connected is not recognized, you can also manually select it here, don't forget to also select the port.
An example is shown below:
The full list of supported hardware is displayed in the popup window below.
On the Arduino Web Editor the Serial Monitor is available on the side bar. When you click on it, a panel will be displayed.
The Serial Monitor reads the board selected at that moment in the Board dropdown. If you need to change board (for instance you have more than one board connected to your PC), just select the one you would like to read from in the dropdown. The PORT infos in the panel will be updated as a result.
If no board if connected at that time, the Serial Monitor will be greyed out and unavailable.
If you are using other programs that communicates via that port (for instance Processing or the Desktop IDE), a message saying that the "Port is used by another software" will appear.
If you wish to use the port with another software or just want the flow of output values to stop, you can press the "Disconnect" button on the panel.
Arduino Web Editor Libraries:The Arduino community has written over 700 libraries that you can include in your sketches without having to install a thing. You can browse through all of them in the Library Manager and favorite the ones you like the most. All the libraries available in the Library Manager are automatically detected, so you’ll never need to install them to get your code to compile.
Since all the contributed libraries are up on our servers, if you use them and then you share your sketch with someone, they could just add a copy of your code to their sketchbook and will be able to compile it without having to do anything else.
If you want to select a specific version of a library, look for it on the Library Manager and star it. It will show up on the the Favorite tab of the Libraries panel. From there you can select a specific version and include it to your sketch.
But what if you want to use your own custom library on the Web IDE? Just zip your custom library and click on the 'Import' button on the Library panel.
If you want to import multiple custom libraries at once you can do so by creating a single zip file which contains all of them and just import it.
The Circuitry:The circuitry is very simple. It's mostly the programming. Follow the figure below to set up your hardware.
Connect PIN 13 of Surilli Basic M0 with the LED Anode Pin whereas the LED Cathode Pin is connected to one end of the resistor and the GND Pin of Surilli Basic M0 with the second leg of the resistor.
STEP 1: Sign up to ArduinoCreate a new Arduino Account at this link. Complete the registration form, then hit the ‘Create Account’ button. You will receive an email with a link to activate your account. Select the link and a new page will open with your confirmed account information.
Note: You can also use this account to write posts on Arduino’s official Forum, buy products on the online store, add comments on the blog, as well as create tutorials on the Arduino Project Hub.
STEP 2: Log in the Arduino Web EditorOnce you have successfully registered for an Arduino account, go to create.arduino.cc/editor. After accepting the term and conditions, you should receive an email with a link to the Forum where you can report any bugs you may encounter and share your feedback.
STEP 3: Pick your Platform: Windows, Mac or LinuxThe Arduino Web Editor can run on a variety of Platforms. If you are using Windows, Mac or Linux follow a simple flow to install the Arduino Web Editor plugin, which permits you to upload sketches from the browser onto your boards.
In my case, I am running the "Arduino Create Agent" plugin on Windows platform.
Note: If you encountering an issue while installing the Plugin, open a thread on the Forum page, to troubleshoot your problem and get you up and running!
At the end of the plugin installation flow, you will be redirected to the Arduino login page to use your credentials!
Note: You will first have to open your plugin "Arduino Create Agent" before entering the credentials of the "Arduino Web Editor."
Now that you’ve set up your online IDE (Web Editor), let’s make sure your computer / laptop can talk to the Surilli Basic M0; it’s time to make sure you can upload a program.
- Double check if the Web Editor is displayed the way you like, check the Preferences panel for a few options.
- Connect your Surilli Basic M0 to your computer. Boards and serial ports are auto-discovered and selectable in a single dropdown. Pick the Arduino M0 board from the dropdown list.
- Choose ‘Examples’ on the menu on the left, then ‘Basic’ and ‘Blink’. The Blink sketch Is now displayed in the code area.
- Change the value of the 'LED_BUILTIN' in the sketch to the pin of your choosing on which you want the LED to blink. I have changed 'LED_BUILTIN' to PIN 13 as I have connected LED to Surilli Basic M0 PIN 13.
- Click the 'Check' button just to the left of the forward arrow button to verify whether your sketch has any problems or not. If not, then you are good to go with uploading with sketch onto your Surilli Basic M0 and a message 'Success: Done verifying Blink' will be displayed on the bottom end of the sketch window, otherwise correct the sketch and then upload it onto your Surilli Basic M0.
- To upload it to your Surilli Basic M0, press the ‘Upload’ button (arrow right) near the dropdown. A ‘BUSY’ label replaces the buttons during code verifying and uploading. If the upload is successful, the message “Success: Done uploading” will appear in the bottom output area.
- Once the upload is complete, you should then see the LED connected to your Surilli Basic M0 blink. If this is the case Congratulations! You have successfully programmed your Surilli Basic M0 to blink its on-board LED.
- Change the delay time by changing the number in the parenthesis to 100, and upload the Blink sketch again. Now the LED should blink much faster. Congratulations! You really are in control.
Play with the program to see how it reacts to different values and logic.
If you make something fun and interesting, do share it with our community.
That’s all for now. If you have any queries, visit surilli.io or contact our support. Stay connected with the Surilli family for more amazing stuff. :-)


Comments
Please log in or sign up to comment.