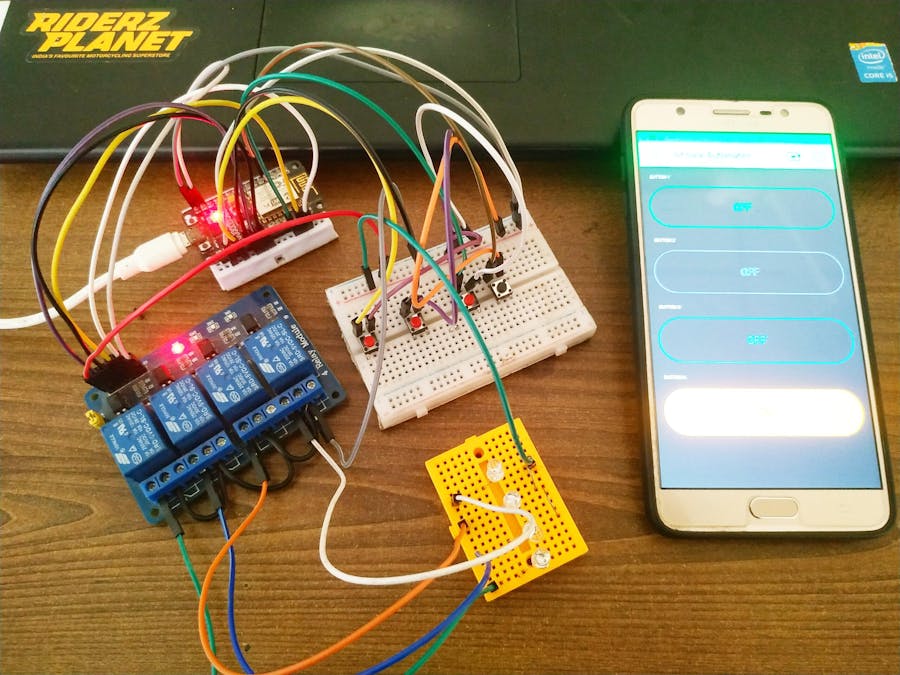
Hey geeks, Welcome back to another new post. Today we gonna make home automation using Blynk App and NodeMCU IoT development board. We can control the home appliances via the Blynk application. There is wireless communication between the Blynk app and the nodemcu. There are some relay modules that we used in our project to switch on and off the devices. For more information regarding this project please visit the original post of this project and also bookmark TECHATRONIC.COM as all my further projects and tutorials will be pre-uploaded there.
Working of the projectYou have to provide the SSID and password of the router or a hotspot in the code below. Then set up the Blynk app, we have discussed the procedure in detail below. There are pushbuttons for the appliances that we have to control so you can switch them manually too. When we tap the buttons on the Blynk app then the relevant command is sent to the nodemcu board and it will further process it and control the appliances. There is a set of predefined commands which we give to the nodemcu so that it can generate the output accordingly.
Components required:- ESP8266 NodeMCU board
- Relay module (4 in 1)
- LED(s) (for demonstration only)
- A phone with Blynk App installed
- Push Buttons
- Jumper Wires
- Breadboard
Caution: relay module uses 220V/110V AC supply so handle it with care.
Code for the projectNOTE: Please upload this code to the nodemcu.
//TECHATRONIC.COM
// BLYNK LIBRARY
// https://github.com/blynkkk/blynk-library
// ESP8266 LIBRARY
// https://github.com/ekstrand/ESP8266wifi
//#define BLYNK_PRINT Serial
#include <BlynkSimpleEsp8266.h>
// define the GPIO connected with Relays and switches
#define RelayPin1 5 //D1
#define RelayPin2 4 //D2
#define RelayPin3 14 //D5
#define RelayPin4 12 //D6
#define SwitchPin1 10 //SD3
#define SwitchPin2 0  //D3
#define SwitchPin3 13 //D7
#define SwitchPin4 3  //RX
#define wifiLed  16  //D0
#define VPIN_BUTTON_1  V1
#define VPIN_BUTTON_2  V2
#define VPIN_BUTTON_3  V3
#define VPIN_BUTTON_4  V4
int toggleState_1 = 1; //Define integer to remember the toggle state for relay 1
int toggleState_2 = 1; //Define integer to remember the toggle state for relay 2
int toggleState_3 = 1; //Define integer to remember the toggle state for relay 3
int toggleState_4 = 1; //Define integer to remember the toggle state for relay 4
int wifiFlag = 0;
#define AUTH "Auth KEY" // You should get Auth Token in the Blynk App.
#define WIFI_SSID "yourwifissid           //Enter Wifi Name
#define WIFI_PASS "yourwifipassword"          //Enter wifi Password
BlynkTimer timer;
void relayOnOff(int relay){
switch(relay){
case 1:
if(toggleState_1 == 1){
digitalWrite(RelayPin1, LOW); // turn on relay 1
toggleState_1 = 0;
Serial.println("Device1 ON");
}
else{
digitalWrite(RelayPin1, HIGH); // turn off relay 1
toggleState_1 = 1;
Serial.println("Device1 OFF");
}
delay(100);
break;
case 2:
if(toggleState_2 == 1){
digitalWrite(RelayPin2, LOW); // turn on relay 2
toggleState_2 = 0;
Serial.println("Device2 ON");
}
else{
digitalWrite(RelayPin2, HIGH); // turn off relay 2
toggleState_2 = 1;
Serial.println("Device2 OFF");
}
delay(100);
break;
case 3:
if(toggleState_3 == 1){
digitalWrite(RelayPin3, LOW); // turn on relay 3
toggleState_3 = 0;
Serial.println("Device3 ON");
}
else{
digitalWrite(RelayPin3, HIGH); // turn off relay 3
toggleState_3 = 1;
Serial.println("Device3 OFF");
}
delay(100);
break;
case 4:
if(toggleState_4 == 1){
digitalWrite(RelayPin4, LOW); // turn on relay 4
toggleState_4 = 0;
Serial.println("Device4 ON");
}
else{
digitalWrite(RelayPin4, HIGH); // turn off relay 4
toggleState_4 = 1;
Serial.println("Device4 OFF");
}
delay(100);
break;
default : break;
}
}
void with_internet(){
//Manual Switch Control
if (digitalRead(SwitchPin1) == LOW){
delay(200);
relayOnOff(1);
Blynk.virtualWrite(VPIN_BUTTON_1, toggleState_1);  // Update Button Widget
}
else if (digitalRead(SwitchPin2) == LOW){
delay(200);
relayOnOff(2);
Blynk.virtualWrite(VPIN_BUTTON_2, toggleState_2);  // Update Button Widget
}
else if (digitalRead(SwitchPin3) == LOW){
delay(200);
relayOnOff(3);
Blynk.virtualWrite(VPIN_BUTTON_3, toggleState_3);  // Update Button Widget
}
else if (digitalRead(SwitchPin4) == LOW){
delay(200);
relayOnOff(4);
Blynk.virtualWrite(VPIN_BUTTON_4, toggleState_4);  // Update Button Widget
}
}
void without_internet(){
//Manual Switch Control
if (digitalRead(SwitchPin1) == LOW){
delay(200);
relayOnOff(1);
}
else if (digitalRead(SwitchPin2) == LOW){
delay(200);
relayOnOff(2);
}
else if (digitalRead(SwitchPin3) == LOW){
delay(200);
relayOnOff(3);
}
else if (digitalRead(SwitchPin4) == LOW){
delay(200);
relayOnOff(4);
}
}
BLYNK_CONNECTED() {
// Request the latest state from the server
Blynk.syncVirtual(VPIN_BUTTON_1);
Blynk.syncVirtual(VPIN_BUTTON_2);
Blynk.syncVirtual(VPIN_BUTTON_3);
Blynk.syncVirtual(VPIN_BUTTON_4);
}
// When App button is pushed - switch the state
BLYNK_WRITE(VPIN_BUTTON_1) {
toggleState_1 = param.asInt();
digitalWrite(RelayPin1, toggleState_1);
}
BLYNK_WRITE(VPIN_BUTTON_2) {
toggleState_2 = param.asInt();
digitalWrite(RelayPin2, toggleState_2);
}
BLYNK_WRITE(VPIN_BUTTON_3) {
toggleState_3 = param.asInt();
digitalWrite(RelayPin3, toggleState_3);
}
BLYNK_WRITE(VPIN_BUTTON_4) {
toggleState_4 = param.asInt();
digitalWrite(RelayPin4, toggleState_4);
}
void checkBlynkStatus() { // called every 3 seconds by SimpleTimer
bool isconnected = Blynk.connected();
if (isconnected == false) {
wifiFlag = 1;
digitalWrite(wifiLed, HIGH); //Turn off WiFi LED
}
if (isconnected == true) {
wifiFlag = 0;
digitalWrite(wifiLed, LOW); //Turn on WiFi LED
}
}
void setup()
{
Serial.begin(9600);
pinMode(RelayPin1, OUTPUT);
pinMode(RelayPin2, OUTPUT);
pinMode(RelayPin3, OUTPUT);
pinMode(RelayPin4, OUTPUT);
pinMode(wifiLed, OUTPUT);
pinMode(SwitchPin1, INPUT_PULLUP);
pinMode(SwitchPin2, INPUT_PULLUP);
pinMode(SwitchPin3, INPUT_PULLUP);
pinMode(SwitchPin4, INPUT_PULLUP);
//During Starting all Relays should TURN OFF
digitalWrite(RelayPin1, toggleState_1);
digitalWrite(RelayPin2, toggleState_2);
digitalWrite(RelayPin3, toggleState_3);
digitalWrite(RelayPin4, toggleState_4);
WiFi.begin(WIFI_SSID, WIFI_PASS);
timer.setInterval(3000L, checkBlynkStatus); // check if Blynk server is connected every 3 seconds
Blynk.config(AUTH);
}
void loop()
{
if (WiFi.status() != WL_CONNECTED)
{
Serial.println("WiFi Not Connected");
}
else
{
Serial.println("WiFi Connected");
Blynk.run();
}
timer.run(); // Initiates SimpleTimer
if (wifiFlag == 0)
with_internet();
else
without_internet();
}Download Blynk App from any Appstore.
After you open it and login in it, you will see this type of main screen interface
Now create a new project.
This is how your main interface will look after completing all setup.
We hope that you like this project. Thanks for reading.
HAPPY LEARNING!


_ztBMuBhMHo.jpg?auto=compress%2Cformat&w=48&h=48&fit=fill&bg=ffffff)


_3u05Tpwasz.png?auto=compress%2Cformat&w=40&h=40&fit=fillmax&bg=fff&dpr=2)
Comments
Please log in or sign up to comment.