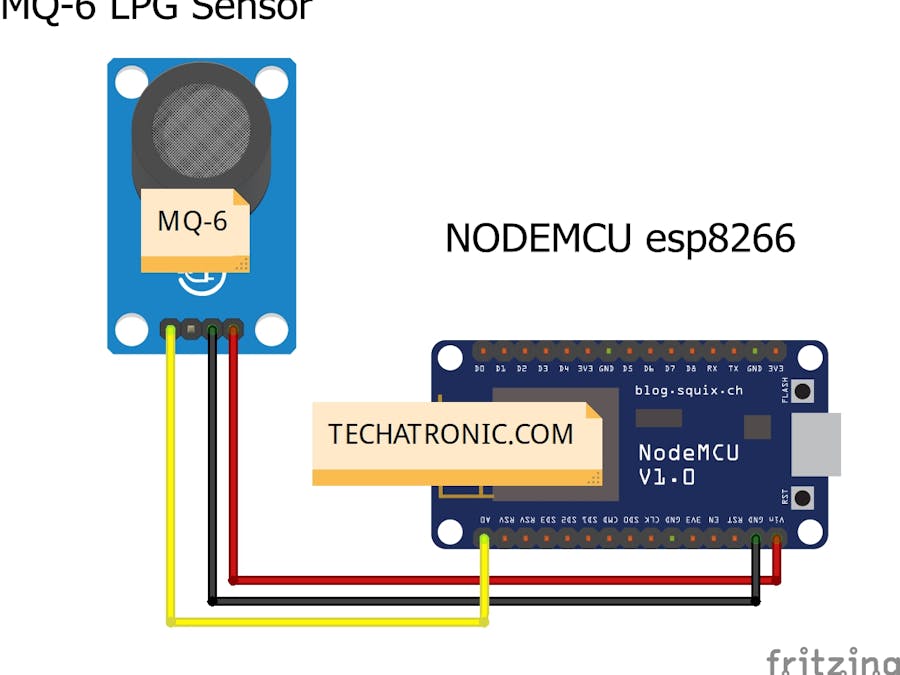
Hi Guys, Hope you are doing fine. Today we are going to make the Blynk LPG Detector project. The project that we are making is very useful as it detects gas leakage and alerts us. For making this we are going to use an MQ6 gas sensor. This sensor is capable of detecting the LPG gas that is highly flammable. You can read the full article on our website.
Working of the Blynk LPG detectorActually, it measures the resistance between its two probes. The operating voltage of this sensor is 5 volts. There is a heater inside the metal mesh that heats up the sensor a little and then checks resistance. When the concentration of the LPG gas is increasing in the air then you will get an alert notification on the app. This can prevent accidents that occur due to gas leakage,
Material Required:- NodeMCU (ESP8266 MOD)
- MQ-6 sensor
- Breadboard
- Jumper wires
- Blynk App installed on a device with Wi-Fi connection
NOTE: Please upload this code to the nodemcu.
//TECHATRONIC.COM
// BLYNK LIBRARY
// https://github.com/blynkkk/blynk-library
// ESP8266 LIBRARY
// https://github.com/ekstrand/ESP8266wifi
#include <ESP8266WiFi.h>
#include <BlynkSimpleEsp8266.h>
#include <SimpleTimer.h>
#define BLYNK_PRINT Serial    // Comment this out to disable prints and save space
char auth[] = "your-auth-code"; //Enter Authentication code sent by Blynk

char ssid[] = "your-wifi-ssid"; //Enter WIFI Name
char pass[] = "your-wifi-password"; //Enter WIFI Password

SimpleTimer timer;

int mq6 = A0; // LPG sensor MQ -6 is connected with the analog pin A0
int data = 0;
void setup()
{
Serial.begin(115200);
Blynk.begin(auth, ssid, pass);
timer.setInterval(1000L, getSendData);
}

void loop()
{
timer.run(); // Initiates SimpleTimer
Blynk.run();
}

void getSendData()
{
data = analogRead(mq6);
Blynk.virtualWrite(V2, data); // Blynk INPUT Connect V2 Pin

if (data > 700 )
{
Blynk.notify("LPG Detected!");
}

}Download the Blynk app from any App Store and log in to the App with any of your social accounts. Remember, the email id which is registered will be used to send Auth-Code for upcoming projects.
After this, you’ll reach the main interface of the App through which you’ll create a new project. Now click on New Project for creating a new project.
Now enter a name using which you’ll create the project as shown in above. Here I’ve used ‘LPG Detector’.
Auth-Code will be sent to the registered email-id which you’ve used at the time of registering on the app. Copy that code and put it in the code defined above for NodeMCU.
Now click on the+ symbol to add widgets that will be used to show values, and then follow the steps as shown below.
Follow theabove steps and create an interface like below. But carefully set all the settings for each button. You may change the pin for connecting the sensor.
With this, you’ve completed the App task and are now good to go for the final task.
We hope that you like this project and also do check out more projects on Arduino.
HAPPY LEARNING!


_ztBMuBhMHo.jpg?auto=compress%2Cformat&w=48&h=48&fit=fill&bg=ffffff)


Comments
Please log in or sign up to comment.