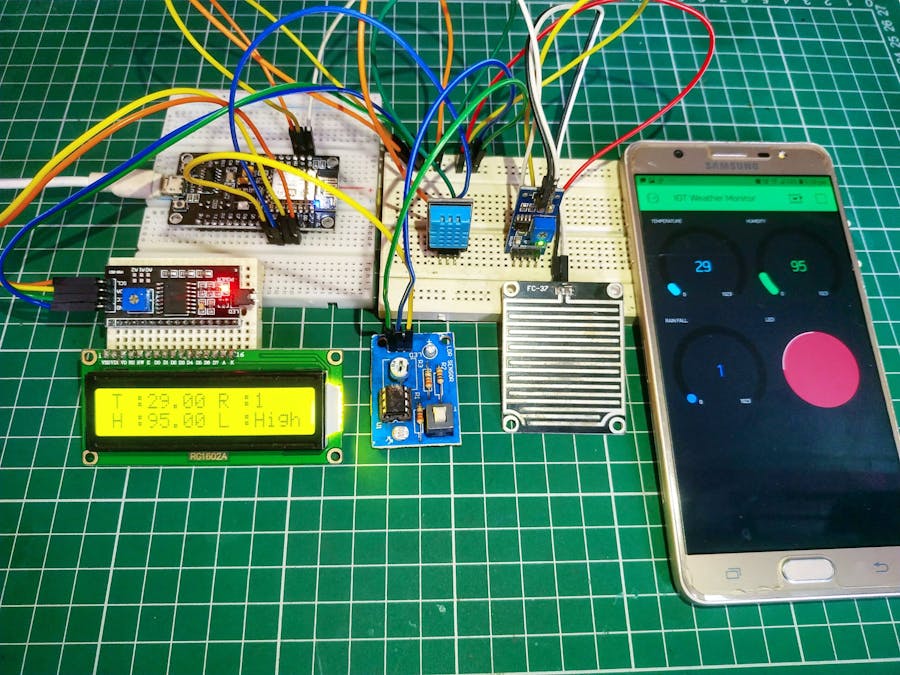
Hi Folks, hope you are doing fine. I am back with another interesting post on IoT which is IoT Weather Monitoring System. This is like a mini weather station that can tell us the weather conditions in our nearby environment. It can calculate the temperature, humidity in our local area. It can also detect if there is rain outside or not. We are using multiple sensors with an esp8266 nodemcu board that can able to collect the data and upload it wirelessly to the cloud storage platform. For more information about this project visit the original post of this project also bookmark TECHATRONIC.COM as all my further projects and tutorials will be pre-uploaded there.
Working of the IoT Weather Monitoring SystemWe are using some sensors with the nodemcu such as the DHT-11 sensor, Rain sensor, and LDR sensor. The DHT-11 sensor is used to calculate the temperature and humidity values in the environment. It has three pins and is generally operated on a 5 volts supply. Then we have a raindrop sensor that can detect the rain and send the signals to the nodemcu. We are using an LDR sensor that is a light-dependent register so that the system can tell us that if there is day or night. All the captured data is displayed on a 16x2 LCD as well as on the Blynk app also.
Material Required:- NodeMCU (EP8266 MOD)
- DHt11
- Rain Sensor
- LDR Sensor
- 16×2 LCD with I2C module
- Breadboard
- Jumper Wires
- Blynk App with Wi-Fi connection
NOTE: You have to upload the code which is given below to the nodemcu.
// TECHATRONIC.COM
// I2C LIBRARY
// https://github.com/fdebrabander/Arduino-LiquidCrystal-I2C-library
// BLYNK LIBRARY
// https://github.com/blynkkk/blynk-library
// ESP8266 LIBRARY
// https://github.com/ekstrand/ESP8266wifi
// Adafruit DHT sensor library:
// https://github.com/adafruit/DHT-sensor-library

#include <LiquidCrystal_I2C.h>
#define BLYNK_PRINT Serial
#include <ESP8266WiFi.h>
#include <BlynkSimpleEsp8266.h>
#include <DHT.h>
LiquidCrystal_I2C lcd(0x3F, 16, 2);
// IF IN LCD IS NOT PRINTED ANY THING THEN CHANGE THIS VALUE 0x3F TO 0x27
DHT dht(D3, DHT11); //(sensor pin,sensor type)
BlynkTimer timer;
char auth[] = " Your-auth-code"; //Enter the Auth code which was send by Blink
char ssid[] = "your-wifi-ssid";  //Enter your WIFI Name
char pass[] = "your-wifi-password";  //Enter your WIFI Password
void weather() {
float h = dht.readHumidity();
float t = dht.readTemperature();
int r = analogRead(A0);
bool l = digitalRead(D4);
r = map(r, 0, 1023, 100, 0);
if (isnan(h) || isnan(t)) {
Serial.println("Failed to read from DHT sensor!");
return;
}
Blynk.virtualWrite(V0, t);  //V0 is for Temperature
Blynk.virtualWrite(V1, h);  //V1 is for Humidity
Blynk.virtualWrite(V2, r);  //V2 is for Rainfall
if (l == 0) {
WidgetLED led1(V3);
led1.on();
lcd.setCursor(9, 1);
lcd.print("L :");
lcd.print("High");
lcd.print(" ");
} else if (l == 1) {
WidgetLED led1(V3);
led1.off();
lcd.setCursor(9, 1);
lcd.print("L :");
lcd.print("Low");
lcd.print(" ");
}
lcd.setCursor(0, 0);
lcd.print("T :");
lcd.print(t);
lcd.setCursor(0, 1);
lcd.print("H :");
lcd.print(h);
lcd.setCursor(9, 0);
lcd.print("R :");
lcd.print(r);
lcd.print("  ");
}
void setup() {
Serial.begin(9600); // See the connection status in Serial Monitor
lcd.begin();
lcd.backlight();
Blynk.begin(auth, ssid, pass);
dht.begin();
// Setup a function to be called every second
timer.setInterval(10L, weather);
}
void loop() {
Blynk.run(); // Initiates Blynk
timer.run(); // Initiates SimpleTimer
}Download the blynk application and then install it.
Log in to the App using any of your social accounts and email-id.
Now create a New Project with your preferred name. Here I have used ‘IoT weather Monitoring’.
Then follow the screenshots given below.
We hope that you understand this project completely. Thanks for reading.
HAPPY LEARNING!


_ztBMuBhMHo.jpg?auto=compress%2Cformat&w=48&h=48&fit=fill&bg=ffffff)


Comments
Please log in or sign up to comment.