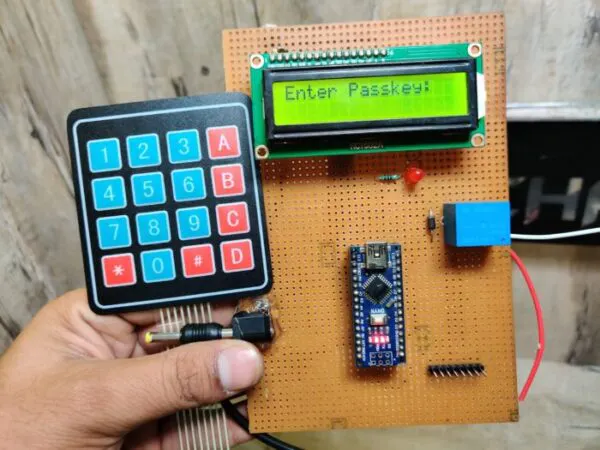
Hey guys, hope you are doing fine. Today we are going to share a very good project that is Password based door lock system using Arduino with Keypad. In this project, we are using a keypad as we have to enter the passcode so that the system grants us access. You can use this project in your homes and offices. This is a very good and strong security system. We are sharing all the details like thecircuit and code along with the images of this project for your convenience.
Working of the projectConnect the 5 volts adapter to the circuit so that Arduino can start working. We are also sharing the code and circuit diagram for this project. There is a solenoidal lock connected with the relay module and controlled by the Arduino. If you want to open the door then enter the passcode and you can also see the values on a 16x2 LCD display that we use here. There is a pre-defined passcode in the system so when someone enters the key the system will start comparing that data with the input data and if both are the same then the door will open else the door will not open until you enter the correct key.
Components Required to make Password based door lock system using Arduino- Arduino Nano
- Arduino nano cable
- LED
- 220-ohm Resistor
- 5V Relay
- Solenoid lock
- Zero PCB
- Soldering Iron
- Soldering Wire
- Hookup wire.
- 16×2 LCD
Keypad Arduino Circuit Diagram:-
Code for the project:NOTE: Please upload this code to the Arduino and also install the required libraries to the software.
#include <Keypad.h>
#include<LiquidCrystal.h>
#include<EEPROM.h>
#define led A3
#define buzzer A4
LiquidCrystal lcd(7,6,5,4,3,2);
char password[4];
char pass[4],pass1[4];
int i=0;
char customKey=0;
const byte ROWS = 4; //four rows
const byte COLS = 4; //four columns
char hexaKeys[ROWS][COLS] = {
{'1','2','3','A'},
{'4','5','6','B'},
{'7','8','9','C'},
{'*','0','#','D'}
};
byte rowPins[ROWS] = {A0, A1, 8, 9}; //connect to the row pinouts of the keypad
byte colPins[COLS] = {10, 11, 12, 13}; //connect to the column pinouts of the keypad
//initialize an instance of class NewKeypad
Keypad customKeypad = Keypad( makeKeymap(hexaKeys), rowPins, colPins, ROWS, COLS);
void setup()
{
lcd.begin(16,2);
pinMode(led, OUTPUT);
pinMode(buzzer, OUTPUT);
pinMode(1, OUTPUT);
//  pinMode(m12, OUTPUT);
lcd.print(" Electronic ");
lcd.setCursor(0,1);
lcd.print(" Keypad Lock ");
delay(2000);
lcd.clear();
lcd.print("Enter Ur Passkey:");
lcd.setCursor(0,1);
for(int j=0;j<4;j++)
EEPROM.write(j, j+49);
for(int j=0;j<4;j++)
pass[j]=EEPROM.read(j);
}
void loop()
{
customKey = customKeypad.getKey();
if(customKey=='#')
change();
if (customKey)
{
password[i++]=customKey;
lcd.print(customKey);
beep();
}
if(i==4)
{
delay(200);
for(int j=0;j<4;j++)
pass[j]=EEPROM.read(j);
if(!(strncmp(password, pass,4)))
{
digitalWrite(1, HIGH
);
digitalWrite(led, HIGH);
beep();
lcd.clear();
lcd.print("Passkey Accepted");
delay(2000);
lcd.setCursor(0,1);
lcd.print("#.Change Passkey");
delay(2000);
lcd.clear();
lcd.print("Enter Passkey:");
lcd.setCursor(0,1);
i=0;
digitalWrite(led, LOW);
digitalWrite(1, LOW);
}
else
{
digitalWrite(buzzer, HIGH);
lcd.clear();
lcd.print("Access Denied...");
lcd.setCursor(0,1);
lcd.print("#.Change Passkey");
delay(2000);
lcd.clear();
lcd.print("Enter Passkey:");
lcd.setCursor(0,1);
i=0;
digitalWrite(buzzer, LOW);
}
}
}
void change()
{
int j=0;
lcd.clear();
lcd.print("UR Current Passk");
lcd.setCursor(0,1);
while(j<4)
{
char key=customKeypad.getKey();
if(key)
{
pass1[j++]=key;
lcd.print(key);
beep();
}
key=0;
}
delay(500);
if((strncmp(pass1, pass, 4)))
{
lcd.clear();
lcd.print("Wrong Passkey...");
lcd.setCursor(0,1);
lcd.print("Better Luck Again");
delay(1000);
}
else
{
j=0;
lcd.clear();
lcd.print("Enter New Passk:");
lcd.setCursor(0,1);
while(j<4)
{
char key=customKeypad.getKey();
if(key)
{
pass[j]=key;
lcd.print(key);
EEPROM.write(j,key);
j++;
beep();
}
}
lcd.print(" Done......");
delay(1000);
}
lcd.clear();
lcd.print("Enter Ur Passk:");
lcd.setCursor(0,1);
customKey=0;
}
void beep()
{
digitalWrite(buzzer, HIGH);
delay(20);
digitalWrite(buzzer, LOW);
}
You can also view the video tutorial of this projectIf you want to learn more about this project and also want to read the full working of this project step by step then please click here.
Thanks for reading.


Comments