


Hardware components | ||||||
| × | 1 | ||||
| × | 1 | ||||
 |
| × | 1 | |||
Software apps and online services | ||||||
| ||||||
| ||||||
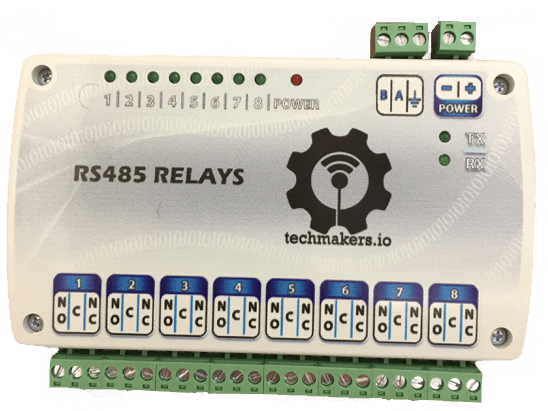
In this project, we decided to show you how simple it is to control a relay board with our Rotilio board. To develop the project is necessary to have a Rotilio Maker and a relay board RS485 not modbus. The relay board used by us is a USB no Modbus 12v RS485 with 8 relays on-board, you will find all the necessary information on Techmakers.io.
Create on the particle online IDE a new app (e.g., RS485_8_RELAY) and continue on to the code section the RS485_relays_board_control.ino file content.
Connect Rotilio to RS485 relay boardFirst, you need to connect the RS485 serial port of Rotilio with the serial port of the relay board. In this case we have chosen to connect Rotilio and the relay board with gray cable that is grounded, the orange wire is the connection A and the white wire connection B.
After connecting the two serial, connect to the electrical current Rotilio and the relay board.
On the mobile application of particle iOS or Android we can create an account or make a log in order to proceed with the acquisition of the photon.
After you have logged in, register a new Photon through the mobile interface and follow the directions of Particle to connect first to the WiFi generated by Photon.
The next step allows you to connect to the desired photon Wi-Fi thereby completing the operation of ownership.
We return to the particle online IDE where we have previously copied the file RS485_relays_board_control.ino and click on the flash and transfer it to the Photon.
The firmware allows you to turn on all the LEDs from position 1 to 8 and turn them off 8 to 1, with an interval of one second.


Comments
Please log in or sign up to comment.