


Hardware components | ||||||
| × | 1 | ||||
 |
| × | 1 | |||
Software apps and online services | ||||||
 |
| |||||
 |
| |||||
 |
| |||||
Hand tools and fabrication machines | ||||||
 |
| |||||
 |
| |||||
In a previous project, I had configured a raspberry-pi 5 to host Apache which served up the temperature of the Pi's CPU for my Home Assistant Machine to scrape and report to the dashboard (https://www.hackster.io/Tom-DeCircle/home-assistant-rasperry-pi-5-custom-sensor-9a4101). This project should be a bit simpler on the software end as I'll use an ESP32-C3 from Seeed Studio to host a web server which reports the distance of the water from an Ultrasonic sensor in my basement sump pit. I'll then get Home Assistant to scrape the page and show the data on my Home Assistant Dashboard.
Theory of OperationOur sump pit works by collecting water from the drain-tile that surrounds the exterior of our house's foundation and then pumps the water through PVC pipes out to the back of our property. If the pump ever fails, the basement could flood in the event of extended or extreme precipitation events outside. We currently use a water alarm located at the top of the pit which will trigger a siren and a phone notification in the even that water completes it's circuit. To add another layer of security and to create a smarter home, I'll add the ability to monitor the water level of the sump pit and report the information to the Home Assistant Dashboard.
The HC-SR04 is well suited for this application as it measures distance to an object through ultrasonic pulses. The module does some on board signal processing before it returns an echo signal after being initialized by the trigger signal. The echo signal pulse-length corresponds to the distance an object is from the sensor. The below image shows the Trigger signal coming from the ESP32-C3 pin D4. The length of the Echo pulse on ESP32-C3 pin D5 encodes the distance to an object. The longer the pulse is, the farther away the object is.
The image below shows the raw signals before any signal processing is taking place by the module. The module calculates the time between the burst and the echo to determine the distance. This distance is then converted to a pulse length which is proportional to the distance to an object - as shown in the previous picture.
The below image shows an 8 x pulse 40kHz signal going out.
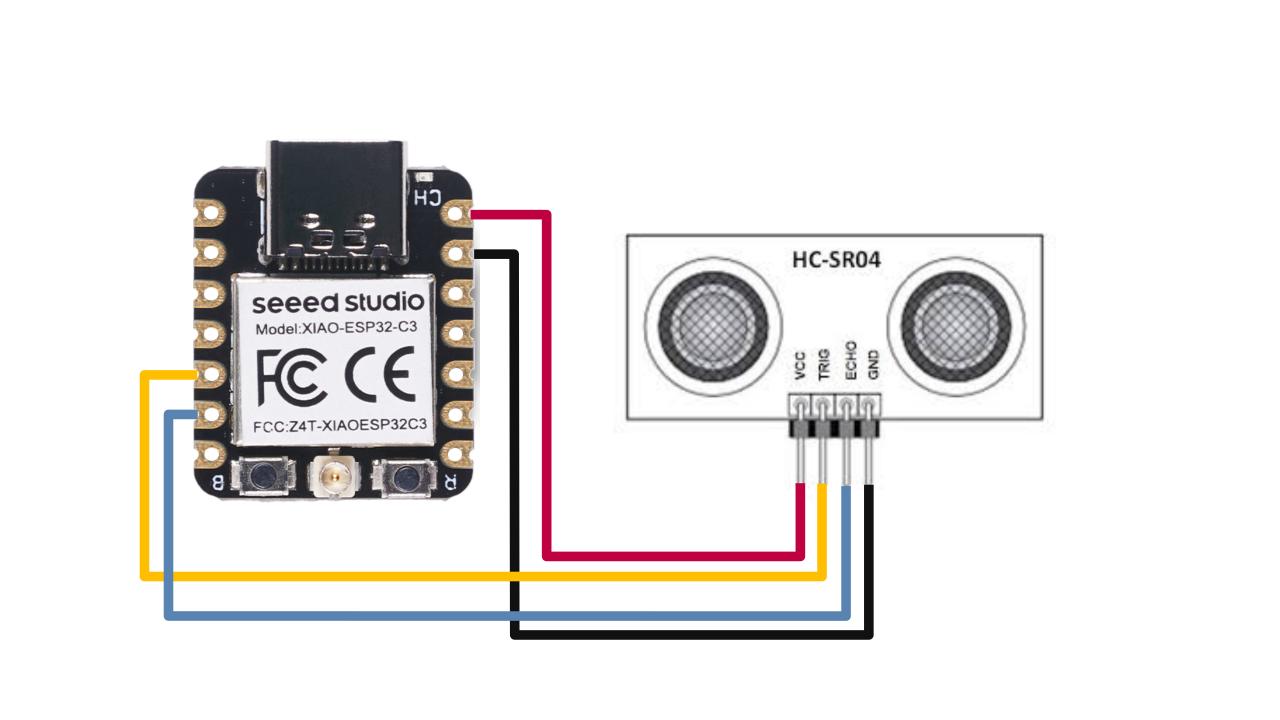
In this application, I'll deploy the HC-SR04 Ultrasonic distance module and connect it to the ESP32-C3 from Seeed Studio. The sensor will look down through an opening in the cover and play a 40KHz square wave through it's speaker. The sensor then listens for the echo to bounce off the top of the water in the pit. Distance can then be determined by calculating the amount of time that passed between the burst and the echo based off the speed of sound in air.
A side diagram of the setup shows the 40KHz pulse that the sensor outputs which then echos off the water and back into the microphone of the sensor.
The HC-SR04 should be wired with the following pinout.
- Vcc = 5V
- Trig = D4
- Echo = D5
- GND = GND
If you're using linux, you can download the Arduino IDE app-image.
https://www.arduino.cc/en/software
Right click on the app-image and make file executable.
Navigate to Tools -->Board: --> Boards Manager...
Install the esp32 Boards from the Boards Manager window shown below
Set the upload speed to 115200.
Use the provided arduino sketch.
/*
Script for monitoring the water level of a sump-pit in a basement.
The distance from the sensor is reported in cm. The ESP32-C3 will make
multiple measurements and store these values in an array, The contents of the array
are averaged together to handle measurement noise. The average distance value is
then published to a website where a raspberry-pi or Home Assistant can scrape
the page and report the value to our Home Assistant dashboard.
Tom DeCircle
5/9/2024
*/
#include <WiFi.h>
#include <WebServer.h>
#include <DistanceSensor.h>
// Wifi Constants
const char* ssid = "YOURWIFI";
const char* password = "YOURPASSWORD";
//HC-SR04 Pins
const int echoPin = D5;
const int trigPin = D4;
//LCV for while loop
int i = 1;
float distance[10];
float sum;
float avg;
// Start the sensor
DistanceSensor sensor(trigPin, echoPin);
//Start the wifi-server
WiFiServer server(80);
void setup() {
// Begin reporting data to the serial port
Serial.begin(9600);
delay(10);
// Connect to a WiFi network
Serial.println();
Serial.println();
Serial.print("Connecting to ");
Serial.println(ssid);
WiFi.begin(ssid, password);
// Staying in a loop until WiFi is connected
while (WiFi.status() != WL_CONNECTED) {
delay(500);
Serial.print("Connecting to WiFi...");
}
Serial.println("");
Serial.println("WiFi connected.");
Serial.println("IP address: ");
Serial.println(WiFi.localIP());
// Host a web page
server.begin();
Serial.println("HTTP server started");
}
void loop() {
// Loop control variable
i++;
// Check if i exceeds the distance array size
if (i >= 10) {
i = 0;    // Reset i to 0
}
// Send the trigger signal and wait for the echo. Write the value to an array indexed by the LCV 'i'
distance[i]= sensor.getCM();
// Sum the elements of the distance array
sum = distance[1] + distance[2] + distance[3] + distance[4] + distance[5] + distance[6] + distance[7] + distance[8] + distance[9] + distance[10];
// Average the the sum
avg = sum / 10;  // Calculate average after incrementing i
// //-----Comment or UnComment this section for debugging-----------------------------
// // Print the first 5 elements to terminal
// Serial.print("Distance[1] = ");
// Serial.print(distance[1]);
// Serial.print("  Distance[2] = ");
// Serial.print(distance[2]);
// Serial.print("  Distance[3] = ");
// Serial.print(distance[3]);
// Serial.print("  Distance[4] = ");
// Serial.print(distance[4]);
// Serial.print("  Distance[5] = ");
// Serial.print(distance[5]);
// // Print the value of sum
// Serial.print("   Sum = ");
// Serial.print(sum);
// // Print the value of avg
// Serial.print("   Avg = ");
// Serial.println(avg);
// // Slow down the terminal otherwise ESP-32 will lock up and can't be programmed
// delay(100);
//-------------------------------------------------------------------------------------
WiFiClient client = server.accept();  // listen for incoming clients
if (client) {                     // if you get a client,
Serial.println("New Client.");  // print a message out the serial port
String currentLine = "";        // make a String to hold incoming data from the client
while (client.connected()) {    // loop while the client's connected
if (client.available()) {     // if there's bytes to read from the client,
char c = client.read();     // read a byte
// if the current line is blank, you got two newline characters in a row.
// that's the end of the client HTTP request, so send a response:
if (currentLine.length() == 0) {
// HTTP headers always start with a response code (e.g. HTTP/1.1 200 OK)
// and a content-type so the client knows what's coming, then a blank line:
client.println("HTTP/1.1 200 OK");
client.println("Content-type:text/html");
client.println();
// the content of the HTTP response follows the header:
client.print("Distance Measurement =");
client.print(avg);
client.print("cm");
// The HTTP response ends with another blank line:
client.println();
// break out of the while loop:
break;
}
}
// close the connection:
client.stop();
Serial.println("Client Disconnected.");
}
}
sum = 0;  // Reset sum
}Upload the sketch to the board and view the serial monitor:
I've opted to comment out the diagnostic distance information from the serial terminal since the data will be written to a web page each time we connect with a web browser.
Next, use a web browser and navigate to the IP address reported by the ESP32-C3. The data will be updated each time a client connects. Since Home Assistant will scrape the page 1 time per minute, the web page will update with the average value of the distance sensor once per minute.
To get this data from the web page to our dashboard in Home Assistant, I'll drop all information from the web page other than the raw numerical value.
Next I'll modify the source code of the configuration.yaml in home assistant using the built-in Studio Code Server.
sensor:
- platform: rest
name: "RPi-Home-Assistant CPU Temperature"
resource: http://192.168.4.137/cpu_data/temperature.txt
value_template: "{{ value | float }}"
unit_of_measurement: "°C"
scan_interval: 60
- platform: rest
name: "Sump-Pit Water Distance from Top"
resource: http://192.168.4.168
value_template: "{{ value | float }}"
unit_of_measurement: "cm"
scan_interval: 15
Restart Home Assistant and add the card to you dashboard of choice by selecting it in the entities.
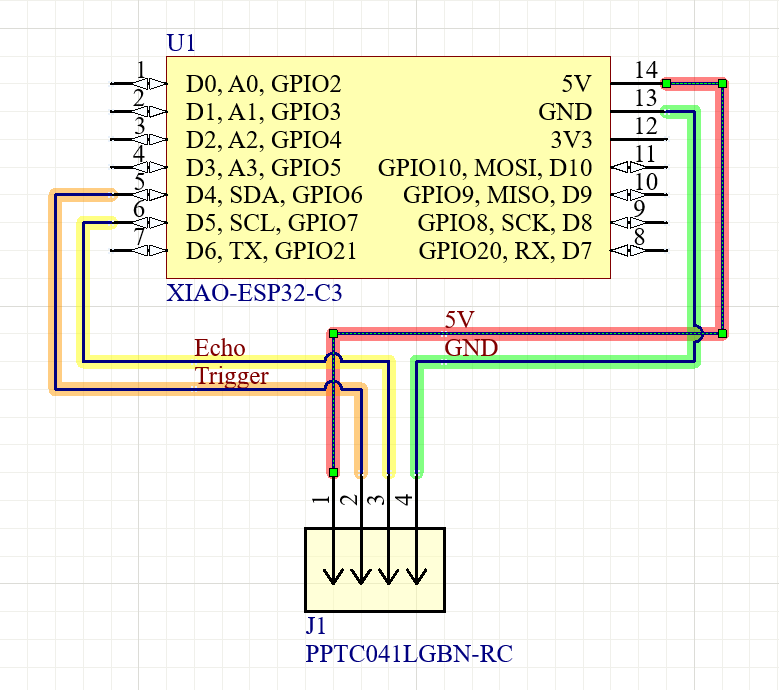
Using Altium Designer, we can create a custom board which uses the ESP32-C3 as a Through-Hole or Surface Mount Device.
J1 can be a surface-mount or through-hole right-angle connector with 100mil pitch.
There are many different mounting configurations for the UltraBdv1.
- The ESP32-C3 can be mounted with through-hole pins or surface mounted with the castellated edge connector
- The HC-SR04 can be mounted directly to the UltraBdv1
- The HC-SR04 can also be mounted using a right-angle through-hole or surface-mounted 100mil pitch female header
By using the mezzanine card, our measurements will be more accurate, as the system is less vulnerable to noise since there are no fly-wires hanging between the micro-controller and the sensor.


Comments