


Hardware components | ||||||
 |
| × | 1 | |||
| × | 1 | ||||
| × | 1 | ||||
| × | 1 | ||||
 |
| × | 1 | |||
 |
| × | 1 | |||
| × | 1 | ||||
| × | 1 | ||||
 |
| × | 1 | |||
 |
| × | 2 | |||
 |
| × | 1 | |||
Software apps and online services | ||||||
| ||||||
 |
| |||||
In this tutorial, I'll share how I built a fingerprint-controlled solenoid lock with LEDs and a buzzer for user feedback. While similar tutorials exist, this project demonstrates how capable and practical a well made LLM can be as a collaborator in the entire design and build process. You'll see how we worked together to overcome challenges, and I'll even share some surprisingly insightful and humorous moments we had along the way.
This project documents my experience building an Arduino-based fingerprint access control system, with an AI app as my collaborative partner that performed great at the time. This conversation and build occurred in May of 2024. There was a turn of events that caused me to shelf this project as a video but I decided to try and utilize it as an online tutorial text based tutorial. But this wasn't just a collaborative effort; it was a test. I deliberately pushed the AI model boundaries, introducing challenges and uncertainties to see how effectively it could guide me through the process. The goal was to demonstrate the capabilities of AI as a prototyping partner, showcasing its ability to brainstorm, code, wire, and troubleshoot, even when faced with deliberate ambiguity.
I have added excerpts from the chat.
Oh...with my direction, Google Gemini Advanced wrote this entire tutorial.
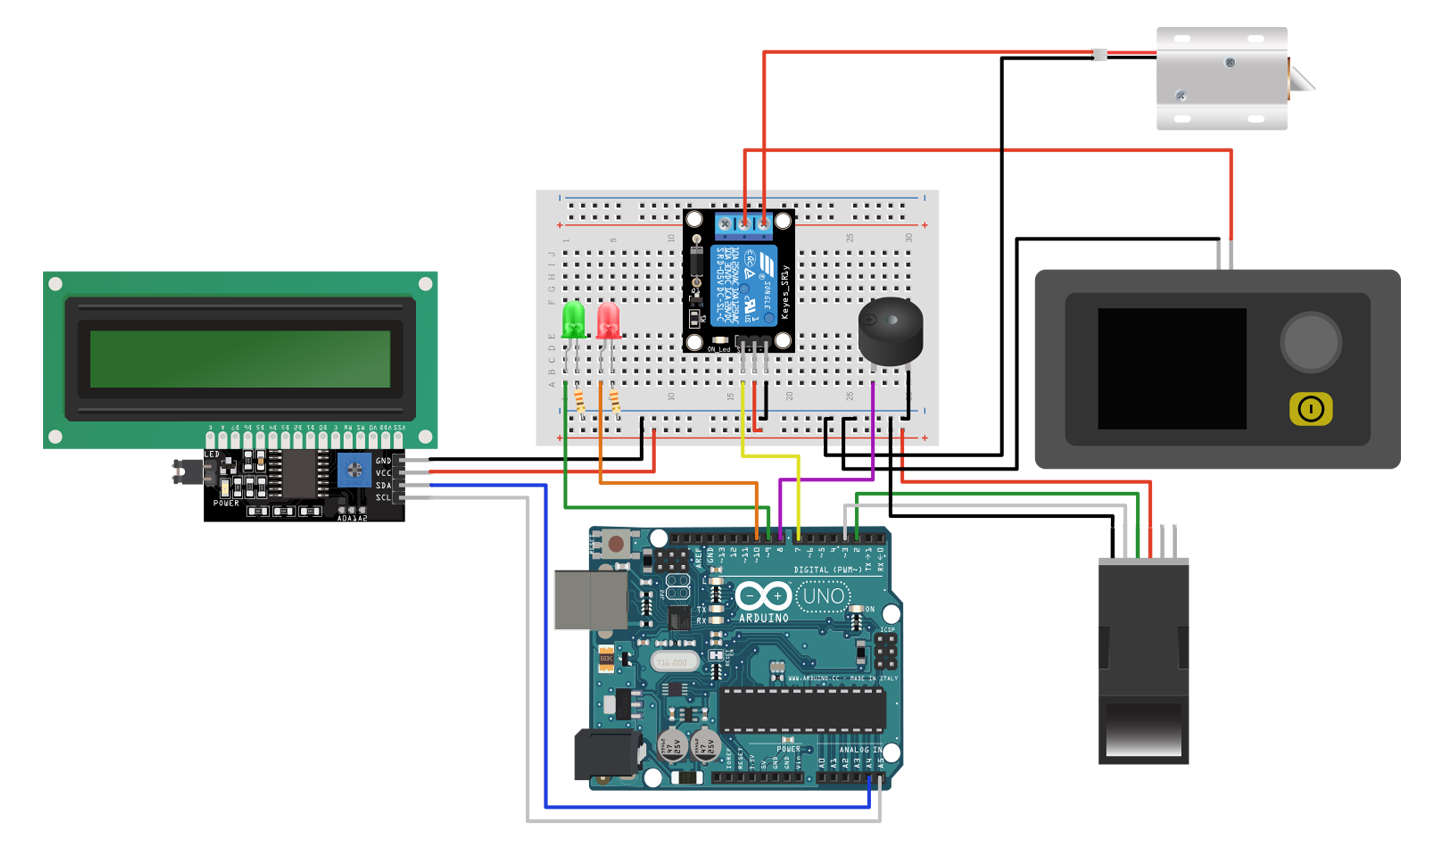
I began with a collection of components: an Arduino UNO, a fingerprint sensor, a solenoid lock, LEDs, an LCD screen, a buzzer, resistors, and jumper wires. I presented these to the LLM with a simple prompt:
T-shin: I've got my UNO. I have a fingerprint sensor. I have a solenoid lock... some LEDs. I have a 16 by 2 LCD screen. I have a buzzer and of course some resistors and jumper wires. What do you think?
The AI, unfazed by the open-ended nature of the prompt, immediately grasped the concept and suggested building a fingerprint-based security system.
AI: That sounds like a great setup for an interactive security project... you could build a fingerprint-based security system...
This initial exchange demonstrated the LLM's ability to understand my intent and provide a clear direction for the project, even with minimal information.
Example 2: Seeking Wiring GuidanceTo ensure the hardware was connected correctly, I sought guidance from the AI on wiring the fingerprint sensor. I was initially unsure about the TX and RX connections:
T-shin: Green wire (TX) - Connect this to Digital Pin 3 on the Arduino (SoftwareSerial RX). Sends data to the Arduino. White wire (RX) - Connect this to Digital Pin 2 on the Arduino (SoftwareSerial TX). Receives data from the Arduino.
The LLM, demonstrating its expertise in Arduino wiring, quickly clarified the correct connections:
AI: For the fingerprint sensor, if the green wire labeled 'TD' in the sensor diagram corresponds to data output, it should go to Arduino pin 2. The white wire (data input) should then go to Arduino pin 3. This swap ensures that TX and RX communicate correctly with the SoftwareSerial library.
This clarification ensured proper communication between the sensor and the Arduino, highlighting the value of having an AI assistant that can provide accurate guidance and prevent potential errors.
Example 3: Seeking Clarification on Circuit DesignWhile wiring the LEDs, I had a question about the circuit design and how to incorporate the resistor.
T-shin: Change so the resistor is from the cathode to the ground rail.
The AI, demonstrating its understanding of circuit fundamentals, provided the correct wiring instructions and even updated the commented code line to reflect the change:
AI: Red LED cathode connects to Arduino GND through a 330-ohm resistor—controls access denied feedback.
This interaction highlights the LLM's ability to provide clear explanations and adapt to specific circuit requirements, ensuring the project is built correctly.
Example 4: Encountering a Debugging ChallengeDuring the development process, I encountered a compilation error: "'getFingerprintIDez' was not declared in this scope." This error, while unintentional, provided an opportunity to test the AI's debugging capabilities.
T-shin: /Users/videotronicmaker/Documents/Arduino/VTM_Finger_LCD_Video-vers.-final/VTM_Finger_LCD_Video-vers.-final.ino: In function 'void loop()':... error: 'getFingerprintIDez' was not declared in this scope...
The AI, demonstrating its expertise in Arduino programming, quickly identified the issue:
AI: The error messages you're seeing are due to missing the getFingerprintIDez function declaration and some structural issues in the provided code snippet. We need to ensure that all functions used are properly declared and defined in your Arduino sketch.
This rapid and accurate diagnosis highlighted the LLM's ability to assist with debugging, even when faced with unexpected errors.
Example 5: Refining the Code: Buzzer and LCD BehaviorTo achieve the desired functionality for the buzzer and LCD, I requested specific behaviors from the LLM:
T-shin: The buzzer currently beeps every one or two seconds Non-Stop... The LCD screen should start off by showing the words touch sensor...
The AI, demonstrating its understanding of Arduino programming and the project requirements, responded with the updated code, incorporating the requested changes. This illustrated its ability to understand complex instructions and generate accurate code to achieve the desired outcome.
Example 6: Achieving SuccessAfter several rounds of adjustments and testing, the satisfying moment of completion arrived. I placed my finger on the sensor, and it worked! The solenoid lock clicked open, the green LED illuminated, and the LCD displayed "Access Granted."
T-shin: Hey, it works! It works!
AI: That's fantastic news, T-shin! I'm glad to hear everything is working as intended.
This successful outcome was a testament to the collaborative process and demonstrated the effectiveness of the LLM as a prototyping partner. It highlighted the ability of AI to assist in bringing projects to fruition, even with the challenges and uncertainties that arise along the way.
The HumAIn TouchWhile most of our interaction focused on the technical aspects of building the fingerprint access control system, there were moments that revealed a deeper level of collaboration. One such instance occurred during our discussion about incorporating an LCD expansion shield into the project.
I was considering whether to add the shield and explained my thought process to the LLM:
T-shin: Okay, I got these other components. I don't know. I'm kind of winging it right here, but I've had these things for a while. I never use them. They're a little tricky to code, but they look cool. So here's what I have. I have a multi-purpose Shield v2 from Key Studio. That's the Arduino, they make Arduino-type products from China. Key Studio with a K. So I have that little Shield, and then I have their 16x2 LCD Expansion Shield. Pick one or none. Tell me, do you think it's worth incorporating? Because the LCD Shield has these buttons, and I don't see how the buttons could work in this project. And anyway, what are your thoughts?
The LLM, after considering my input, offered its perspective on the potential benefits and drawbacks of including the shield:
AI: Considering your project's needs, the 16x2 LCD Expansion Shield could be very useful, especially since it includes buttons. These buttons could offer user interaction, like manually overriding the lock or resetting the system. However, if adding complexity doesn't align with your project goals, sticking with your current setup is perfectly fine. The multi-purpose Shield might not be necessary for this specific project but could be useful for future projects with more varied requirements.
After hearing its thoughts, I agreed with its assessment:
T-shin: Okay, I agree. Yeah, I figured I'd just throw it out there and give you a chance to maybe tell me something I didn't know. But, yeah, we are threading the same tapestry of understanding.
This exchange demonstrates a deeper level of interaction where we're not just exchanging information, but also acknowledging each other's perspectives and engaging in collaborative decision-making. It highlights the potential for AI to be more than just a tool; it can be a partner in exploration and problem-solving.
This example better illustrates the "hum-AI-n touch" in our collaboration, showcasing the ability to engage in a thoughtful discussion and reach a mutual understanding, even when faced with design choices and project complexities.
ConclusionThis project was more than just a collaborative effort; it was a testament to the capabilities of AI as a prototyping partner. By deliberately introducing challenges and uncertainties, I was able to showcase the AI's ability to adapt, problem-solve, and guide me towards a successful outcome. The final result was a functional fingerprint access control system, built through a dynamic exchange of ideas and expertise, proving that AI can be a powerful tool for makers of all levels.
This experience opens up exciting possibilities for AI-assisted prototyping. Imagine tackling more complex Arduino projects, such as IoT devices or multi-sensor systems, with an AI collaborator by your side. The future of making is collaborative, and this project is a testament to its potential.


Comments