


Hardware components | ||||||
 |
| × | 1 | |||
| × | 1 | ||||
| × | 1 | ||||
 |
| × | 1 | |||
| × | 1 | ||||
| × | 1 | ||||
| × | 1 | ||||
Software apps and online services | ||||||
 |
| |||||
| ||||||
This project is a Smart Greenhouse Automation System designed to optimize the growth environment for vegetables using an ESP32 microcontroller. The system automates essential greenhouse functions such as watering, ventilation, and environmental monitoring. It integrates various sensors and actuators, with data visualization and remote monitoring capabilities through Adafruit IO.
Features:- LDR Sensor: Measures ambient light intensity to control lighting.
- Two DHT Sensors: Monitors temperature and humidity both inside and outside the greenhouse.
- Two Soil Moisture Sensors: Assesses soil moisture levels to automate irrigation.
- 4-Channel Relay Module: Controls a water pump, ventilation fan, and two additional actuators as needed.
- TFT Display: Displays real-time data for temperature, humidity, soil moisture, and light intensity.
- Adafruit IO Cloud Integration: Provides remote monitoring and control, allowing you to access and manage the greenhouse from anywhere.
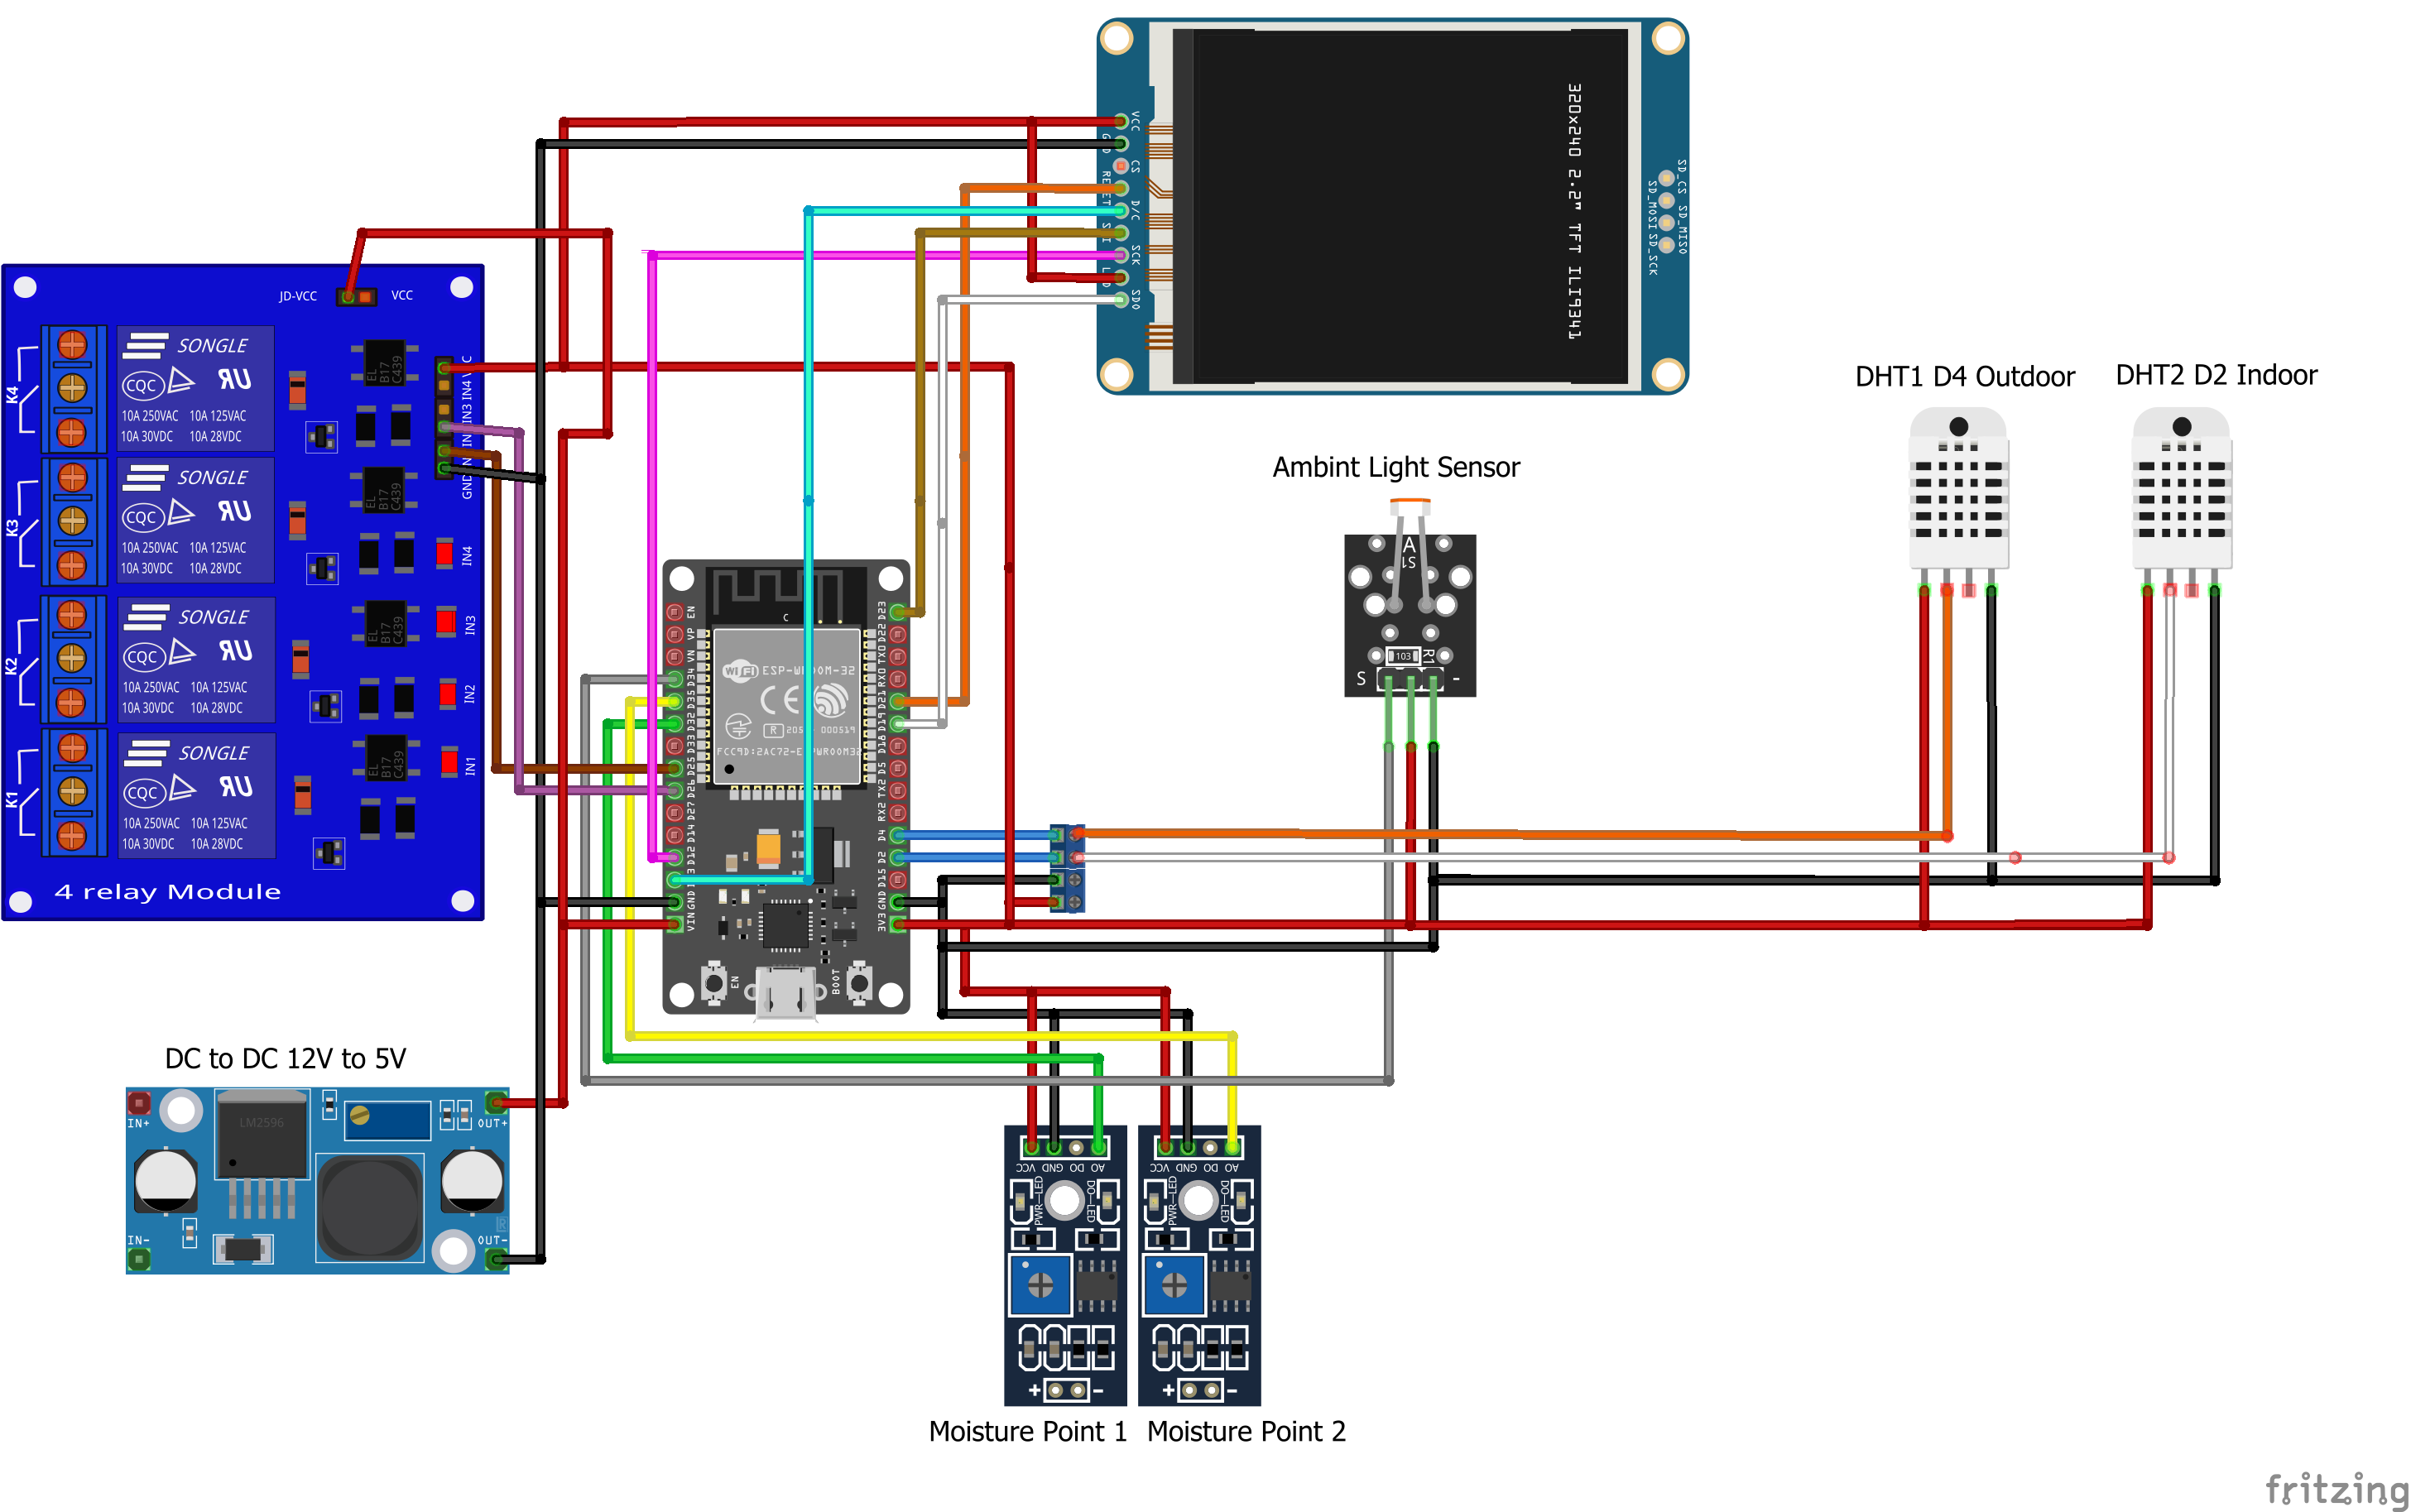
To create the circuit, connect the components as follows:
- LDR Sensor: Connect the LDR sensor to the ESP32's ADC pin (e.g., GPIO34) for light intensity readings.
- DHT22 Sensors: Connect one DHT22 to GPIO2 (indoor) and the other to GPIO4 (outdoor) for temperature and humidity data.
- Soil Moisture Sensors: Connect the first soil moisture sensor to GPIO32 and the second to GPIO35.
- Relay Module: Connect the relay inputs to GPIO12, GPIO14, GPIO26, and GPIO25 on the ESP32. Connect the relay outputs to the water pump, ventilation fan, and any additional actuators.
- TFT Display: Connect the TFT display to the ESP32 using the SPI protocol, with pins connected according to your specific display module.
- Power Supply: Ensure that all components are powered correctly. The ESP32 can be powered via USB or an external 5V power supply.
Setting Up Adafruit IO:
- Create an account on Adafruit IO.
- Set up feeds for temperature, humidity, soil moisture, and light intensity.
- Create a dashboard to visualize the data in real-time.
ESP32 Code:
The attached code controls a greenhouse monitoring and automation system using an ESP8266. It connects to Wi-Fi and Adafruit's MQTT server to publish environmental data like temperature, humidity, light, and soil moisture from sensors. The system subscribes to MQTT topics to control a fan and pump remotely. It also uses an ILI9341 display to show real-time sensor readings and status. The code handles MQTT connections, reads sensor data, maps values, and updates the display accordingly. The WiFiManager library manages Wi-Fi connections, simplifying setup.
The feeds are used to interact with different data channels in an IoT setup using the MQTT protocol. These feeds allow you to send and receive data from various sensors or control devices through the Adafruit IO platform. Here's a breakdown of the feeds used in the code:
1. Adafruit_MQTT_Publish dataT
Description: This feed is responsible for publishing (sending) temperature data to Adafruit IO.
Usage: The code will push temperature readings to this feed, allowing the temperature data to be stored or visualized on the Adafruit IO platform.
2. Adafruit_MQTT_Publish dataH
Description: Similar to dataT, this feed publishes humidity data.
Usage: Humidity readings from a sensor are sent to this feed, making the data available on Adafruit IO.
3. Adafruit_MQTT_Publish dataL
Description: This feed is used to publish Ambient Light data.
Usage: Ambient Light data from a sensor is pushed to this feed, where it can be monitored or logged via Adafruit IO.
4. Adafruit_MQTT_Publish dataP1and dataP2
Description: This feed handles the publishing of Moisture Sensors data.
Usage: Moisture sensor readings are sent to this feed for tracking and analysis on Adafruit IO.
5. Adafruit_MQTT_Subscribe Fan
Description: This feed is for subscribing (listening) to data about the state of a fan.
Usage: The code listens to this feed to determine whether to turn the fan on or off based on commands or conditions set on the Adafruit IO platform. For example, if the fan needs to be turned on or off remotely, a message can be sent to this feed, and the device will act accordingly.
6. Adafruit_MQTT_Subscribe Pump
Description: This feed subscribes to data controlling the pump.
Usage: The code listens to this feed to control the pump's operation, turning it on or off based on commands received through Adafruit IO.
Project OperationInitial Setup:
- Power on the ESP32 and ensure all components are properly connected.
- The system will automatically connect to Wi-Fi and Adafruit IO.
- Sensor data will be displayed on the TFT screen and uploaded to the Adafruit IO dashboard.
Automated Control:
- The water pump will activate when soil moisture is below a certain threshold.
- The ventilation fan will operate when the indoor temperature exceeds the set point.
- Additional actuators can be controlled based on user-defined conditions.
Remote Monitoring:
- Access the Adafruit IO dashboard to monitor real-time sensor data from anywhere.
- Adjust settings and control actuators remotely through the dashboard if needed.


Comments
Please log in or sign up to comment.