I felt in love instantly with this gorgeous RGB LED matrix panel and wanted to do something with it, and what better than an awesome PONG clock that I could hang on my wall?
You need TinyGo, so you can compile and run Go programs on different microcontrollers, such as the BBC micro:bit, Arduino Uno or Adafruit Circuit Express Playground and Itsybitsy. There are installation instructions for Linux, Windows, macOS and even Docker.
You also will need Golang (installation instructions)
Finally to download the clock's code, run the following on a terminal:
go get -u github.com/conejoninja/pongclock
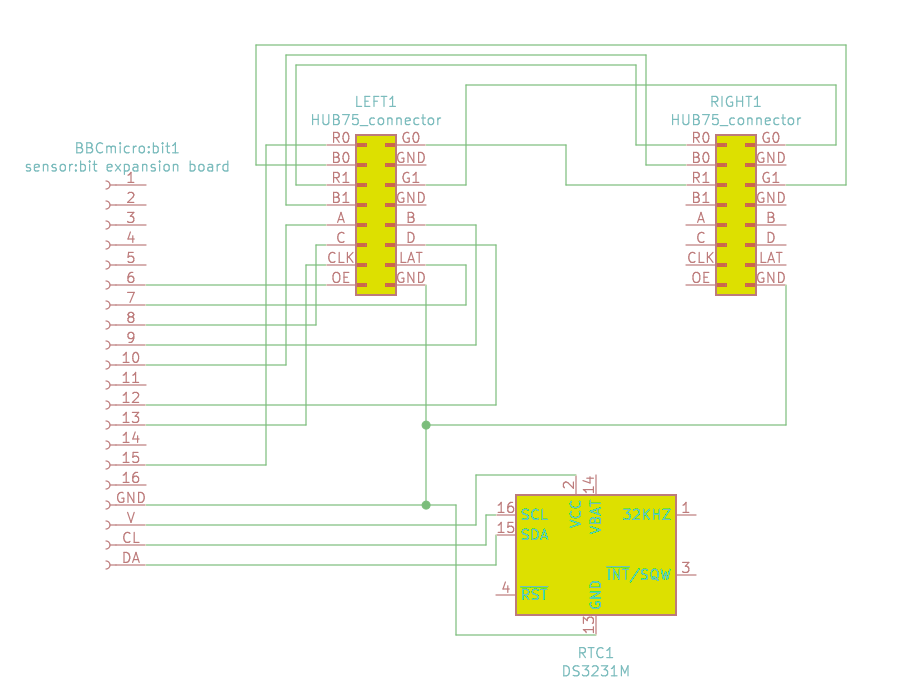
There are a few pins that need to be connected. The easy part is connecting the DS3231 through the I²C interface of the sensor:bit expansion board, in case there's any doubt:
Connecting the micro:bit to the LED matrix is a bit more messy, you could use female-female Dupont wires, but after a while of testing and playing they tend to be disconnected. I put together some female header and solder some wires as the following tables.
First, in case your matrix don't have labels on the pins, you could use this table of the 2x8 connector (the notch should be on the left):
Next, the matrix-micro:bit connection:
Then the matrix to itself, left connector could be labeled as "data_in" and right connector as "data_out", without this, only half matrix will work:
Finally you need to power both, the matrix through its POWER connector and your micro:bit via micro USB. You probably received a power cable with your matrix that you could use with a power source. This example use less than 1A, but it you decide to enable all LEDs white at max brightness, the matrix will consume ~4A, so be careful.
Step 3 - Flash the code to the micro:bitOnce everything is installed and connected, flashing the code to your micro:bit it's as simple as running the following command on a terminal
tinygo flash -target=microbit -port=/dev/ttyACM0 github.com/conejoninja/pongclock
And voilà! You got your PONG-style clock.


_1x_bGT19vVAby.png?auto=compress%2Cformat&w=40&h=40&fit=fillmax&bg=fff&dpr=2)

Comments