In this tutorial we will learn how to control high voltage devices using a relay module.
Components needed- HW-383 relay
- Jumper cables
- Arduino Uno board
- Light bulb
- IR Remote Control
- IR Receiver
A relay is a switch which is electrically operated by an electromagnet. This relay has two channels. This means it can control two high voltage devices. There are other models with 1, 4, and 8 channels. The relay has two sides. One connects to the high voltage device and the other side connects to the Arduino. The side that controls the high voltage device has 3 pins. The common pin (COM), normally open pin (NO), and normally closed pin (NC).
- COM: The common pin
- NC (Normally Closed): The normally closed configuration is used when you want the relay to be closed by default, this means that the current is flowing unless you send a signal from the Arduino to open the circuit.
- NO (Normally Open): The normally open configuration works the other way around: the relay is always open, so this means that the circuit is broken and the current is not flowing unless you send a signal from the Arduino to close the circuit (this is the configuration we will use).
If you just want to light up a lamp occasionally, it is better to use a normally-open circuit configuration.
Now let’s talk about the side that connects to the Arduino. This side has a set of four pins and a set of three pins. The set of four pins has VCC which is for power, GND, which is for ground, and IN1 and IN2 which is the pin that controls the relay switch to turn high voltage device on or off.
The set of three pins has GND, VCC, and JD-VCC. As you can see, the VCC and the JD-VCC is covered with a jumper cap. The JD-VCC pin powers the relay’s electromagnet. With the jumper cap on, the VCC and JD-VCC pins are connected. That means the relay electromagnet is directly powered from the Arduino’s power pin. Without the jumper cap, you need to provide a separate power source to power up the relay’s electromagnet through the JD-VCC pin.
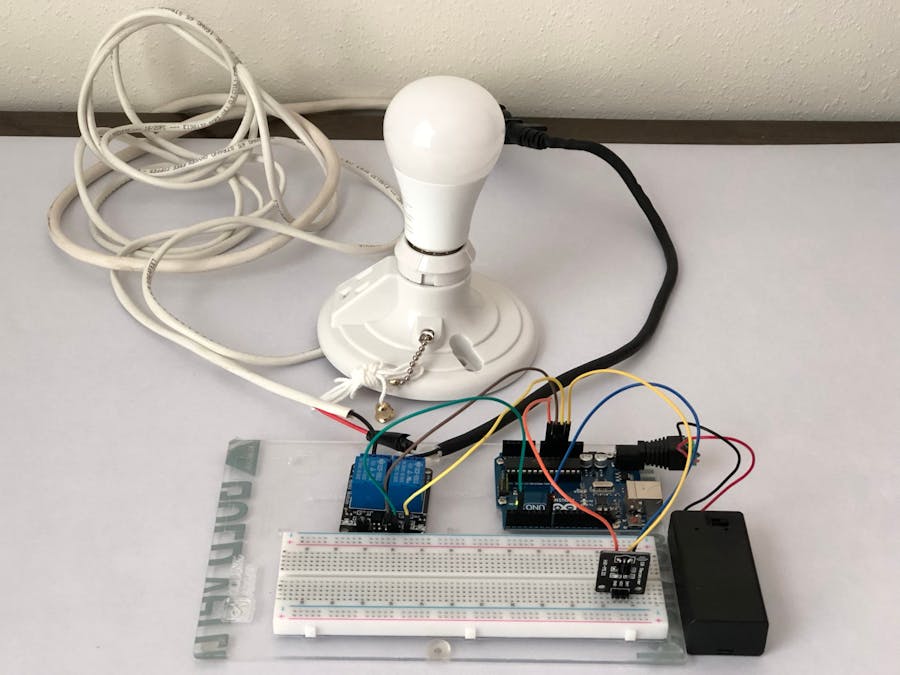
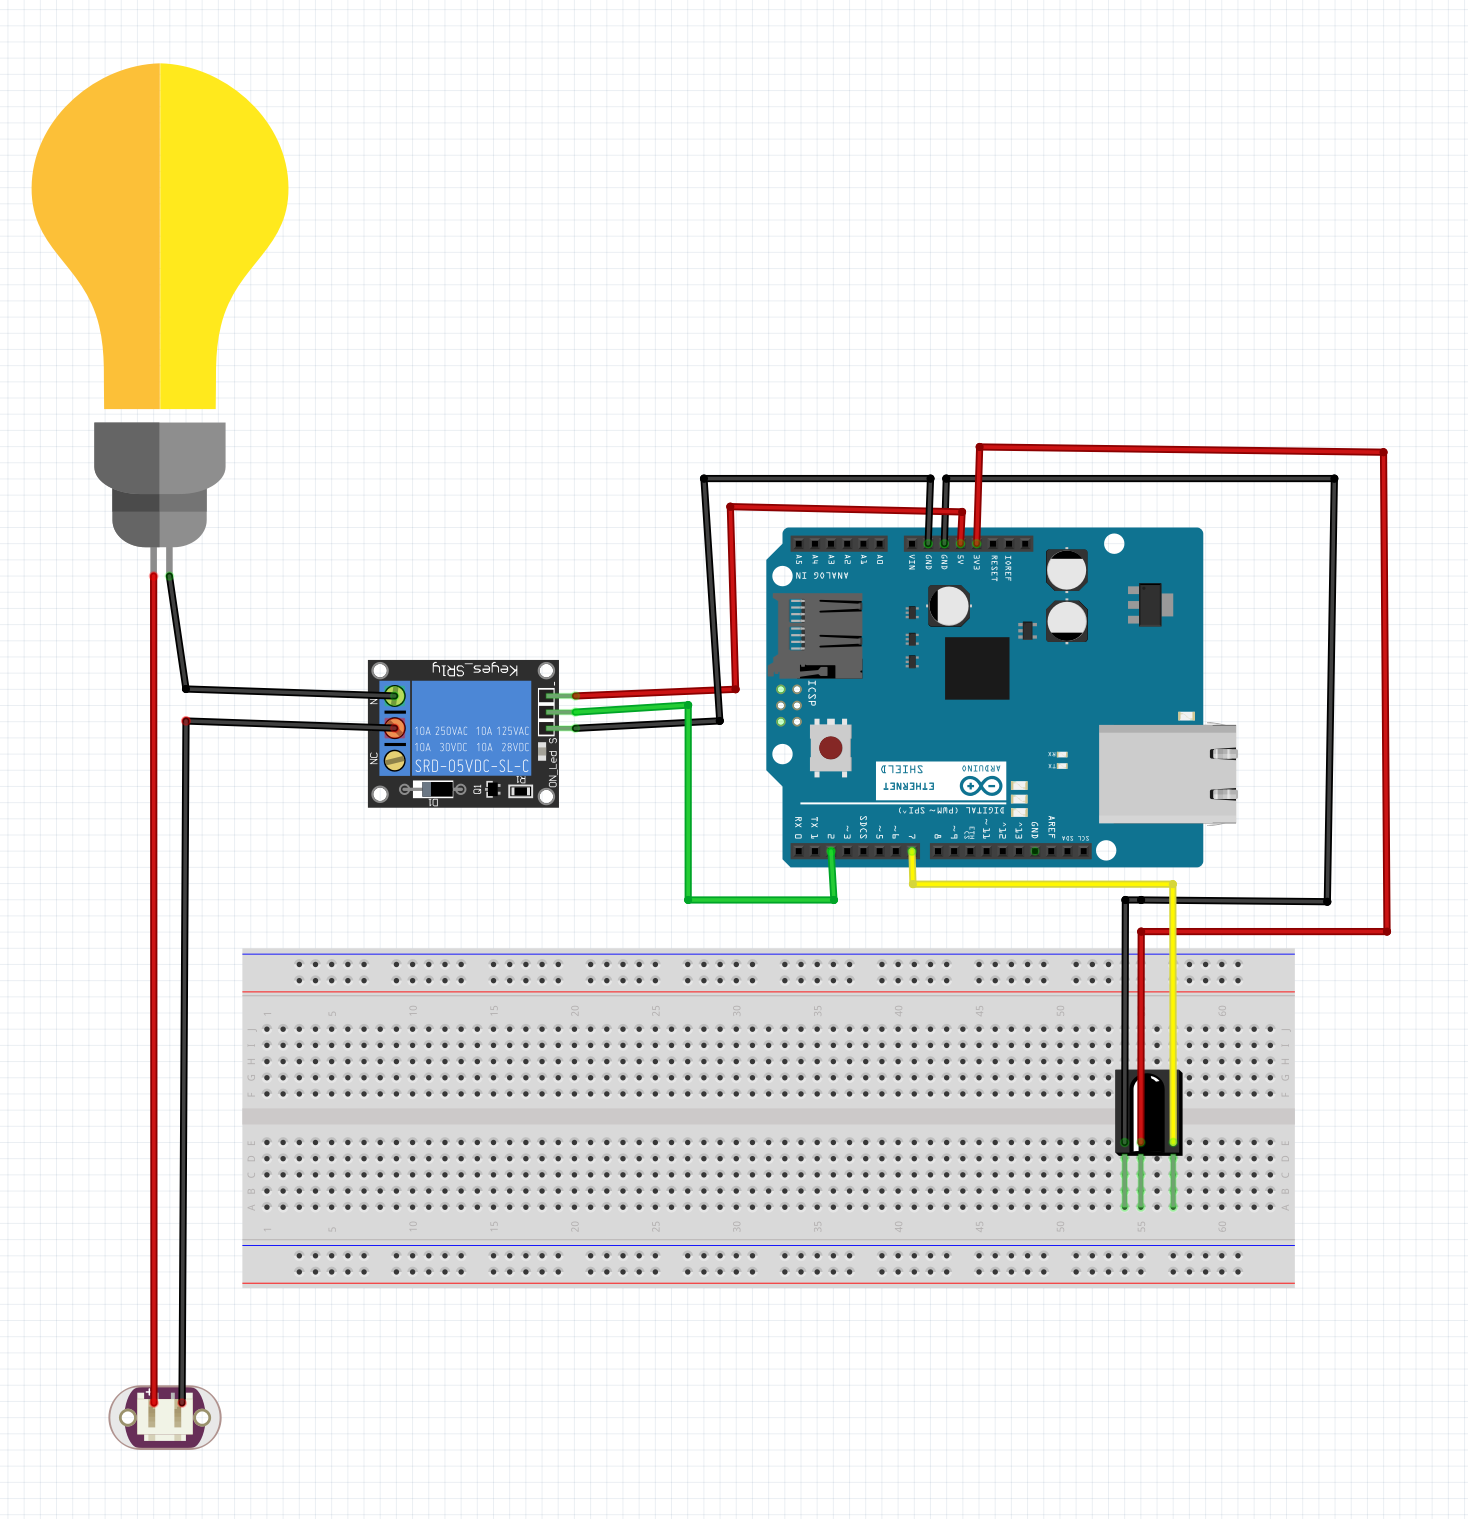
Completed circuitThe picture above shows the completed circuit for the remote control light bulb using the relay. The connections for the relay is simple. We take a wire from the light bulb and cut it so that we have two separate wires just like it is shown in the picture above. Then we put one wire into the NO (normally open) pin of the relay, and the other wire into the COM (common) pin of the relay. With this configuration the circuit is broken and the current is not flowing unless you send a signal from the Arduino to close the circuit. Then we put an IR receiver for the remote. Click here to check out my other blog to learn about an IR receiver if you don’t know how it works. Now let’s move on to the code.
The code#include <IRremote.h>
int relayPin = 2;
int irPin = 7;
IRrecv irRecive(irPin);
decode_results results;
void setup() {
Serial.begin(9600);
irRecive.enableIRIn();
pinMode(relayPin, OUTPUT);
}
void loop() {
if (irRecive.decode(&results)) {
Serial.print("Received value = ");
Serial.println(results.value);
Serial.print("Received code = ");
Serial.println(results.decode_type);
Serial.print("Received bits = ");
Serial.println(results.bits);
switch (results.value) {
case 16754775:
Serial.println("LIGHTS ON");
digitalWrite(relayPin, HIGH);
break;
case 16769055:
Serial.println("LIGHTS OFF");
digitalWrite(relayPin, LOW);
break;
default:
Serial.println("case: default");
delay(1000);
}
irRecive.resume();
}
}
The code is also very simple. We first want to see the encoded form of the buttons on the remote. In my project, I wanted the plus sign button to turn on the light, and the minus sign button to turn off the light. So we decode the buttons and use it in our switch statement in the loop function. In our switch statement, we set the relay pin to HIGH to close the relay circuit which will turn on the light bulb and when minus button on the remote is pressed, we set the relay pin to LOW to open the relay circuit which will turn off the light bulb. If any other button on the remote control is pressed, it will go to default case and nothing would happen. Watch the video below for the complete tutorial and demo.
VideoPublished by Aarav Patel


_ztBMuBhMHo.jpg?auto=compress%2Cformat&w=48&h=48&fit=fill&bg=ffffff)


Comments
Please log in or sign up to comment.