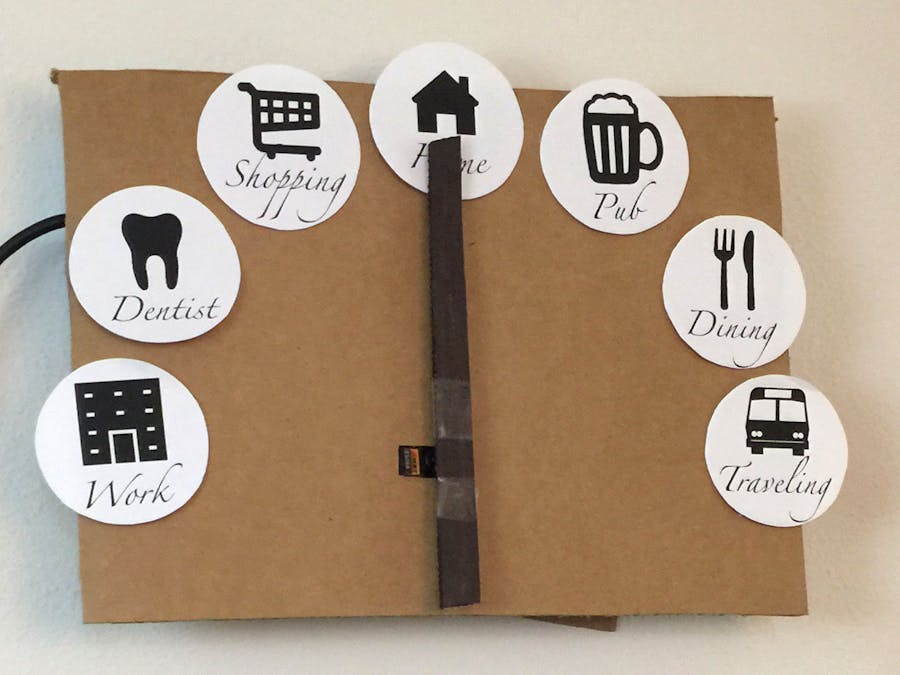
The Magic Clock shows where you're currently checked in to on Foursquare!
I've always been a fan of passive information displays, where you can quickly at a glance to see some information rather than having to pull up an app on your phone or computer. The Magic Clock hangs on your wall and always points to the location of the person it's following on Foursquare.
Behind the clock is a servo motor which moves the clock hand to point to one of the icons. The servo is controlled by a small computer behind the clock, which is connected to the AWS IoT platform.
Foursquare has a realtime API where it will post a notification whenever a new checkin happens. We can take advantage of this to trigger a notification in the IoT MQTT platform which is then received by the device.
Before we can get started on the hardware, we need to set some things up in the AWS IoT platform.
In the AWS IoT dashboard, click "create a new resource" and then create a new Thing. Call the thing "MagicClock". You'll then need to create a new certificate that the device will use to authenticate. You can use the "one-click" method to create the certificate. Be sure to download all three files that it generates once it's complete.
Copy down the endpoint URL that it generates for the device, you'll need that in the next step. It will look like the following:
A2SFLSU8D1NT9D.iot.us-west-2.amazonaws.com
Switch over to the AWS Lambda service in the AWS console. Create a new function (skip the blueprint selection). Call the function MagicClockCheckin, make sure the Node.js runtime is selected, and paste in the code. You can find the code for the function here: index.js Be sure to replace the placeholder gateway URL with the URL you obtained in the previous step. This function passes the message from the Foursquare API to the MQTT channel that the device is subscribed to.
Scroll down to the "Role" selection and choose "Basic execution role" from the dropdown. This will open a new window where you'll create the policy document.
Click the "View policy document" to open the editor. Paste the policy JSON from this file into the editor. Then replace the region and account ID with your own.
Complete the setup of the function and save it.
The next step is to add an API endpoint that will run the function when it's called. Click the "API endpoints" tab and click "Add API Endpoint". Fill in the details of the endpoint matching the screenshot below.
The important detail is to select the POST method as well as Open security. This allows the Foursquare API to post a message here.
Once you've created the API endpoint, you will see the full URL for it. Copy this URL down because you'll need it in the next step! It should look something like the below:
https://rmm3z8a9md.execute-api.us-west-2.amazonaws.com/prod/checkin
In the Foursquare developer site, create a new application. Fill out the basic application information, and enter http://localhost/ as the redirect URI. (We're going to fake log in to the app later.) Also enable the Push API for the application and set the Push URL to the URL of your Lambda function created above.
Once you've created the application, any user that authorizes this application on Foursquare will have their future checkins pushed to the Lambda function!
Now we just need to sign in to the application! Rather than create an actual web app, you really just need to get your own account authorized on the app so that Foursquare delivers push notifications for you. You can simulate logging in by following the steps below.
First, in the URL below, replace the placeholder client ID with the client ID of your application, then visit the URL in your browser.
https://foursquare.com/oauth2/authorize?client_id=PLACEHOLDER-CLIENT-ID&response_type=code&redirect_uri=http://localhost/
Click Allow on the Foursquare authorization screen.
This will redirect your browser to http://localhost/?code=xxxxx which will probably look like a big error message in your browser. Ignore the error, just copy the code from the URL in your address bar.
In a terminal, type the following command, replacing the placeholder values with your own appropriate values:
curl https://foursquare.com/oauth2/access_token -d client_id=YOUR-CLIENT-ID -d client_secret=YOUR-CLIENT-SECRET -d grant_type=authorization_code -d redirect_uri=http://localhost/ -d code=CODE-FROM-URL
The response will be an access token, but you can ignore that. At this point, Foursquare knows you've authorized the app and will begin pushing your checkins to the Push URL you've configured.
The DragonBoard 410c is the main controller behind the project. First we'll need to install Linux on the board, which you can do by following the instructions here.
Once Linux is installed, we'll need to install Ruby which is how the board will communicate with the AWS IoT platform.
In a terminal window on the DragonBoard, install ruby using the package manager:
$ sudo apt-get install ruby
We'll then need to install bundler:
$ sudo gem install bundler
Now you're ready to install the source code for this project. You can find the source code on Github. Download it to the device with git:
$ git clone https://github.com/aaronpk/MagicClock.git
Then install the dependencies with bundler:
$ cd MagicClock
$ bundle install
Now you'll need to copy config.template.yml to config.yml and fill in the details of your AWS configuration. This is where you'll enter the MQTT URL you created originally, as well as point to the the AWS certificates you downloaded when you created the device in the IoT dashboard. The other configuration bit is the serial port name for the Maestro controller. You should be able to find it after you plug in the controller via USB, by looking for a device that matches the name in the template config file.
Once all the software is installed, you're ready to hook up the motor!
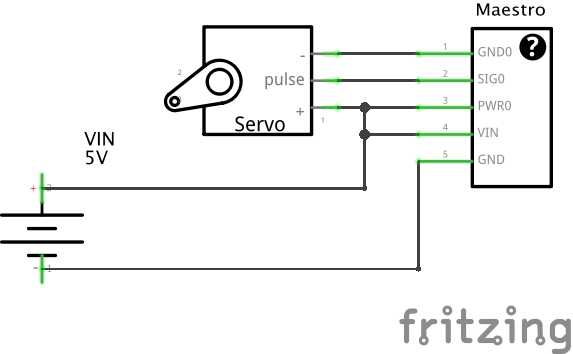
The actual circuit is relatively simple. Hook up the three wires on the servo to the servo controller. Usually the wires on the servo are colored red, black and a third color. Red and black are positive and negative, and the other color will be the data line. You'll also need to give the motor a power source other than the USB port.
Once you've hooked this up, the DragonBoard can control the servo via its USB connection.
Run the clock.rb script with the following command:
$ bundle exec ruby clock.rb
You should see it connect to the MQTT gateway and begin listening for messages. When you check in on Foursquare, a message will be sent to the device's MQTT channel and it will process the checkin and move the motor accordingly!
Lastly you'll just need to mount the motor to a clock hand, and create the labels for the different categories! If you like the ones I used, you can download the PDF here!


Comments
Please log in or sign up to comment.