


Hardware components | ||||||
 |
| × | 1 | |||
| × | 1 | ||||
| × | 1 | ||||
| × | 1 | ||||
 |
| × | 1 | |||
| × | 1 | ||||
 |
| × | 1 | |||
| × | 1 | ||||
| × | 1 | ||||
| × | 1 | ||||
| × | 1 | ||||
Software apps and online services | ||||||
 |
| |||||
| ||||||
| ||||||
| ||||||
Hand tools and fabrication machines | ||||||
 |
| |||||
 |
| |||||
 |
| |||||
EleTect is a modular edge‑AI system designed to protect humans and wildlife. Starting with human–elephant conflict (HEC), it has evolved into a family of devices (EleTect 1.0, 1.5, 2.0, Razor, Mini, Echo/Ember, and Link) that use TinyML, IoT, and natural deterrents to detect animals (and illegal activities) and issue timely alerts or countermeasures. Key innovations include on-device machine learning, solar power, LoRa-based mesh networking, and multi-module interoperability. This unified documentation first summarizes EleTect 1.0 and 1.5 (their problems, solutions, features, and innovations), then provides a detailed step‑by‑step tutorial for building EleTect 2.0 and its add‑on modules. All designs work offline with low power, making them ideal for remote forest deployment.
EleTect 1.0: TinyML for Human–Elephant ConflictIn Kerala and other regions, humans and elephants increasingly clash at forest boundaries. In one case study, 3,930 people died over eight years from elephant encounters. Elephants raid crops or wander into villages, causing fatalities and fear. EleTect 1.0 addressed this by deploying sensor nodes at forest edges to detect elephants early and deter them harmlessly. Each node uses: - Vision: A Grove Vision AI V2 camera module running a TinyML elephant‑detection model (edge‑compiled via SenseCraft AI and Edge Impulse).
- Audio: A Seeed XIAO ESP32‑S3 Sense with microphone running a TinyML model to recognize elephant sounds.
- Deterrent: An onboard speaker plays recorded honeybee buzzing, exploiting elephants’ natural fear of bee stings. Studies show elephants strongly avoid bee noises, so this is a non‑harmful, effective deterrent.
- Communication: A LoRa radio (Wio‑E5 module) transmits alerts to a central hub. Each node runs on solar power and battery for self‑sufficiency.
This architecture forms a “watchdog” at the forest boundary: vision and audio TinyML models run continuously, and if an elephant is detected, the node immediately plays the bee sound locally and sends a LoRa alert. By combining camera + sound detection, EleTect 1.0 provides redundant, real‑time detection without external servers. It is fully solar‑powered for remote use.
Why it’s innovative: EleTect 1.0 was among the first to bring TinyML to wildlife conflict: running on-device inference (camera and audio) for HEC mitigation. Its use of bees as a deterrent leverages ecological knowledge (the “Elephants & Bees” concept) and is backed by field research. Importantly, the system is low‑power, self‑sustaining (solar/battery), and cost‑effective for scaling. Compared to traditional solutions (expensive fences, static signs), EleTect 1.0 offers autonomous, proactive alerts and harmless deterrence, reducing incidents while preserving wildlife.
For more details please do visit the Hackster Documentation:EleTect: Mitigating Human-Elephant conflict with TinyML
EleTect 1.5: Smarter Warnings with Interactive SignageEleTect 1.5 builds on 1.0 by adding roadside warning signs to protect drivers in elephant corridors. In many forest roads, static elephant signs fail to convey real‑time risk.
EleTect 1.5 adds two networked components:
- EleTect Detection Node: Essentially the EleTect 1.0 node (camera + sound + bee speaker + LoRa). It continuously monitors for elephants and sends status updates. When it detects an elephant and vehicles are present, it triggers an alert.
- Interactive Signage Node: A solar‑powered LED sign placed ~500 m before known crossing points. The signboard includes: a XIAO ESP32‑S3 controller, a Grove Vision AI camera for vehicle detection, and a matrix of high‑visibility LEDs. When an elephant warning is received via LoRa and the sign’s camera sees approaching vehicles, it flashes a bright red elephant icon to warn drivers. The board only activates (and drains power) when needed, thanks to its vehicle-trigger logic.
Key features of EleTect 1.5:
- Interactive warnings: The sign flashes in real time when an elephant is detected ahead, alerting motorists 500 m out.
- Vehicle detection: Integrated TinyML on the sign’s camera ensures warnings only flash when cars/trucks approach, preventing false alarms when roads are empty.
- Solar‑powered and LoRa mesh: Both nodes run on solar+battery, communicating over LoRa without cellular coverage.
Compared to 1.0, EleTect 1.5 extends coverage to road safety. It not only deters elephants from villages but also proactively saves drivers. By combining TinyML detection and dynamic signage, it creates an adaptive warning system proven to enhance safety. This innovation won awards in Edge‑AI contests for precisely this blend of ecological insight and IoT.
For more details please do visit the Hackster Documentation:EleTect 1.5 : Smarter Warnings, Safer journeys
EleTect 2.0 is the core of the EleTect ecosystem: a rugged, solar-powered TinyML node that runs vision + audio detection on-device and sends LoRa mesh alerts to rangers. For vision, we use the Grove Vision AI Module V2 with a Raspberry Pi IR Night Vision Camera (160° FOV) for wide-angle, day/night detection. For audio, we use the Seeed XIAO ESP32-S3 Sense to classify elephant calls, gunshots, chainsaws, and illegal vehicle entry. Alerts travel over a Meshtastic-style LoRa mesh using the Seeed Meshtastic add-on for XIAO (with aviation connectors for modularity). All enclosures are Fusion 360–designed, 3D-printed, and laser-cut, then assembled with aviation connectors for field-serviceable modules.
🛠️ Mechanical Design & EnclosureTo keep the system field-ready, weatherproof, and modular, the entire enclosure was designed in Fusion 360. The design balances IP67 protection, thermal management, and easy servicing using aviation connectors.
CAD Design (Fusion 360)- Fusion 360 was used for parametric enclosure modeling.
Key design considerations:
- Drip edges and sloped tops to shed rainwater.
- Sun-facing panel mount with adjustable tilt (10–20°)
- Internal mounting bosses for Vision AI board, XIAO S3, LoRa SX1262, and amplifier.
- Connector panel with GX12/GX16 aviation connectors and IP67 glands.
- Separate battery box (external IP67 case) linked via XT30/XT60 for safety and easy replacement.
- RF clearance zone for LoRa SMA antenna, isolated from metal LED plate to reduce interference.
3D Printing:
Main enclosure shell printed in using 3D Priting.
- Internal mounts & brackets (board trays, speaker cages) printed in ABS.
- Custom vent plugs printed with hydrophobic membranes for condensation control.
Laser Cutting (Acrylic/Aluminum):
- Acrylic faceplates (transparent IR-filter window for camera, clear slots for strobes).
Assembly:
- Boards mounted with M3 brass heat-set inserts (.
- Rubber gaskets + O-rings used at lid seams and aviation connectors.
- Speakers mounted on vibration-isolating rubber grommets.
- Cable routing handled via IP67 glands with strain relief.
- Field servicing → damaged modules (amp, LEDs, speakers, boards) can be hot-swapped.
- Upgrade path → e.g., swap strobes for higher-wattage LEDs or speakers with horns.
- Cross-project reuse → same enclosure shell works for EleTect Razor, Ember, or Link with minor internal changes.
The Grove Vision AI V2 (ARM Cortex-M55 + Ethos-U55 NPU) delivers high FPS inference at ultra-low power — ideal for 24/7 forest deployment. Paired with the Raspberry Pi IR night-vision camera (160°), it maintains detection in low light and wide corridors (rail/road/forest trails)
Hardware Overview
Comparison with XIAO ESP32-S3 Sense (Vision)
In practice, Grove Vision AI V2 offers:
- Higher inference FPS at the edge (esp. with SenseCraft-optimized models)
- Lower power draw vs. running vision on the ESP32 camera pipeline
Specifications (Core
- Vision: Grove Vision AI V2 (WiseEye2 HX6538), ARM Cortex-M55 + Ethos-U55 NPU, CSI camera port (Raspberry Pi IR 160°)
- Audio: XIAO ESP32-S3 Sense (digital mic, PSRAM, SD)
- Mesh: Seeed Meshtastic add-on for XIAO (LoRa SX126x), mesh relays and P2P alerts
- Logging: SD card + DS3231 RTC (timestamps)
- Deterrent: 3 W speaker (bee buzz for elephants; optional DFPlayer Mini)
- Power: 18650 Li-ion + TP4056 + 5–6 V solar panel
- Build: Fusion 360 design; 3D-printed + laser-cut; aviation connectors for camera, power, speaker, and LoRa links
- Connect the Raspberry Pi IR 160° camera to the CSI port on Grove Vision AI V2.
- Ensure ribbon orientation is correct (contacts match the port).
Bootloader:
- Method 1: Hold BOOT, plug USB-C, then release → enters Bootloader.
- Method 2: With USB connected, press BOOT then tap RESET → Bootloader.
Reset: If frames freeze or serial drops, tap RESET.
Driver: If not recognized, install the CH34x driver for your OS.
- Windows Vendor VCP Driver One-Click Installer: CH343SER.EXE
- Windows Vendor VCP Driver: CH343SER.ZIP
- Windows CDC driver one-click installer: CH343CDC.EXE
- Windows CDC driver: CH343CDC.ZIP
- macOS Vendor VCP Driver: CH34xSER_MAC.ZIP
below is a block Diagram of the Grove Vision AI (V2) system, including a camera and a master controller.
SenseCraft AI empowers users to effortlessly deploy a vast library of publicly available AI models on tot heir edge devices such as Recomputer(Jetson), XIAOS3, and more, and provides a seamless and user-friendly experience, allowing you to deploy public AI models directly on to your edge devices with just a few clicks.Say good bye to complex configurations and coding – with SenseCraft AI, you can efftortlessly unlock the power of AI on your devices. SenseCraft AI also allows you to upload and share your own trained AI models with the community. By publishing your models, you contribute to a growing library of shared knowledge, fostering collaboration and innovation among AI enthusiasts.Now we will quickly get started the modules with SenseCraft AI, and this will only require the module only.
Step 1. Connect the Grove Vision AI V2 to the SenseCraft AI Model Assistant
First, we need to open the main SenseCraft AI Model Assistant page.
Create an account and login
Please use a Type-C type cable to connect Grove Vision AI V2 to your computer.
Here we are using a public model for testing the Grove Vision V2.
we selected the "Gesture Detection" model to deploy.
Click on "Deploy Model"
Then click on "connect"
Click on "Confirm" and select the connected serial port
Now the model will begin to get uploaded to the Grove vision V2
Now you can see that we have successfully uploaded the model.Now we can test it by showing different gestures
we can see how good the new Grove vision V2 is when compared to other MCUs and the previous version, we really got a massive upgrade in every terms, Really Loved it.
We can see that in the Preview Settings on the right hand side, there are two setting options that can be changed to optimise the recognition accuracy of the model.
- Confidence: Confidence refers to the level of certainty or probability assigned by a model to its predictions.
- IoU: IoU is used to assess the accuracy of predicted bounding boxes compared to truth bounding boxes.
1. Visit the official Arduinowebsite: https://www.arduino.cc/en/software
2. Click on the "Windows" or "Mac"buttonbased on your operatingsystem.
3. Download the ArduinoIDE1.8.19installer.
4. Once the downloadis complete, runtheinstaller.
5. Follow the installation wizard, acceptingthe license agreement and choosing the installation directory.
6. If prompted, allow the installer to install device drivers.
7. Once the installationis finished, click"Close" to exit the installer.
8. Open the Arduino IDE fromthedesktopshortcut or the start menu. 9. You're now ready tostart usingArduinoIDE 1.8.19!
Downloading the necessary libraries
1. Open your web browser and navigate to the GitHub repository:
https://github.com/Seeed-Studio/Seeed_Arduino_SSCMA
2. Click on the green "Code" button and select "Download ZIP" to download the library as a ZIP file.
3. Save the ZIP file to a location on your computer where you can easily find it.
4. Open the Arduino IDE.
5. Go to Sketch > Include Library >Add.ZIPLibrary.
6. In the file browser window that appears, navigate to the location where you saved the downloaded ZIP file.
7. Select the ZIP file and click "Open" to add the library to your Arduino IDE.
8. The Seeed_Arduino_SSCMAlibrary should now be installed and ready to use.
9. To verify the installation, go to Sketch>Include Library and check if "Seeed_Arduino_SSCMA" appears in the list of installed libraries.
You also need to download one more library
Go to the Sketch menu, then select Include Library>Manage Libraries.... This will open the Library Manager.In the search bar at the top of the Library Manager, type in ArduinoJSON. The search results will list the ArduinoJSON library. There will be an Install button next to the library. Click the Install button. The ArduinoIDE will automatically download and install the library into your Arduino development environment.
Installing the board to Arduino IDE
1. Open theArduinoIDE.
2. Go to File>Preferences.
3. In the "Additional BoardsManager URLs" field, enter the following URL:
https://raw.githubusercontent.com/espressif/arduinoesp32/gh-pages/package_esp32_index.json4.Click "OK" to close the Preferences window.
5. Navigate to Tools >Board>Boards Manager.
6. In the Boards Manager window, search for "ESP32".
7. Locate the "ESP32 by Espressif Systems" entry and click on it.
8. Select the latest version from the drop down menu and click "Install".
9. Wait for the installation process to complete. This may take a few minutes.
10. Once the installation is finished, close the Boards Manager window
Custom model for Wild Animals detectionIn this part, we'll kick off by labeling our dataset with the intuitive tools provided by Roboflow. From there, we'll advance to training our model within Google Colab's collaborative environment. Next up, we'll explore deploying our trained model using the SenseCraft Model Assistant, a process designed to smoothly bridge the gap between training and real-world applications. By the conclusion of this part, you'll have your very own custom model ready to detect elephants and boars, operational on Grove Vision AI V2.
From dataset to model deployment, our journey consists of the following key stages:
1. Dataset Labeling — This section details the process of acquiring datasets suitable for training models. There are two primary methods: utilizing labeled datasets from the Roboflow community or curating your own dataset with scenario-specific images, necessitating manual labeling.
2. Model Training with Google Colab — Here, we focus on training a model capable of deployment on Grove Vision AI V2, leveraging the dataset obtained in the previous step via the Google Colab platform.
3. Model Upload via SenseCraft Model Assistant — This segment explains how to employ the exported model file to upload our elephant detection model to Grove Vision AI V2 using the SenseCraft Model Assistant.
Step 1.Create a free Roboflow account
Roboflow provides everything you need to label, train, and deploy computer vision solutions. To get started, create a free Roboflow account.
Step 2. Creating a New Project and Uploading images
Once you've logged into Roboflow, Click on Create Project.
Name your project ("EleTect_2.0"). Define your project as Object Detection. Set the Output Labels as Categorical
Now it's time to upload elephant images.
Collect images of elephants and Boars. Ensure you have a variety of backgrounds and lighting conditions. On your project page, click "Add Images".
You can drag and drop your images or select them from your computer. Upload at least 100 images for a robust dataset.
click on Save and Continue
Step 3: Annotating Images
After uploading, you'll need to annotate the images by labeling elephant.
Roboflow offers three different ways of labelling images: Auto Label, Roboflow Labeling and Manual Labeling.
Auto Label: Use a large generalized model to automatically label images.
Auto Label: Use a large generalized model to automatically label images.
- Auto Label: Use a large generalized model to automatically label images.
Roboflow Labeling: Work with a professional team of human labelers. No minimum volumes. No upfront commitments. Bounding Box annotations start at $0.04 and Polygon annotations start at $0.08.
Roboflow Labeling: Work with a professional team of human labelers. No minimum volumes. No upfront commitments. Bounding Box annotations start at $0.04 and Polygon annotations start at $0.08.
- Roboflow Labeling: Work with a professional team of human labelers. No minimum volumes. No upfront commitments. Bounding Box annotations start at $0.04 and Polygon annotations start at $0.08.
Manual Labeling: You and your team label your own images.
Manual Labeling: You and your team label your own images.
- Manual Labeling: You and your team label your own images.
The following describes the most commonly used method of manual labelling.
Click on "Manual Labeling" button. Roboflow will load the annotation interface.
Select the "Start Annotating" button. Draw bounding boxes around the elephant in each image.
Label each bounding box as elephant.
Use the ">" button to move through your dataset, repeating the annotation process for each image.
Step 4: Review and Edit Annotations
It's essential to ensure annotations are accurate.
Review each image to make sure the bounding boxes are correctly drawn and labeled. If you find any mistakes, select the annotation to adjust the bounding box or change the label.
Step 5: Generating and Exporting the Dataset
Once all images are annotated. In Annotate click the Add x images to Dataset button in the top right corner.
Then click the Add Images button at the bottom of the new pop-up window.
Click Generate in the left toolbar and click Continue in the third Preprocessing step.
In the Augmentation in step 4, select Mosaic, which increases generalisation.
In the final Create step, please calculate the number of images reasonably according to Roboflow's boost; in general, the more images you have, the longer it takes to train the model. However, the more pictures you have will not necessarily make the model more accurate, it mainly depends on whether the dataset is good enough or not.
Click on Create to create a version of your dataset. Roboflow will process the images and annotations, creating a versioned dataset. After the dataset is generated, click Export Dataset. Choose the COCO format that matches the requirements of the model you'll be training.
Click on Continue and you'll then get the Raw URL for this model. Keep it, we'll use the link in the model training step a bit later.
Congratulations! You have successfully used Roboflow to upload, annotate, and export a dataset for elephant detection model. With your dataset ready, you can proceed to train a machine learning model using platforms like Google Colab.
Training Dataset Exported Model Step 1. Access the Colab Notebook
You can find different kinds of model Google Colab code files on the SenseCraft Model Assistant's Wiki. If you don't know which code you should choose, you can choose any one of them, depending on the class of your model (object detection or image classification).
If you are not already signed into your Google account, please sign in to access the full functionalities of Google Colab.
Click on "Connect" to allocate resources for your Colab session.
select the panel showing RAM and Disk
select "Change runtime type"
Select "T4 GPU"
Now run the "Setup SSCMA"
you will get a warning like this click on "Run anyways"
Wait untill the repositary is fully clonedand installed all the dependencies.
now its finished
Now run the "download the pretrain model weights file
Step 2. Add your Roboflow Dataset
Before officially running the code block step-by-step, we need to modify the code's content so that the code can use the dataset we prepared. We have to provide a URL to download the dataset directly into the Colab filesystem.
To customize this code for your own model link from Roboflow:
1)Replace Gesture_Detection_Swift-YOLO_192 with the desired directory name where you want to store your dataset.
2)Replace the Roboflow dataset URL
with the link to your exported dataset (It's the Raw URL we got in the last step in Labelled Datasets). Make sure to include the key parameter if required for access.
3)Adjust the output filename in the wget command if necessary
(-O your_directory/your_filename.zip).4)Make sure the output directory in the unzip command matches the directory you created and the filename matches the one you set in the wget command.
Step 3. Adjustment of model parameters
The next step is to adjust the input parameters of the model. Please jump to the Train a model with SSCMA section and you will see the following code snippet.
This command is used to start the training process of a machine learning model, specifically a YOLO (You Only Look Once) model, using the SSCMA (Seeed Studio SenseCraft Model Assistant) framework.
To customize this command for your own training, you would:
1)Replace configs/swift_yolo/swift_yolo_tiny_1xb16_300e_coco.py with the path to your own configuration file if you have a custom one.2)Change work_dir to the directory where you want your training outputs to be saved.3)Update num_classes to match the number of classes in your own dataset. It depends on the number of tags you have, for example rock, paper, scissors should be three tags.4)Adjust epochs to the desired number of training epochs for your model. Recommended values are between 50 and 100.5)Set height and width to match the dimensions of the input images for your model.6)Change data_root to point to the root directory of your dataset.7)If you have a different pre-trained model file, update the load_from path accordingly.
Step 5. Exportthe model
After training, you can export the model to the format for deployment. SSCMA supports exporting to ONNX, and TensorFlow Lite at present
Step 6. Evaluate the model
When you get to the Evaluate the model section, you have the option of executing the Evaluate the TFLite INT8 model code block.
Step 6. Download the exported model file
After the Export the model section, you will get the model files in various formats, which will be stored in the Model Assistant folder by default. Our stored directory is EleTect.
select "ModelAssistatnt"
In the directory above, the .tflite model files are available for XIAO ESP32S3 and Grove Vision AI V2. For Grove Vision AI V2, we prefer to use the vela.tflite files, which are accelerated and have better operator support. And due to the limitation of the device memory size, we recommend you to choose INT8 model.
After locating the model files, it's essential to promptly download them to your local computer. Google Colab might clear your storage directory if there's prolonged inactivity. With these steps completed, we now have exported model files compatible with Grove Vision AI V2. Next, let's proceed to deploy the model onto the device.
Upload models to Grove Vision V2 via SenseCraft Model AssistantPlease connect the device after selecting Grove Vision AI V2 and then select Upload Custom AI Model at the bottom of the page.
You will then need to prepare the name of the model, the model file, and the labels. I want to highlight here how this element of the label ID is determined.
If you are using a custom dataset, then you can view the different categories and its order on the Health Check page. Just install the order entered here.
Then click Send Model in the bottom right corner. This may take about 3 to 5 minutes or so. If all goes well, then you can see the results of your model in the Model Name and Preview windows above.
Or you could use the model published by Us.Go to search and in public models search for "EleTect", you can find it.
Click on deploy and connect your grove vision V2.
Press Confirm and you are good to go.Now that we have done training the vision based model, now we can train the audio model also for increased accuracy
Now that we have done training the vision based model, now we can train the audio model also for increased accuracy
Training audio based TinyML model on XIAO ESP32S3 SenseXIAO ESP32S3 Sense Introduction
A compact yet powerful development board designed to kickstart your journey into intelligent voice and vision AI. With its integrated camera sensor, digital microphone, and SD card support, this tiny board packs a punch, offering embedded ML computing power and photography capabilities. Whether you're delving into edge computing or exploring AI applications, the XIAO ESP32S3 Sense is your go-to tool for realizing innovative projects with ease and efficiency.
Edge Impulse Introduction
Edge Impulse is a platform for developing machine learning models specifically designed for edge devices and embedded systems. It provides a comprehensive set of tools and services that enable developers to quickly create, train, and deploy machine learning models without requiring deep expertise in machine learning.
Recording Audio with XIAO ESP32S3 Sense
Let's use the onboard SD Card reader to save.wav audio files, we need to habilitate the XIAO PSRAM first.
Insert the microSD card into the microSD card slot. Please note the direction of insertion, the side with the gold finger should face inward.
Then compile and upload the following program to XIAO ESP32S3.
/*
* WAV Recorder for Seeed XIAO ESP32S3 Sense
*
* NOTE: To execute this code, we will need to use the PSRAM
* function of the ESP-32 chip, so please turn it on before uploading.
* Tools>PSRAM: "OPI PSRAM"
*
* Adapted by M.Rovai @May23 from original Seeed code
*/
#include <I2S.h>
#include "FS.h"
#include "SD.h"
#include "SPI.h"
// make changes as needed
#define RECORD_TIME   10  // seconds, The maximum value is 240
#define WAV_FILE_NAME "data"
// do not change for best
#define SAMPLE_RATE 16000U
#define SAMPLE_BITS 16
#define WAV_HEADER_SIZE 44
#define VOLUME_GAIN 2
int fileNumber = 1;
String baseFileName;
bool isRecording = false;
void setup() {
Serial.begin(115200);
while (!Serial) ;
I2S.setAllPins(-1, 42, 41, -1, -1);
if (!I2S.begin(PDM_MONO_MODE, SAMPLE_RATE, SAMPLE_BITS)) {
Serial.println("Failed to initialize I2S!");
while (1) ;
}
if(!SD.begin(21)){
Serial.println("Failed to mount SD Card!");
while (1) ;
}
Serial.printf("Enter with the label name\n");
//record_wav();
}
void loop() {
if (Serial.available() > 0) {
String command = Serial.readStringUntil('\n');
command.trim();
if (command == "rec") {
isRecording = true;
} else {
baseFileName = command;
fileNumber = 1; // reset file number each time a new base file name is set
Serial.printf("Send rec for starting recording label \n");
}
}
if (isRecording && baseFileName != "") {
String fileName = "/" + baseFileName + "." + String(fileNumber) + ".wav";
fileNumber++;
record_wav(fileName);
delay(1000); // delay to avoid recording multiple files at once
isRecording = false;
}
}
void record_wav(String fileName)
{
uint32_t sample_size = 0;
uint32_t record_size = (SAMPLE_RATE * SAMPLE_BITS / 8) * RECORD_TIME;
uint8_t *rec_buffer = NULL;
Serial.printf("Start recording ...\n");
File file = SD.open(fileName.c_str(), FILE_WRITE);
// Write the header to the WAV file
uint8_t wav_header[WAV_HEADER_SIZE];
generate_wav_header(wav_header, record_size, SAMPLE_RATE);
file.write(wav_header, WAV_HEADER_SIZE);
// PSRAM malloc for recording
rec_buffer = (uint8_t *)ps_malloc(record_size);
if (rec_buffer == NULL) {
Serial.printf("malloc failed!\n");
while(1) ;
}
Serial.printf("Buffer: %d bytes\n", ESP.getPsramSize() - ESP.getFreePsram());
// Start recording
esp_i2s::i2s_read(esp_i2s::I2S_NUM_0, rec_buffer, record_size, &sample_size, portMAX_DELAY);
if (sample_size == 0) {
Serial.printf("Record Failed!\n");
} else {
Serial.printf("Record %d bytes\n", sample_size);
}
// Increase volume
for (uint32_t i = 0; i < sample_size; i += SAMPLE_BITS/8) {
(*(uint16_t *)(rec_buffer+i)) <<= VOLUME_GAIN;
}
// Write data to the WAV file
Serial.printf("Writing to the file ...\n");
if (file.write(rec_buffer, record_size) != record_size)
Serial.printf("Write file Failed!\n");
free(rec_buffer);
file.close();
Serial.printf("Recording complete: \n");
Serial.printf("Send rec for a new sample or enter a new label\n\n");
}
void generate_wav_header(uint8_t *wav_header, uint32_t wav_size, uint32_t sample_rate)
{
// See this for reference: http://soundfile.sapp.org/doc/WaveFormat/
uint32_t file_size = wav_size + WAV_HEADER_SIZE - 8;
uint32_t byte_rate = SAMPLE_RATE * SAMPLE_BITS / 8;
const uint8_t set_wav_header[] = {
'R', 'I', 'F', 'F', // ChunkID
file_size, file_size >> 8, file_size >> 16, file_size >> 24, // ChunkSize
'W', 'A', 'V', 'E', // Format
'f', 'm', 't', ' ', // Subchunk1ID
0x10, 0x00, 0x00, 0x00, // Subchunk1Size (16 for PCM)
0x01, 0x00, // AudioFormat (1 for PCM)
0x01, 0x00, // NumChannels (1 channel)
sample_rate, sample_rate >> 8, sample_rate >> 16, sample_rate >> 24, // SampleRate
byte_rate, byte_rate >> 8, byte_rate >> 16, byte_rate >> 24, // ByteRate
0x02, 0x00, // BlockAlign
0x10, 0x00, // BitsPerSample (16 bits)
'd', 'a', 't', 'a', // Subchunk2ID
wav_size, wav_size >> 8, wav_size >> 16, wav_size >> 24, // Subchunk2Size
};
memcpy(wav_header, set_wav_header, sizeof(set_wav_header));
}
Now, Compile and run the code and get samples of different elephant sounds. You can also capture noise and other sounds. The Serial monitor will prompt you to receive the label to be recorded.
Send the label (for example, Elephant). The program will wait for another command: rec. And the program will start recording new samples every time a command rec is sent. The files will be saved as elephant.1.wav, elephant.2.wav, elephant.3.wav, etc. until a new label (for example, Noice) is sent. In this case, you should send the command rec for each new sample, which will be saved as Noice1.wav, Noice.2.wav, Noice.3.wav, etc. Ultimately, we will get the saved files on the SD card.
send the first label name first, through the serial monitor
Then send command rec and start recording the elephant sounnd using XIAO.
Collect both samples in same amount.
Use a card reader to save all the sound samples stored inside the SD card to your computer.
Training Exported Models with Edge Impulse
We should initiate a new project at Edge Impulse and give it the same name “EleTect”.
Once the project is created, select the Upload Data tool in the Data Acquisition section. Choose the files to be uploaded.
make sure to balance between train and test set.80/20 is the best recommended ratio.
All data on dataset have a 1s length, but the samples recorded in the previous section have 10s and must be split into 1s samples to be compatible. Click on three dots after the sample name and select Split sample.
Once inside the tool, split the data into 1-second records. If necessary, add or remove segments. This procedure should be repeated for all samples.
Go to Impulse design
An impulse takes raw data, uses signal processing to extract features, and then uses a learning block to classify new data. First, we will take the data points with a 1-second window, augmenting the data, sliding that window each 500ms. Note that the option zero-pad data is set. This is important to fill with zeros samples smaller than 1 second (in some cases, I reduced the 1000 ms window on the split tool to avoid noises and spikes).
The next step is to create the images to be trained in the next phase. We can keep the default parameter values or take advantage of the DSP Autotuneparameters option, which we will do.
We will use a Convolution Neural Network (CNN) model. The basic architecture is defined with two blocks of Conv1D + MaxPooling (with 8 and 16 neurons, respectively) and a 0.25 Dropout. And on the last layer, after Flattening four neurons, one for each class.
Edge Impulse will package all the needed libraries, preprocessing functions, and trained models, downloading them to your computer. You should select the option Arduino Library and at the bottom, select Quantized (Int8) and press the button Build. When the Build button is selected, a Zip file will be created and downloaded to your computer.
Deploying models to XIAO ESP32S3 Sense
Upload the zip file to your Arduino IDE
Before we use the downloaded library, we need to enable the ESP NN Accelerator. For that, you can download a preliminary version from the project GitHub, unzip it, and replace the ESP NN folder with it under: src/edge-impulse-sdk/porting/espressif/ESP-NN, in your Arduino library folder.
Link Address: https://github.com/Mjrovai/XIAO-ESP32S3-Sense/blob/main/ESP-NN.zip
Then you will get the program, compile and run it.
/* Edge Impulse Arduino examples
* Copyright (c) 2022 EdgeImpulse Inc.
*
* Permission is hereby granted, free of charge, to any person obtaining a copy
* of this software and associated documentation files (the "Software"), to deal
* in the Software without restriction, including without limitation the rights
* to use, copy, modify, merge, publish, distribute, sublicense, and/or sell
* copies of the Software, and to permit persons to whom the Software is
* furnished to do so, subject to the following conditions:
*
* The above copyright notice and this permission notice shall be included in
* all copies or substantial portions of the Software.
*
* THE SOFTWARE IS PROVIDED "AS IS", WITHOUT WARRANTY OF ANY KIND, EXPRESS OR
* IMPLIED, INCLUDING BUT NOT LIMITED TO THE WARRANTIES OF MERCHANTABILITY,
* FITNESS FOR A PARTICULAR PURPOSE AND NONINFRINGEMENT. IN NO EVENT SHALL THE
* AUTHORS OR COPYRIGHT HOLDERS BE LIABLE FOR ANY CLAIM, DAMAGES OR OTHER
* LIABILITY, WHETHER IN AN ACTION OF CONTRACT, TORT OR OTHERWISE, ARISING FROM,
* OUT OF OR IN CONNECTION WITH THE SOFTWARE OR THE USE OR OTHER DEALINGS IN THE
* SOFTWARE.
*/
// These sketches are tested with 2.0.4 ESP32 Arduino Core
// https://github.com/espressif/arduino-esp32/releases/tag/2.0.4
// If your target is limited in memory remove this macro to save 10K RAM
#define EIDSP_QUANTIZE_FILTERBANK 0
/*
** NOTE: If you run into TFLite arena allocation issue.
**
** This may be due to may dynamic memory fragmentation.
** Try defining "-DEI_CLASSIFIER_ALLOCATION_STATIC" in boards.local.txt (create
** if it doesn't exist) and copy this file to
** `<ARDUINO_CORE_INSTALL_PATH>/arduino/hardware/<mbed_core>/<core_version>/`.
**
** See
** (https://support.arduino.cc/hc/en-us/articles/360012076960-Where-are-the-installed-cores-located-)
** to find where Arduino installs cores on your machine.
**
** If the problem persists then there's not enough memory for this model and application.
*/
/* Includes ---------------------------------------------------------------- */
#include <EleTect_inferencing.h>
#include "freertos/FreeRTOS.h"
#include "freertos/task.h"
#include "driver/i2s.h"
/** Audio buffers, pointers and selectors */
typedef struct {
int16_t *buffer;
uint8_t buf_ready;
uint32_t buf_count;
uint32_t n_samples;
} inference_t;
static inference_t inference;
static const uint32_t sample_buffer_size = 2048;
static signed short sampleBuffer[sample_buffer_size];
static bool debug_nn = false; // Set this to true to see e.g. features generated from the raw signal
static bool record_status = true;
/**
* @brief Arduino setup function
*/
void setup()
{
// put your setup code here, to run once:
Serial.begin(115200);
// comment out the below line to cancel the wait for USB connection (needed for native USB)
while (!Serial);
Serial.println("Edge Impulse Inferencing Demo");
// summary of inferencing settings (from model_metadata.h)
ei_printf("Inferencing settings:\n");
ei_printf("\tInterval: ");
ei_printf_float((float)EI_CLASSIFIER_INTERVAL_MS);
ei_printf(" ms.\n");
ei_printf("\tFrame size: %d\n", EI_CLASSIFIER_DSP_INPUT_FRAME_SIZE);
ei_printf("\tSample length: %d ms.\n", EI_CLASSIFIER_RAW_SAMPLE_COUNT / 16);
ei_printf("\tNo. of classes: %d\n", sizeof(ei_classifier_inferencing_categories) / sizeof(ei_classifier_inferencing_categories[0]));
ei_printf("\nStarting continious inference in 2 seconds...\n");
ei_sleep(2000);
if (microphone_inference_start(EI_CLASSIFIER_RAW_SAMPLE_COUNT) == false) {
ei_printf("ERR: Could not allocate audio buffer (size %d), this could be due to the window length of your model\r\n", EI_CLASSIFIER_RAW_SAMPLE_COUNT);
return;
}
ei_printf("Recording...\n");
}
/**
* @brief Arduino main function. Runs the inferencing loop.
*/
void loop()
{
bool m = microphone_inference_record();
if (!m) {
ei_printf("ERR: Failed to record audio...\n");
return;
}
signal_t signal;
signal.total_length = EI_CLASSIFIER_RAW_SAMPLE_COUNT;
signal.get_data = µphone_audio_signal_get_data;
ei_impulse_result_t result = { 0 };
EI_IMPULSE_ERROR r = run_classifier(&signal, &result, debug_nn);
if (r != EI_IMPULSE_OK) {
ei_printf("ERR: Failed to run classifier (%d)\n", r);
return;
}
// print the predictions
ei_printf("Predictions ");
ei_printf("(DSP: %d ms., Classification: %d ms., Anomaly: %d ms.)",
result.timing.dsp, result.timing.classification, result.timing.anomaly);
ei_printf(": \n");
for (size_t ix = 0; ix < EI_CLASSIFIER_LABEL_COUNT; ix++) {
ei_printf(" %s: ", result.classification[ix].label);
ei_printf_float(result.classification[ix].value);
ei_printf("\n");
}
#if EI_CLASSIFIER_HAS_ANOMALY == 1
ei_printf(" anomaly score: ");
ei_printf_float(result.anomaly);
ei_printf("\n");
#endif
}
static void audio_inference_callback(uint32_t n_bytes)
{
for(int i = 0; i < n_bytes>>1; i++) {
inference.buffer[inference.buf_count++] = sampleBuffer[i];
if(inference.buf_count >= inference.n_samples) {
inference.buf_count = 0;
inference.buf_ready = 1;
}
}
}
static void capture_samples(void* arg) {
const int32_t i2s_bytes_to_read = (uint32_t)arg;
size_t bytes_read = i2s_bytes_to_read;
while (record_status) {
/* read data at once from i2s */
i2s_read((i2s_port_t)1, (void*)sampleBuffer, i2s_bytes_to_read, &bytes_read, 100);
if (bytes_read <= 0) {
ei_printf("Error in I2S read : %d", bytes_read);
}
else {
if (bytes_read < i2s_bytes_to_read) {
ei_printf("Partial I2S read");
}
// scale the data (otherwise the sound is too quiet)
for (int x = 0; x < i2s_bytes_to_read/2; x++) {
sampleBuffer[x] = (int16_t)(sampleBuffer[x]) * 8;
}
if (record_status) {
audio_inference_callback(i2s_bytes_to_read);
}
else {
break;
}
}
}
vTaskDelete(NULL);
}
/**
* @brief Init inferencing struct and setup/start PDM
*
* @param[in] n_samples The n samples
*
* @return { description_of_the_return_value }
*/
static bool microphone_inference_start(uint32_t n_samples)
{
inference.buffer = (int16_t *)malloc(n_samples * sizeof(int16_t));
if(inference.buffer == NULL) {
return false;
}
inference.buf_count = 0;
inference.n_samples = n_samples;
inference.buf_ready = 0;
if (i2s_init(EI_CLASSIFIER_FREQUENCY)) {
ei_printf("Failed to start I2S!");
}
ei_sleep(100);
record_status = true;
xTaskCreate(capture_samples, "CaptureSamples", 1024 * 32, (void*)sample_buffer_size, 10, NULL);
return true;
}
/**
* @brief Wait on new data
*
* @return True when finished
*/
static bool microphone_inference_record(void)
{
bool ret = true;
while (inference.buf_ready == 0) {
delay(10);
}
inference.buf_ready = 0;
return ret;
}
/**
* Get raw audio signal data
*/
static int microphone_audio_signal_get_data(size_t offset, size_t length, float *out_ptr)
{
numpy::int16_to_float(&inference.buffer[offset], out_ptr, length);
return 0;
}
/**
* @brief Stop PDM and release buffers
*/
static void microphone_inference_end(void)
{
i2s_deinit();
ei_free(inference.buffer);
}
static int i2s_init(uint32_t sampling_rate) {
// Start listening for audio: MONO @ 8/16KHz
i2s_config_t i2s_config = {
.mode = (i2s_mode_t)(I2S_MODE_MASTER | I2S_MODE_RX | I2S_MODE_TX),
.sample_rate = sampling_rate,
.bits_per_sample = (i2s_bits_per_sample_t)16,
.channel_format = I2S_CHANNEL_FMT_ONLY_RIGHT,
.communication_format = I2S_COMM_FORMAT_I2S,
.intr_alloc_flags = 0,
.dma_buf_count = 8,
.dma_buf_len = 512,
.use_apll = false,
.tx_desc_auto_clear = false,
.fixed_mclk = -1,
};
i2s_pin_config_t pin_config = {
.bck_io_num = 26, // IIS_SCLK
.ws_io_num = 32, // IIS_LCLK
.data_out_num = -1, // IIS_DSIN
.data_in_num = 33, // IIS_DOUT
};
esp_err_t ret = 0;
ret = i2s_driver_install((i2s_port_t)1, &i2s_config, 0, NULL);
if (ret != ESP_OK) {
ei_printf("Error in i2s_driver_install");
}
ret = i2s_set_pin((i2s_port_t)1, &pin_config);
if (ret != ESP_OK) {
ei_printf("Error in i2s_set_pin");
}
ret = i2s_zero_dma_buffer((i2s_port_t)1);
if (ret != ESP_OK) {
ei_printf("Error in initializing dma buffer with 0");
}
return int(ret);
}
static int i2s_deinit(void) {
i2s_driver_uninstall((i2s_port_t)1); //stop & destroy i2s driver
return 0;
}
#if !defined(EI_CLASSIFIER_SENSOR) || EI_CLASSIFIER_SENSOR != EI_CLASSIFIER_SENSOR_MICROPHONE
#error "Invalid model for current sensor."
#endifThe DFMini Player module is a small music player. It is low cost and low power and reproduces sounds stored on a memory card.
Based on this, the module can be controlled via the standalone mode, that is, in this mode, there will only be the DFMini module, a battery to power, the speaker, buttons to control it, and the SD card with the songs.
Another way to control it is to use an Arduino or another control device. The Arduino, for example, will send commands through serial communication with the DFMini Player Module.
To control it, it is important to use the basic standalone circuit
The two buttons shown in the circuit above are used to change the music tracks and control the volume of the sound.
The button connected to pin IO1 is used to go to the previous track and reduce the volume.
With a quick touch the system returns to the previous song, however, if you press the button for more than 1 second, the system will reduce the volume of the song.
The button connected to pin IO2 is used to go to the next track and increase the volume.
With a quick touch the system advances to the next song, however, if you press the button for more than 1 second, the system will increase the volume of the song.
In this standalone method, the songs must be saved on the memory card
This way, each time the buttons are pressed, the system will play each song in ascending or descending order.
However, when using Arduino or another control device, we must modify the way of organizing the musical files on the SD Card.
Now, I'll explain how to control the DFMini Player using the xiao esp32s3 through serial communication.
Controlling the DFMini Player with XIAO
In this step, the volume control, range control, equalization commands and other features will be sent by XIAO.
The XIAOmust communicate via the serial with the DFMini Player and send the control commands.
First, we must assemble the circuit shown in the Figure below.
After assembling this circuit, you must add the songs on your memory card. In this step, the audio files should be renamed as 0001, 0002, 0003, for example.
You cannot leave the files with their names, as there will be a problem when the XIAO sends the command to execute the specific track. Therefore, you must configure as shown below.
After naming the files, write the following code on your XIAO.
#include "SoftwareSerial.h"
#include "DFRobotDFPlayerMini.h"
//Inicia a serial por software nos pinos 10 e 11
SoftwareSerial mySoftwareSerial(10, 11); // RX, TX
DFRobotDFPlayerMini myDFPlayer;
char command;
int pausa = 0;
void setup()
{
//Comunicacao serial com o modulo
mySoftwareSerial.begin(9600);
//Inicializa a serial do Arduino
Serial.begin(115200);
//Verifica se o modulo esta respondendo e se o
//cartao SD foi encontrado
Serial.println();
Serial.println(F("DFRobot DFPlayer Mini"));
Serial.println(F("Initializing DFPlayer module ... Wait!"));
if (!myDFPlayer.begin(mySoftwareSerial))
{
Serial.println(F("Not initialized:"));
Serial.println(F("1. Check the DFPlayer Mini connections"));
Serial.println(F("2. Insert an SD card"));
while (true);
}
Serial.println();
Serial.println(F("DFPlayer Mini module initialized!"));
//Definicoes iniciais
myDFPlayer.setTimeOut(500); //Timeout serial 500ms
myDFPlayer.volume(5); //Volume 5
myDFPlayer.EQ(0); //Equalizacao normal
menu_opcoes();
}
void loop()
{
//Waits for data entry via serial
while (Serial.available() > 0)
{
command = Serial.read();
if ((command >= '1') && (command <= '9'))
{
Serial.print("Music reproduction");
Serial.println(command);
command = command - 48;
myDFPlayer.play(command);
menu_opcoes();
}
//Reproduction
//Stop
if (command == 's')
{
myDFPlayer.stop();
Serial.println("Music Stopped!");
menu_opcoes();
}
//Pausa/Continua a musica
if (command == 'p')
{
pausa = !pausa;
if (pausa == 0)
{
Serial.println("Continue...");
myDFPlayer.start();
}
if (pausa == 1)
{
Serial.println("Music Paused!");
myDFPlayer.pause();
}
menu_opcoes();
}
//Increases volume
if (command == '+')
{
myDFPlayer.volumeUp();
Serial.print("Current volume:");
Serial.println(myDFPlayer.readVolume());
menu_opcoes();
}
if (command == '<')
{
myDFPlayer.previous();
Serial.println("Previous:");
Serial.print("Current track:");
Serial.println(myDFPlayer.readCurrentFileNumber()-1);
menu_opcoes();
}
if (command == '>')
{
myDFPlayer.next();
Serial.println("next:");
Serial.print("Current track:");
Serial.println(myDFPlayer.readCurrentFileNumber()+1);
menu_opcoes();
}
//Decreases volume
if (command == '-')
{
myDFPlayer.volumeDown();
Serial.print("Current Volume:");
Serial.println(myDFPlayer.readVolume());
menu_opcoes();
}
}
}
void menu_opcoes()
{
Serial.println();
Serial.println(F("=================================================================================================================================="));
Serial.println(F("Commands:"));
Serial.println(F(" [1-3] To select the MP3 file"));
Serial.println(F(" [s] stopping reproduction"));
Serial.println(F(" [p] pause/continue music"));
Serial.println(F(" [+ or -] increases or decreases the volume"));
Serial.println(F(" [< or >] forwards or backwards the track"));
Serial.println();
Serial.println(F("================================================================================================================================="));
}
The code presented above is quite simple and will help you to select the song by its number, stop, pause, control the volume and pass the tracks.
The musical control consists of sending data from the Arduino IDE serial to our Arduino board.
Initially, the system makes the configuration in the setup and checks if the SD Card is inserted in the module. If it is not inserted, the system presents a message to alert the user.
In addition, the system displays messages with system configuration options.
void setup()
{
//Comunicacao serial com o modulo
mySoftwareSerial.begin(9600);
//Inicializa a serial do Arduino
Serial.begin(115200);
//Verifica se o modulo esta respondendo e se o
//cartao SD foi encontrado
Serial.println();
Serial.println(F("DFRobot DFPlayer Mini"));
Serial.println(F("Initializing DFPlayer module ... Wait!"));
if (!myDFPlayer.begin(mySoftwareSerial))
{
Serial.println(F("Not initialized:"));
Serial.println(F("1. Check the DFPlayer Mini connections"));
Serial.println(F("2. Insert an SD card"));
while (true);
}
Serial.println();
Serial.println(F("DFPlayer Mini module initialized!"));
//Definicoes iniciais
myDFPlayer.setTimeOut(500); //Timeout serial 500ms
myDFPlayer.volume(5); //Volume 5
myDFPlayer.EQ(0); //Equalizacao normal
menu_opcoes();
}
If the memory card is inserted, the code flow will enter the loop function.
void loop()
{
//Waits for data entry via serial
while (Serial.available() > 0)
{
command = Serial.read();
if ((command >= '1') && (command <= '3'))
{
Serial.print("Music reproduction");
Serial.println(command);
command = command - 48;
myDFPlayer.play(command);
menu_opcoes();
}
//Reproduction
//Stop
if (command == 's')
{
myDFPlayer.stop();
Serial.println("Music Stopped!");
menu_opcoes();
}
//Pausa/Continua a musica
if (command == 'p')
{
pausa = !pausa;
if (pausa == 0)
{
Serial.println("Continue...");
myDFPlayer.start();
}
if (pausa == 1)
{
Serial.println("Music Paused!");
myDFPlayer.pause();
}
menu_opcoes();
}
//Increases volume
if (command == '+')
{
myDFPlayer.volumeUp();
Serial.print("Current volume:");
Serial.println(myDFPlayer.readVolume());
menu_opcoes();
}
if (command == '<')
{
myDFPlayer.previous();
Serial.println("Previous:");
Serial.print("Current track:");
Serial.println(myDFPlayer.readCurrentFileNumber()-1);
menu_opcoes();
}
if (command == '>')
{
myDFPlayer.next();
Serial.println("next:");
Serial.print("Current track:");
Serial.println(myDFPlayer.readCurrentFileNumber()+1);
menu_opcoes();
}
//Decreases volume
if (command == '-')
{
myDFPlayer.volumeDown();
Serial.print("Current Volume:");
Serial.println(myDFPlayer.readVolume());
menu_opcoes();
}
}
}
The user can send the following control characters:
- Numbers 1 to 3: Select the song to be played;
- Letter s: Stop the song;
- Letter p: Pause the song;
- Send the + sign: Increase the song volume;
- Send the - signal: Decrease the song volume;
- Send the signal <: Select the previous song;
- Send the signal >: Select the next song;
From these signals, letters, and numbers, the Arduino will receive them via the serial and will control the music to be played.
Each condition is presented below and internally, with its respective commands.
if ((command >= '1') && (command <= '3'))
{
Serial.print("Music reproduction");
Serial.println(command);
command = command - 48;
myDFPlayer.play(command);
menu_opcoes();
}
//Reproduction
//Stop
if (command == 's')
{
myDFPlayer.stop();
Serial.println("Music Stopped!");
menu_opcoes();
}
//Pausa/Continua a musica
if (command == 'p')
{
pausa = !pausa;
if (pausa == 0)
{
Serial.println("Continue...");
myDFPlayer.start();
}
if (pausa == 1)
{
Serial.println("Music Paused!");
myDFPlayer.pause();
}
menu_opcoes();
}
//Increases volume
if (command == '+')
{
myDFPlayer.volumeUp();
Serial.print("Current volume:");
Serial.println(myDFPlayer.readVolume());
menu_opcoes();
}
if (command == '<')
{
myDFPlayer.previous();
Serial.println("Previous:");
Serial.print("Current track:");
Serial.println(myDFPlayer.readCurrentFileNumber()-1);
menu_opcoes();
}
if (command == '>')
{
myDFPlayer.next();
Serial.println("next:");
Serial.print("Current track:");
Serial.println(myDFPlayer.readCurrentFileNumber()+1);
menu_opcoes();
}
//Decreases volume
if (command == '-')
{
myDFPlayer.volumeDown();
Serial.print("Current Volume:");
Serial.println(myDFPlayer.readVolume());
menu_opcoes();
}
}
LoRa is a low-power wireless modulation technology that enables devices to communicate over long distances with minimal energy consumption. "P2P" stands for "point-to-point, " meaning devices can communicate directly with each other without the need for intermediate network infrastructure such as base stations or routers.
By leveraging LoRa P2P, IoT devices can communicate directly with each other in environments requiring long-distance communication and low power consumption.
We can connect the Wio-E5 module to the UART socket directly as the below picture shows.
Download Library
The u8g2 library must be installed for this demo. Click to download the library and install it (How to install an Arduino Library).
Download the example
Copy the code stick on the Aruino IDE then upload it. One of them is used as a master, and the NODE_SLAVE macro definition in the code needs to be commented out, and the other is used as a slave, and the NODE_SLAVE macro definition in the code needs to be turned on.
# include <Arduino.h>
# include <U8x8lib.h>
// #define NODE_SLAVE
U8X8_SSD1306_128X64_NONAME_HW_I2C u8x8(/*reset=*/U8X8_PIN_NONE);
// U8X8_SSD1306_128X64_NONAME_SW_I2C u8x8(/*clock=*/ SCL, /*data=*/ SDA, /*reset=*/ U8X8_PIN_NONE);   // OLEDs without Reset of the Display
static char recv_buf[512];
static bool is_exist = false;
static int at_send_check_response(char *p_ack, int timeout_ms, char*p_cmd, ...)
{
int ch = 0;
int index = 0;
int startMillis = 0;
va_list args;
memset(recv_buf, 0, sizeof(recv_buf));
va_start(args, p_cmd);
Serial1.printf(p_cmd, args);
Serial.printf(p_cmd, args);
va_end(args);
delay(200);
startMillis = millis();Flash Meshtastic firmware on the add-on
Step 1: Firstly, open a browser and visit https://flasher.meshtastic.org/# requires Chrome or Edge browser.
Step 2: Then, use a suitable USB cable to connect the device to the PC. You may need to turn off, then press and hold the BOOT button while plugging in the USB cable.
Step 3: Follow the following instruction provided to perform the subsequent flashing operations. Select the Device as "Seeed XIAO S3", Firmware as the lastest one, and then click "Flash". Don't forget to tick "Full Erase and Install" if you want to cover previous firmware.
- Mount the kit
Seat the XIAO ESP32-S3 onto the Wio SX1262 base. Tighten if needed.
[INSERT_IMAGE: lora_mount.jpg | Caption: XIAO on Wio SX1262 base] - Attach the antenna
Screw the SMA antenna to the LoRa port. Keep it upright and away from the camera cable.
[INSERT_IMAGE: lora_antenna.jpg | Caption: SMA antenna installed] - Wire/confirm SPI pins
On most XIAO S3 + Wio SX1262 kits, SPI is pre-routed. If you’re hand-wiring, connect SCK/MISO/MOSI/CS, plus DIO1, RST, BUSY exactly as per Seeed wiki.
[INSERT_WIRING_DIAGRAM: sx1262_pins.svg | Caption: NSS/DIO1/RST/BUSY pin map] - Install RadioLib
Arduino IDE → Library Manager → search “RadioLib” → Install. - Set frequency & region
In the sketch, setLORA_FREQ_MHZto your band (e.g., 865.0). This must match all nodes. - Test TX
Open Serial Monitor at 115200.
You’ll seeLoRa init OK.Trigger an event (play a chainsaw sound or show elephant image).
Keep payloads short and consistent:
"ELEPHANT","BOAR","ILLEGAL:chainsaw","ILLEGAL:gunshot","VEHICLE","FIRE:detected"- Enable hops/relay on repeaters.
code:
/**************************************************************
* EleTect 2.0 — Audio + Vision + DFPlayer + LoRa (SX1262)
* Board: Seeed XIAO ESP32-S3 Sense
*
* AUDIO (Edge Impulse):
* Classes: elephant_call, boar_grunt, chainsaw, gunshot, vehicle, background
*
* VISION (Grove Vision AI V2 + SSCMA):
* Labels in your deployed model: "elephant", "boar" (add others if you trained)
*
* LORA:
* Wio SX1262 (XIAO ESP32S3 kit) — RadioLib P2P messages
*
* DFPLAYER:
* Track 1 -> bees.mp3 (elephant deterrent)
* Track 2 -> predator.mp3 (boar deterrent)
**************************************************************/
// ==== AUDIO (Edge Impulse) ====
#include <EleTect_inferencing.h> // <-- your EI audio export
#include "freertos/FreeRTOS.h"
#include "freertos/task.h"
#include "driver/i2s.h"
// ==== VISION (SSCMA - Grove Vision AI V2) ====
#include <Seeed_Arduino_SSCMA.h>
SSCMA AI;
// ==== LORA (RadioLib for SX1262) ====
#include <RadioLib.h>
// ==== DFPLAYER ====
#include <HardwareSerial.h>
#include <DFRobotDFPlayerMini.h>
// ======================= CONFIG ===========================
// --------- DFPlayer UART pins (set to match your wiring) ---------
// For XIAO ESP32-S3, use HardwareSerial(1) or (2) with pins you wired to DFPlayer
HardwareSerial dfSerial(1); // UART1
// TODO: Replace with your pins (consult XIAO ESP32S3 pinout)
static const int DF_TX_PIN = 10; // XIAO TX -> DFPlayer RX
static const int DF_RX_PIN = 9; // XIAO RX -> DFPlayer TX
DFRobotDFPlayerMini dfPlayer;
// --------- SX1262 pin mapping (from Seeed wiki for your kit) ---------
// These vary by the Wio SX1262 XIAO base. Copy EXACT pins from the wiki page you’re using.
// Common mappings for XIAO+SX1262 boards look like this (example only):
// NSS(SS) , DIO1 , NRST , BUSY (SPI uses SCK/MISO/MOSI default VSPI pins)
static const int LORA_NSS_PIN = 7; // CS
static const int LORA_DIO1_PIN = 1;
static const int LORA_RST_PIN = 2;
static const int LORA_BUSY_PIN = 0;
// SPI pins typically auto-config on ESP32; if you need to set:
// SCK=GPIO36, MISO=GPIO37, MOSI=GPIO35 on XIAO S3 (check your board doc)
// If needed: SPI.begin(SCK, MISO, MOSI, LORA_NSS_PIN);
// Select your frequency (match your region & antenna)
// e.g., 868.0 for EU, 915.0 for US, 865~867 for India (check local regs!)
float LORA_FREQ_MHZ = 865.0;
// Create RadioLib instance for SX1262
SX1262 radio = new Module(LORA_NSS_PIN, LORA_DIO1_PIN, LORA_RST_PIN, LORA_BUSY_PIN);
// --------- CLASSIFICATION THRESHOLDS & COOLDOWNS ---------
const float TH_ELPH = 0.70f;
const float TH_BOAR = 0.70f;
const float TH_SAW = 0.80f;
const float TH_GUN = 0.80f;
const float TH_VEH = 0.80f;
const uint32_t COOLDOWN_MS = 10 * 1000; // 10s to avoid spam
// Audio inference buffers (Edge Impulse demo scaffolding)
typedef struct {
int16_t *buffer;
uint8_t buf_ready;
uint32_t buf_count;
uint32_t n_samples;
} inference_t;
static inference_t inference;
static const uint32_t sample_buffer_size = 2048;
static int16_t sampleBuffer[sample_buffer_size];
static bool debug_nn = false;
static bool record_status = true;
// I2S pins for XIAO ESP32S3 Sense mic (match your earlier working code)
static const int I2S_BCLK = 26;
static const int I2S_WS = 32;
static const int I2S_DIN = 33;
// ---- Debounce state ----
uint32_t lastElephantMs = 0;
uint32_t lastBoarMs = 0;
uint32_t lastSawMs = 0;
uint32_t lastGunMs = 0;
uint32_t lastVehMs = 0;
// ---- Vision polling ----
uint32_t lastVisionMs = 0;
const uint32_t VISION_PERIOD_MS = 300; // call AI every ~300ms
// ======================= HELPERS ===========================
void sendLoRa(const String& msg) {
int16_t state = radio.transmit(msg);
if (state == RADIOLIB_ERR_NONE) {
Serial.print("[LoRa] TX OK: ");
Serial.println(msg);
} else {
Serial.print("[LoRa] TX fail, code=");
Serial.println(state);
}
}
void playDeterrentElephant() {
// Track 1: bee buzz
dfPlayer.play(1);
}
void playDeterrentBoar() {
// Track 2: predator sound / ultrasound trigger (audio track)
dfPlayer.play(2);
}
bool cooldownExpired(uint32_t &lastMs) {
uint32_t now = millis();
if (now - lastMs >= COOLDOWN_MS) {
lastMs = now;
return true;
}
return false;
}
void handleEvent(const char* evt) {
String msg = evt;
if (msg == "ELEPHANT") {
if (cooldownExpired(lastElephantMs)) {
playDeterrentElephant();
sendLoRa("ELEPHANT");
Serial.println("[EVENT] ELEPHANT");
}
return;
}
if (msg == "BOAR") {
if (cooldownExpired(lastBoarMs)) {
playDeterrentBoar();
sendLoRa("BOAR");
Serial.println("[EVENT] BOAR");
}
return;
}
if (msg == "ILLEGAL:chainsaw") {
if (cooldownExpired(lastSawMs)) {
sendLoRa("ILLEGAL:chainsaw");
Serial.println("[EVENT] CHAINSAW");
}
return;
}
if (msg == "ILLEGAL:gunshot") {
if (cooldownExpired(lastGunMs)) {
sendLoRa("ILLEGAL:gunshot");
Serial.println("[EVENT] GUNSHOT");
}
return;
}
if (msg == "VEHICLE") {
if (cooldownExpired(lastVehMs)) {
sendLoRa("VEHICLE");
Serial.println("[EVENT] VEHICLE");
}
return;
}
}
// ================== EDGE IMPULSE AUDIO SETUP ===================
static void audio_inference_callback(uint32_t n_bytes) {
for (int i = 0; i < n_bytes >> 1; i++) {
inference.buffer[inference.buf_count++] = sampleBuffer[i];
if (inference.buf_count >= inference.n_samples) {
inference.buf_count = 0;
inference.buf_ready = 1;
}
}
}
static void capture_samples(void* arg) {
const int32_t i2s_bytes_to_read = (uint32_t)arg;
size_t bytes_read = i2s_bytes_to_read;
while (record_status) {
i2s_read((i2s_port_t)1, (void*)sampleBuffer, i2s_bytes_to_read, &bytes_read, 100);
if (bytes_read > 0) {
// gain
for (int x = 0; x < i2s_bytes_to_read/2; x++) {
sampleBuffer[x] = (int16_t)(sampleBuffer[x]) * 8;
}
if (record_status) audio_inference_callback(i2s_bytes_to_read);
else break;
}
}
vTaskDelete(NULL);
}
static int i2s_init(uint32_t sampling_rate) {
i2s_config_t i2s_config = {
.mode = (i2s_mode_t)(I2S_MODE_MASTER | I2S_MODE_RX | I2S_MODE_TX),
.sample_rate = (int)sampling_rate,
.bits_per_sample = I2S_BITS_PER_SAMPLE_16BIT,
.channel_format = I2S_CHANNEL_FMT_ONLY_RIGHT,
.communication_format = I2S_COMM_FORMAT_I2S,
.intr_alloc_flags = 0,
.dma_buf_count = 8,
.dma_buf_len = 512,
.use_apll = false,
.tx_desc_auto_clear = false,
.fixed_mclk = -1,
};
i2s_pin_config_t pin_config = {
.bck_io_num = I2S_BCLK,
.ws_io_num = I2S_WS,
.data_out_num = -1,
.data_in_num = I2S_DIN,
};
esp_err_t ret = 0;
ret = i2s_driver_install((i2s_port_t)1, &i2s_config, 0, NULL);
if (ret != ESP_OK) return ret;
ret = i2s_set_pin((i2s_port_t)1, &pin_config);
if (ret != ESP_OK) return ret;
ret = i2s_zero_dma_buffer((i2s_port_t)1);
return ret;
}
static int i2s_deinit(void) {
i2s_driver_uninstall((i2s_port_t)1);
return 0;
}
static bool microphone_inference_start(uint32_t n_samples) {
inference.buffer = (int16_t *)malloc(n_samples * sizeof(int16_t));
if (inference.buffer == NULL) return false;
inference.buf_count = 0;
inference.n_samples = n_samples;
inference.buf_ready = 0;
if (i2s_init(EI_CLASSIFIER_FREQUENCY)) {
ei_printf("Failed to start I2S!");
return false;
}
ei_sleep(100);
record_status = true;
xTaskCreate(capture_samples, "CaptureSamples", 1024 * 32, (void*)sample_buffer_size, 10, NULL);
return true;
}
static bool microphone_inference_record(void) {
while (inference.buf_ready == 0) { delay(10); }
inference.buf_ready = 0;
return true;
}
static int microphone_audio_signal_get_data(size_t offset, size_t length, float *out_ptr) {
numpy::int16_to_float(&inference.buffer[offset], out_ptr, length);
return 0;
}
// ======================= SETUP ===============================
void setup() {
Serial.begin(115200);
while(!Serial) {}
Serial.println("\nEleTect 2.0 fused: Audio+Vision+LoRa+DFPlayer");
// ---- DFPlayer ----
dfSerial.begin(9600, SERIAL_8N1, DF_RX_PIN, DF_TX_PIN);
if (!dfPlayer.begin(dfSerial)) {
Serial.println("DFPlayer init failed (check wiring & SD). Continuing without sound.");
} else {
dfPlayer.volume(25); // 0..30
Serial.println("DFPlayer OK.");
}
// ---- LoRa (SX1262 via RadioLib) ----
// If needed: SPI.begin(SCK, MISO, MOSI, LORA_NSS_PIN);
int16_t state = radio.begin(LORA_FREQ_MHZ, 125.0, 9, 7, 0x34, 10, 8, 0);
if (state == RADIOLIB_ERR_NONE) {
Serial.println("LoRa init OK.");
} else {
Serial.print("LoRa init failed, code=");
Serial.println(state);
}
// ---- Vision (SSCMA) ----
AI.begin();
Serial.println("SSCMA init done.");
// ---- Audio (Edge Impulse) ----
ei_printf("Inferencing settings:\n");
ei_printf("\tInterval: "); ei_printf_float((float)EI_CLASSIFIER_INTERVAL_MS);
ei_printf("\t ms.\n");
ei_printf("\tFrame size: %d\n", EI_CLASSIFIER_DSP_INPUT_FRAME_SIZE);
ei_printf("\tSample length: %d ms.\n", EI_CLASSIFIER_RAW_SAMPLE_COUNT / 16);
ei_printf("\tNo. of classes: %d\n", sizeof(ei_classifier_inferencing_categories) / sizeof(ei_classifier_inferencing_categories[0]));
ei_sleep(500);
if (!microphone_inference_start(EI_CLASSIFIER_RAW_SAMPLE_COUNT)) {
ei_printf("ERR: Could not allocate audio buffer.\n");
} else {
ei_printf("Audio recording started.\n");
}
}
// ======================= MAIN LOOP ===========================
void loop() {
// ---- AUDIO INFERENCE ----
if (microphone_inference_record()) {
signal_t signal;
signal.total_length = EI_CLASSIFIER_RAW_SAMPLE_COUNT;
signal.get_data = µphone_audio_signal_get_data;
ei_impulse_result_t result = { 0 };
EI_IMPULSE_ERROR r = run_classifier(&signal, &result, debug_nn);
if (r == EI_IMPULSE_OK) {
// pick max class
const char* maxLabel = nullptr;
float maxVal = -1.0f;
for (size_t ix = 0; ix < EI_CLASSIFIER_LABEL_COUNT; ix++) {
const char* label = result.classification[ix].label;
float val = result.classification[ix].value;
if (val > maxVal) { maxVal = val; maxLabel = label; }
}
if (maxLabel != nullptr) {
// Map to events with thresholds
if (strcmp(maxLabel, "elephant_call") == 0 && maxVal >= TH_ELPH) {
handleEvent("ELEPHANT");
} else if (strcmp(maxLabel, "boar_grunt") == 0 && maxVal >= TH_BOAR) {
handleEvent("BOAR");
} else if (strcmp(maxLabel, "chainsaw") == 0 && maxVal >= TH_SAW) {
handleEvent("ILLEGAL:chainsaw");
} else if (strcmp(maxLabel, "gunshot") == 0 && maxVal >= TH_GUN) {
handleEvent("ILLEGAL:gunshot");
} else if (strcmp(maxLabel, "vehicle") == 0 && maxVal >= TH_VEH) {
handleEvent("VEHICLE");
}
}
}
}
// ---- VISION INFERENCE (periodic) ----
uint32_t now = millis();
if (now - lastVisionMs >= VISION_PERIOD_MS) {
lastVisionMs = now;
// Prefer invoke(1, false, false): single run, no filter, no image
if (!AI.invoke(1, false, false)) {
auto &boxes = AI.boxes();
for (size_t i = 0; i < boxes.size(); i++) {
int score = boxes[i].score; // 0..100
String label = boxes[i].label; // depends on your model labels
if (score > 80) {
// Map labels to events
if (label == "elephant") {
handleEvent("ELEPHANT");
} else if (label == "boar") {
handleEvent("BOAR");
}
// add more labels if your model has them
}
}
}
}
}Each EleTect 2.0 node not only detects elephants, boars, and illegal activities — it also logs every event with a timestamp and triggers deterrent sounds to reduce conflicts.
📒 RTC + SD LoggingA Real-Time Clock (RTC) (DS3231) ensures that every detection is stored with the correct date and time, even when the node is deep in the forest.
Logs are written to the SD card as a simple CSV file:
YYYY-MM-DD hh:mm:ss, source=<vision|audio>, class=<elephant|chainsaw|...>, conf=<0..1>- Verification & evidence: Rangers can cross-check later (e.g. “chainsaw at 02:17”).
- Cross-checking incidents: Compare logs with ranger patrol reports or camera traps.
- Model improvement: Use logs to spot false positives/negatives and retrain ML models.
- Operational analytics: See what times animals or threats appear most often.
- Audits & maintenance: Detect if a sensor is inactive (no logs for days).
Example CSV file from /logs/events.csv:
timestamp,source,class,confidence
2025-09-30 19:04:12,vision,elephant,0.902
2025-09-30 19:05:47,audio,elephant,0.915
2025-09-30 23:14:21,audio,chainsaw,0.841
2025-09-30 23:16:09,vision,boar,0.873
💡 These logs can be opened in Excel/Sheets or loaded into Jupyter/Edge Impulse Studio to refine models later.
Complete Code
/**************************************************************
* EleTect 2.0 — COMPLETE FUSED SKETCH
* Board: Seeed XIAO ESP32-S3 Sense
*
* Features:
* - AUDIO (Edge Impulse): elephant_call, boar_grunt, chainsaw, gunshot, vehicle, background
* - VISION (Grove Vision AI V2 + SSCMA): elephant, boar
* - DFPLAYER deterrents:
* Track 1 -> bee buzz (elephant)
* Track 2 -> predator (boar)
* Track 3 -> siren (optional)
* Track 4 -> chainsaw tone (optional)
* Track 5 -> gunshot tone (optional)
* Track 6 -> vehicle tone (optional)
* - LoRa P2P (SX1262 / Wio SX1262 for XIAO) via RadioLib
* - RTC + SD CSV logging: timestamp,source,class,confidence
**************************************************************/
// ================== REQUIRED LIBRARIES ==================
// Install: RadioLib, DFRobotDFPlayerMini, RTClib, Seeed_Arduino_SSCMA
// Include your Edge Impulse audio export (adds EleTect_inferencing.h)
// ---- Edge Impulse audio model export ----
#include <EleTect_inferencing.h>
// ---- ESP32 includes for audio I2S ----
#include "freertos/FreeRTOS.h"
#include "freertos/task.h"
#include "driver/i2s.h"
// ---- Grove Vision AI V2 (SSCMA) ----
#include <Seeed_Arduino_SSCMA.h>
SSCMA AI;
// ---- LoRa SX1262 (RadioLib) ----
#include <RadioLib.h>
// ---- DFPlayer Mini ----
#include <HardwareSerial.h>
#include <DFRobotDFPlayerMini.h>
// ---- Logging (RTC + SD) ----
#include <RTClib.h>
#include <SD.h>
#include <SPI.h>
// ================== USER CONFIG (EDIT) ==================
// ---------- DFPLAYER UART PINS (XIAO ESP32-S3) ----------
HardwareSerial dfSerial(1);
// TODO: Set these to the pins you wired to DFPlayer:
static const int DF_TX_PIN = 10; // XIAO TX -> DFPlayer RX
static const int DF_RX_PIN = 9; // XIAO RX -> DFPlayer TX
DFRobotDFPlayerMini dfPlayer;
// ---------- SX1262 PINS (SEEED KIT PINOUT) ---------------
// Replace with exact pins from your Seeed wiki/carrier board
static const int LORA_NSS_PIN = 7; // CS/NSS
static const int LORA_DIO1_PIN = 1; // DIO1
static const int LORA_RST_PIN = 2; // RESET
static const int LORA_BUSY_PIN = 0; // BUSY
// If your SPI pins are not default, call SPI.begin(SCK, MISO, MOSI, LORA_NSS_PIN);
// LoRa Frequency (match regional regs and all nodes)
float LORA_FREQ_MHZ = 865.0; // e.g., 865–867 (IN), 868 (EU), 915 (US)
SX1262 radio = new Module(LORA_NSS_PIN, LORA_DIO1_PIN, LORA_RST_PIN, LORA_BUSY_PIN);
// ---------- AUDIO I2S PINS (XIAO ESP32-S3 Sense MIC) -----
static const int I2S_BCLK = 26;
static const int I2S_WS = 32;
static const int I2S_DIN = 33;
// ---------- LOGGING (RTC + SD) ---------------------------
static const int SD_CS_PIN = 21; // XIAO Sense onboard SD: CS=21
const char* LOG_DIR = "/logs";
const char* LOG_FILE = "/logs/events.csv";
RTC_DS3231 rtc;
bool rtcOk = false;
bool sdOk = false;
// ---------- CLASS THRESHOLDS & COOLDOWN ------------------
const float TH_ELPH = 0.70f;
const float TH_BOAR = 0.70f;
const float TH_SAW = 0.80f;
const float TH_GUN = 0.80f;
const float TH_VEH = 0.80f;
const uint32_t COOLDOWN_MS = 10 * 1000; // 10 s debounce for alerts
// ---------- DFPLAYER TRACK MAP ---------------------------
const uint8_t TRK_ELEPHANT = 1; // 01_bee_buzz.mp3
const uint8_t TRK_BOAR = 2; // 02_predator.mp3
const uint8_t TRK_SIREN = 3; // 03_siren.mp3 (optional)
const uint8_t TRK_SAW = 4; // 04_chainsaw.mp3 (optional)
const uint8_t TRK_GUN = 5; // 05_gunshot.mp3 (optional)
const uint8_t TRK_VEH = 6; // 06_vehicle.mp3 (optional)
// ---------- VISION POLLING RATE --------------------------
uint32_t lastVisionMs = 0;
const uint32_t VISION_PERIOD_MS = 300;
// ---------- COOLDOWN STATE -------------------------------
uint32_t lastElephantMs = 0;
uint32_t lastBoarMs = 0;
uint32_t lastSawMs = 0;
uint32_t lastGunMs = 0;
uint32_t lastVehMs = 0;
// ================== AUDIO INFERENCE STATE =================
typedef struct {
int16_t *buffer;
uint8_t buf_ready;
uint32_t buf_count;
uint32_t n_samples;
} inference_t;
static inference_t inference;
static const uint32_t sample_buffer_size = 2048;
static int16_t sampleBuffer[sample_buffer_size];
static bool debug_nn = false;
static bool record_status = true;
// ================== HELPERS ===============================
void playTrack(uint8_t t) {
// Drain DFPlayer status quickly to avoid blocking
if (dfPlayer.available()) {
(void)dfPlayer.readType();
(void)dfPlayer.read();
}
dfPlayer.play(t);
}
void playDeterrentElephant() { playTrack(TRK_ELEPHANT); }
void playDeterrentBoar() { playTrack(TRK_BOAR); }
bool cooldownExpired(uint32_t &lastMs) {
uint32_t now = millis();
if (now - lastMs >= COOLDOWN_MS) {
lastMs = now;
return true;
}
return false;
}
// ---- LoRa send ----
void sendLoRa(const String& msg) {
int16_t state = radio.transmit(msg);
if (state == RADIOLIB_ERR_NONE) {
Serial.print("[LoRa] TX OK: ");
Serial.println(msg);
} else {
Serial.print("[LoRa] TX fail, code=");
Serial.println(state);
}
}
// ---- Timestamp & Logging ----
String two(int v) { return (v < 10) ? "0" + String(v) : String(v); }
String getTimestamp() {
if (!rtcOk) return "1970-01-01 00:00:00";
DateTime now = rtc.now();
return String(now.year()) + "-" + two(now.month()) + "-" + two(now.day()) + " " +
two(now.hour()) + ":" + two(now.minute()) + ":" + two(now.second());
}
void ensureLogHeader() {
if (!sdOk) return;
if (!SD.exists(LOG_DIR)) SD.mkdir(LOG_DIR);
if (!SD.exists(LOG_FILE)) {
File f = SD.open(LOG_FILE, FILE_WRITE);
if (f) {
f.println("timestamp,source,class,confidence");
f.close();
}
}
}
void logEventCSV(const String& source, const String& clazz, float conf) {
if (!sdOk) return;
File f = SD.open(LOG_FILE, FILE_APPEND);
if (!f) return;
f.println(getTimestamp() + "," + source + "," + clazz + "," + String(conf, 3));
f.close();
Serial.printf("[LOG] %s,%s,%.3f\n", source.c_str(), clazz.c_str(), conf);
}
void logEvent(const char* source, const char* clazz, float conf) {
logEventCSV(String(source), String(clazz), conf);
}
// ---- Unified event handler (deterrent + LoRa + cooldown) ----
void handleEvent(const char* evt) {
String msg = evt;
if (msg == "ELEPHANT") {
if (cooldownExpired(lastElephantMs)) {
playDeterrentElephant();
sendLoRa("ELEPHANT");
Serial.println("[EVENT] ELEPHANT");
}
return;
}
if (msg == "BOAR") {
if (cooldownExpired(lastBoarMs)) {
playDeterrentBoar();
sendLoRa("BOAR");
Serial.println("[EVENT] BOAR");
}
return;
}
if (msg == "ILLEGAL:chainsaw") {
if (cooldownExpired(lastSawMs)) {
sendLoRa("ILLEGAL:chainsaw");
Serial.println("[EVENT] CHAINSAW");
}
return;
}
if (msg == "ILLEGAL:gunshot") {
if (cooldownExpired(lastGunMs)) {
sendLoRa("ILLEGAL:gunshot");
Serial.println("[EVENT] GUNSHOT");
}
return;
}
if (msg == "VEHICLE") {
if (cooldownExpired(lastVehMs)) {
sendLoRa("VEHICLE");
Serial.println("[EVENT] VEHICLE");
}
return;
}
}
// ================== AUDIO (Edge Impulse) ==================
static void audio_inference_callback(uint32_t n_bytes) {
for (int i = 0; i < n_bytes >> 1; i++) {
inference.buffer[inference.buf_count++] = sampleBuffer[i];
if (inference.buf_count >= inference.n_samples) {
inference.buf_count = 0;
inference.buf_ready = 1;
}
}
}
static void capture_samples(void* arg) {
const int32_t i2s_bytes_to_read = (uint32_t)arg;
size_t bytes_read = i2s_bytes_to_read;
while (record_status) {
i2s_read((i2s_port_t)1, (void*)sampleBuffer, i2s_bytes_to_read, &bytes_read, 100);
if (bytes_read > 0) {
// gain
for (int x = 0; x < i2s_bytes_to_read/2; x++) {
sampleBuffer[x] = (int16_t)(sampleBuffer[x]) * 8;
}
if (record_status) audio_inference_callback(i2s_bytes_to_read);
else break;
}
}
vTaskDelete(NULL);
}
static int i2s_init(uint32_t sampling_rate) {
i2s_config_t i2s_config = {
.mode = (i2s_mode_t)(I2S_MODE_MASTER | I2S_MODE_RX | I2S_MODE_TX),
.sample_rate = (int)sampling_rate,
.bits_per_sample = I2S_BITS_PER_SAMPLE_16BIT,
.channel_format = I2S_CHANNEL_FMT_ONLY_RIGHT,
.communication_format = I2S_COMM_FORMAT_I2S,
.intr_alloc_flags = 0,
.dma_buf_count = 8,
.dma_buf_len = 512,
.use_apll = false,
.tx_desc_auto_clear = false,
.fixed_mclk = -1,
};
i2s_pin_config_t pin_config = {
.bck_io_num = I2S_BCLK,
.ws_io_num = I2S_WS,
.data_out_num = -1,
.data_in_num = I2S_DIN,
};
esp_err_t ret = 0;
ret = i2s_driver_install((i2s_port_t)1, &i2s_config, 0, NULL);
if (ret != ESP_OK) return ret;
ret = i2s_set_pin((i2s_port_t)1, &pin_config);
if (ret != ESP_OK) return ret;
ret = i2s_zero_dma_buffer((i2s_port_t)1);
return ret;
}
static int i2s_deinit(void) {
i2s_driver_uninstall((i2s_port_t)1);
return 0;
}
static bool microphone_inference_start(uint32_t n_samples) {
inference.buffer = (int16_t *)malloc(n_samples * sizeof(int16_t));
if (inference.buffer == NULL) return false;
inference.buf_count = 0;
inference.n_samples = n_samples;
inference.buf_ready = 0;
if (i2s_init(EI_CLASSIFIER_FREQUENCY)) {
ei_printf("Failed to start I2S!");
return false;
}
ei_sleep(100);
record_status = true;
xTaskCreate(capture_samples, "CaptureSamples", 1024 * 32, (void*)sample_buffer_size, 10, NULL);
return true;
}
static bool microphone_inference_record(void) {
while (inference.buf_ready == 0) { delay(10); }
inference.buf_ready = 0;
return true;
}
static int microphone_audio_signal_get_data(size_t offset, size_t length, float *out_ptr) {
numpy::int16_to_float(&inference.buffer[offset], out_ptr, length);
return 0;
}
// ================== SETUP ==================
void setup() {
Serial.begin(115200);
while(!Serial) {}
Serial.println("\nEleTect 2.0 — Fused (Audio + Vision + LoRa + DFPlayer + Logging)");
// ---- DFPlayer ----
dfSerial.begin(9600, SERIAL_8N1, DF_RX_PIN, DF_TX_PIN);
if (!dfPlayer.begin(dfSerial)) {
Serial.println("DFPlayer init failed (check wiring & SD). Continuing without sound.");
} else {
dfPlayer.volume(25); // 0..30
Serial.println("DFPlayer OK.");
}
// ---- LoRa (SX1262 via RadioLib) ----
// If needed for your carrier: SPI.begin(SCK, MISO, MOSI, LORA_NSS_PIN);
int16_t state = radio.begin(LORA_FREQ_MHZ, 125.0, 9, 7, 0x34, 10, 8, 0);
if (state == RADIOLIB_ERR_NONE) {
Serial.println("LoRa init OK.");
} else {
Serial.print("LoRa init failed, code=");
Serial.println(state);
}
// ---- Vision (SSCMA) ----
AI.begin();
Serial.println("SSCMA init done.");
// ---- RTC ----
if (rtc.begin()) {
// If RTC lost power once, set the time with:
// rtc.adjust(DateTime(F(__DATE__), F(__TIME__)));
rtcOk = true;
Serial.println("RTC DS3231 OK.");
} else {
rtcOk = false;
Serial.println("RTC init failed (check wiring).");
}
// ---- SD ----
if (SD.begin(SD_CS_PIN)) {
sdOk = true;
ensureLogHeader();
Serial.println("SD OK, logging enabled.");
} else {
sdOk = false;
Serial.println("SD init failed (check CS & card).");
}
// ---- Audio (Edge Impulse) ----
ei_printf("Inferencing settings:\n");
ei_printf("\tInterval: "); ei_printf_float((float)EI_CLASSIFIER_INTERVAL_MS); ei_printf(" ms\n");
ei_printf("\tFrame size: %d\n", EI_CLASSIFIER_DSP_INPUT_FRAME_SIZE);
ei_printf("\tSample length: %d ms\n", EI_CLASSIFIER_RAW_SAMPLE_COUNT / 16);
ei_printf("\tNo. of classes: %d\n", sizeof(ei_classifier_inferencing_categories) / sizeof(ei_classifier_inferencing_categories[0]));
if (!microphone_inference_start(EI_CLASSIFIER_RAW_SAMPLE_COUNT)) {
ei_printf("ERR: Could not allocate audio buffer.\n");
} else {
ei_printf("Audio recording started.\n");
}
}
// ================== LOOP ==================
void loop() {
// ---- AUDIO INFERENCE ----
if (microphone_inference_record()) {
signal_t signal;
signal.total_length = EI_CLASSIFIER_RAW_SAMPLE_COUNT;
signal.get_data = µphone_audio_signal_get_data;
ei_impulse_result_t result = { 0 };
EI_IMPULSE_ERROR r = run_classifier(&signal, &result, debug_nn);
if (r == EI_IMPULSE_OK) {
// Determine max class
const char* maxLabel = nullptr;
float maxVal = -1.0f;
for (size_t ix = 0; ix < EI_CLASSIFIER_LABEL_COUNT; ix++) {
const char* label = result.classification[ix].label;
float val = result.classification[ix].value;
if (val > maxVal) { maxVal = val; maxLabel = label; }
}
if (maxLabel != nullptr) {
if (strcmp(maxLabel, "elephant_call") == 0 && maxVal >= TH_ELPH) {
logEvent("audio", "elephant", maxVal);
handleEvent("ELEPHANT");
} else if (strcmp(maxLabel, "boar_grunt") == 0 && maxVal >= TH_BOAR) {
logEvent("audio", "boar", maxVal);
handleEvent("BOAR");
} else if (strcmp(maxLabel, "chainsaw") == 0 && maxVal >= TH_SAW) {
logEvent("audio", "chainsaw", maxVal);
playTrack(TRK_SAW); // optional tone
handleEvent("ILLEGAL:chainsaw");
} else if (strcmp(maxLabel, "gunshot") == 0 && maxVal >= TH_GUN) {
logEvent("audio", "gunshot", maxVal);
playTrack(TRK_GUN);
handleEvent("ILLEGAL:gunshot");
} else if (strcmp(maxLabel, "vehicle") == 0 && maxVal >= TH_VEH) {
logEvent("audio", "vehicle", maxVal);
playTrack(TRK_VEH);
handleEvent("VEHICLE");
}
}
}
}
// ---- VISION INFERENCE (periodic, non-blocking) ----
uint32_t now = millis();
if (now - lastVisionMs >= VISION_PERIOD_MS) {
lastVisionMs = now;
// invoke once, no filter, not contain image
if (!AI.invoke(1, false, false)) {
auto &boxes = AI.boxes();
for (size_t i = 0; i < boxes.size(); i++) {
// SSCMA box has .score (0..100), .label (String)
int score = boxes[i].score;
String label = boxes[i].label;
float conf = score / 100.0f;
if (score > 80) {
if (label == "elephant") {
logEvent("vision", "elephant", conf);
handleEvent("ELEPHANT");
} else if (label == "boar") {
logEvent("vision", "boar", conf);
handleEvent("BOAR");
}
}
}
}
}
}- Logs give a long-term archive of detections for research and legal follow-up.
- Data can be re-used to train better ML models
- Communities can trust the system with verifiable records of when and where events happened.
Standard activity (MED):
- Energy: ~80 Wh/day
- Solar: 30–40 W panel (PSH 4 h, 0.7 derate)
- Battery (1 night + losses): 3S 10 Ah
- Fuses: Main 10 A; Amp 3 A; Strobes 7.5 A; Logic 1 A
- Wiring: Battery/LED/Amp AWG16–18; Logic AWG22–24
High activity (more flashes):
- Energy: ~96 Wh/day
- Solar: 40–50 W panel
- Battery: 3S 12 Ah
- Enclosure: PETG/ASA/ABS, drip edges, overhangs, UV-resistant
- Glands: IP67 cable glands for every external cable (power, speakers, LED harness, RF)
- Power (GX12-2 or GX16-2)
- Speakers L/R (GX12-2 each)
- Strobes harness (GX16-4 or GX16-6, depending on grouping)
- LoRa antenna via SMA bulkhead (not aviation) with 50 Ω coax
- Connectors: GX12/GX16 aviation with O-rings & caps:
Power (GX12-2 or GX16-2)
Speakers L/R (GX12-2 each)
Strobes harness (GX16-4 or GX16-6, depending on grouping)
LoRa antenna via SMA bulkhead (not aviation) with 50 Ω coax - Battery: in external IP67 box with XT30/XT60, main fuse, and strain relief
- Vent: hydrophobic ePTFE vent plug to minimize condensation
Razor is a plug-on module for EleTect 2.0 that adds:
- Two strobe “eyes” → each eye is 3×10 W LEDs on an aluminum plate (for thermal mass)
- Ultrasonic tweeter → PWM frequency sweep (18–25 kHz) to disturb boars
- Audio deterrents → DFPlayer plays crackers/gunshot clips
- EEPROM ID → EleTect auto-switches to boar mode if Razor is attached
All external runs (strobe harness, speaker, power) use IP67 cable glands and GX12/GX16 aviation connectors for rugged field swapping.
📦 Parts (Razor)- LEDs: 6× “10 W” white LEDs (≈9–12 V, 0.9–1.0 A each)
- Heatsinks: 2× aluminum plates (3–4 mm thick), each carries 3 LEDs with thermal paste
- LED Drivers: constant-current driver (900 mA, 9–12 V). Drivers must tolerate input side on/off or have EN/PWM pin
MOSFETs: 2× logic-level N-MOSFETs (e.g., IRLZ44N/IRLZ34N/AO3400) to switch driver banks (one per eye),Here i have used the IRLZ44N + flyback diodes not needed for LEDs
- Ultrasonic tweeter: 1× with a small Class-D/AB driver (module accepts logic-level PWM audio)
- EEPROM: 24LC02/24LC04 (I²C) to store Razor ID
- Connectors: GX12/GX16 aviation connectors, SMA bulkhead for RF (from main unit), XT30/XT60 if Razor powered separately (usually it piggybacks on EleTect 12 V bus)
- Glands: IP67 cable glands sized to cables (strobe harness, speaker, power)
- Hardware: M3 screws, heat-set inserts, thermal paste, wire (AWG16–18 for LED power, AWG22–24 for control)
3D print (PETG/ASA/ABS)
Razor front shroud (eye openings)
Internal mounts for LED driver boards, ultrasonic amp, EEPROM carrier
Rear cover & gasket groove
Mounting tabs to slide and fit onto EleTect 2.0
Laser cut
- 2× aluminum plates (3–4 mm) for the two eyes
→ drill pattern for 3 LEDs; countersink if needed
→ add M3 holes to bolt into the printed bezel - acrylic cosmetic bezel/IR filter window for aesthetics
Route driver output to its LED; driver input to 12 V bus through MOSFET switch
- Route driver output to its LED; driver input to 12 V bus through MOSFET switch
- Power: 12 V bus from EleTect 2.0 via GX12/GX16 (2-pin). Fuse per branch (strobe bank ~7.5 A max, ultrasound <1 A)
Strobes:
- Each eye: 3 LEDs, each on its own CC driver (900 mA)
- Tie the three driver inputs (VIN/GND) together on a small distribution board
- Switch ground of that driver-input group with one N-MOSFET (low-side)
- Gate → XIAO GPIO via 100 Ω, Gate-to-GND 100 kΩ pulldown, Source → GND, Drain → driver-input GND rail
- Do this twice (LEFT eye, RIGHT eye) for independent patterns
- Ultrasonic tweeter: driven by a small audio driver fed with PWM from XIAO (LEDC). Use series RC (e.g., 100 Ω + 10 nF) if your amp needs smoothing; many Class-D boards accept PWM fine at 20–25 kHz.
- EEPROM (24LC02): SCL/SDA to I²C lines; write “RAZ2” signature at address 0x50 (page 0). 3.3 V, GND.
⚠️ Don’t PWM raw high-power LEDs from GPIO. Always use constant-current drivers and switch their input (or use driver EN pin). Short on/off strobe bursts are OK with input switching.⚙️ Firmware — Razor Module Additions
Below are add-on snippets to merge into your existing fused EleTect 2.0 sketch (the one I gave you earlier). They:
- read Razor EEPROM ID
- define pins for the two strobe eyes + ultrasound PWM
- implement strobe patterns + ultrasound sweeps
- enhance BOAR event handling to use Razor (strobes + ultrasound + DFPlayer crackers/gunshots)
// ===== RAZOR MODULE PINS =====
// Strobe MOSFET gates (low-side switching of LED driver input grounds)
static const int PIN_STROBE_LEFT  = 4;   // GPIO -> MOSFET gate (Left eye drivers ground switch)
static const int PIN_STROBE_RIGHT = 5;   // GPIO -> MOSFET gate (Right eye drivers ground switch)

// Ultrasonic PWM out (to small audio amp -> ultrasonic tweeter)
static const int PIN_US_PWM       = 6;   // LEDC PWM capable

// I2C EEPROM address for Razor ID (24LC02)
static const uint8_t RAZOR_EEPROM_ADDR = 0x50;

// Strobe pattern config
const uint16_t STROBE_ON_MS   = 60;   // flash duration
const uint16_t STROBE_OFF_MS  = 80;   // dark gap
const uint16_t STROBE_BURSTS  = 20;   // ~2.8 s pattern if (60+80)*20
const uint16_t RAZOR_RUN_MS   = 5000; // total Razor action time (boar event)

// Ultrasound sweep config
const uint16_t US_MIN_KHZ = 18;    // 18 kHz
const uint16_t US_MAX_KHZ = 25;    // 25 kHz
const uint16_t US_STEP_KHZ = 1;    // sweep step
const uint16_t US_STEP_MS = 60; // dwell per step// Razor IO
pinMode(PIN_STROBE_LEFT, OUTPUT);
pinMode(PIN_STROBE_RIGHT, OUTPUT);
digitalWrite(PIN_STROBE_LEFT, LOW);
digitalWrite(PIN_STROBE_RIGHT, LOW);
// Ultrasonic PWM channel
const int usChannel = 3; // LEDC channel
const int usResolutionBits = 10; // 10 bits, duty 0-1023
ledcSetup(usChannel, 20000, usResolutionBits); // init 20 kHz
ledcAttachPin(PIN_US_PWM, usChannel);
ledcWrite(usChannel, 0); // start muted#include <Wire.h>
bool razorPresent() {
Wire.beginTransmission(RAZOR_EEPROM_ADDR);
if (Wire.endTransmission() != 0) return false; // no device
// Read first 4 bytes (expect 'R','A','Z','2')
Wire.beginTransmission(RAZOR_EEPROM_ADDR);
Wire.write((uint8_t)0x00); // start addr
Wire.endTransmission();
Wire.requestFrom((int)RAZOR_EEPROM_ADDR, 4);
if (Wire.available() < 4) return false;
char sig[5] = {0};
for (int i = 0; i < 4; i++) sig[i] = (char)Wire.read();
return (sig[0]=='R' && sig[1]=='A' && sig[2]=='Z' && sig[3]=='2');
}Write “RAZ2” once using a tiny provisioning sketch (or your main firmware once) to the EEPROM at 0x00.4) Strobe & Ultrasound Helpers
// Turn both eyes ON/OFF (switch LED driver grounds via MOSFETs)
void strobeSet(bool on) {
  digitalWrite(PIN_STROBE_LEFT,  on ? HIGH : LOW);
  digitalWrite(PIN_STROBE_RIGHT, on ? HIGH : LOW);
}

// Ultrasound: set frequency (kHz) and enable with modest duty
void usToneKHz(uint16_t kHz) {
  const int usChannel = 3;
  uint32_t freq = (uint32_t)kHz * 1000UL;
  ledcWriteTone(usChannel, freq);     // ESP32-S3 LEDC helper sets freq
  ledcWrite(usChannel, 512);          // ~50% duty on 10-bit (0..1023)
}

void usOff() {
  const int usChannel = 3;
  ledcWrite(usChannel, 0);
}

// Razor strobe + ultrasound routine (blocking for durationMs)
void runRazorDeterrent(uint32_t durationMs) {
  uint32_t t0 = millis();
  uint16_t bursts = 0;

  while (millis() - t0 < durationMs) {
    // Strobe burst
    strobeSet(true);
    // Sweep ultrasound upward
    for (uint16_t k = US_MIN_KHZ; k <= US_MAX_KHZ; k += US_STEP_KHZ) {
      usToneKHz(k);
      delay(US_STEP_MS);
      if (millis() - t0 >= durationMs) break;
    }
    strobeSet(false);
    // Sweep ultrasound downward
    for (int k = US_MAX_KHZ; k >= (int)US_MIN_KHZ; k -= US_STEP_KHZ) {
      usToneKHz((uint16_t)k);
      delay(US_STEP_MS);
      if (millis() - t0 >= durationMs) break;
    }
    usOff();

    // Optional dark gap between bursts
    delay(STROBE_OFF_MS);
    bursts++;
    if (bursts >= STROBE_BURSTS) bursts = 0; // keep going until duration
  }
  // Ensure off
  strobeSet(false);
  usOff();
}Notes:5) DFPlayer Tracks for Boar
• For very bright flashes, you can also alternate eyesLEFT/RIGHTinstead of both together — just splitstrobeSet()control.
• If your LED drivers support EN/PWM input, drive that instead of input power ground switching.
const uint8_t TRK_CRACKER = 7;
const uint8_t TRK_GUNSHOT = 8;

void playCracker() { playTrack(TRK_CRACKER); }
void playGunshot() { playTrack(TRK_GUNSHOT); }if (msg == "BOAR") {
if (cooldownExpired(lastBoarMs)) {
Serial.println("[EVENT] BOAR");
sendLoRa("BOAR");
if (razorPresent()) {
// MULTI-MODAL DETERRENT: Strobes + Ultrasound + Loud audio
playCracker(); // start loud deterrent
delay(300); // small offset
runRazorDeterrent(RAZOR_RUN_MS); // ~5s of strobes + ultrasound
playGunshot(); // follow-up punch (optional)
} else {
// Fallback: base device
playDeterrentBoar();
delay(3000);
}
}
return;
}This preserves your cooldown (to avoid spamming) and sends LoRa before deterrence begins
EleTect Mini is the compact, portable member of the EleTect ecosystem. It helps farmers and field workers deter different animals (elephants, boars, monkeys, dogs, birds, etc.) by selecting a mode with a knob. Each mode activates two strobe “eyes” and plays species-specific deterrent sounds from a DFPlayer + speaker.
It’s lightweight, battery-powered, and solar-chargeable, designed for small crop fields, livestock areas, or personal safety use.
✨ Features- Seeed XIAO MCU (ESP32-S3 Sense)
- Two “strobe eyes” → 1 W LEDs with MOSFET switching
- Speaker + DFPlayer → plays deterrent sounds
- Rotary selector knob → choose target animal mode
- Dual power input → rechargeable Li-ion battery + solar charging (TP4056)
- Portable mount → fold-out leg, wall hook, or pole clamp
- Designed in Fusion 360 for compactness
- Front face → two LED “eyes” + speaker grill.
- Side panel → rotary knob + solar input jack.
Back cover → hinged, with gasket + screws.
- Ports → USB-C charging, power switch.
- Main shell + back cover → PETG/ASA (weather resistant).
- Knob cap + mounting legs → PLA/ABS.
- Gasket groove for silicone seal → waterproof assembly.
Aluminum LED heatsink plate → cut from 3 mm aluminum.
- Speaker grill plate → laser cut acrylic/aluminum, vented.
XIAO ESP32-S3
Rotary potentiometer (10kΩ) → mode selector (ADC input
DFPlayer Mini + microSD → stores deterrent MP3 sounds
8–10 W full-range speaker (4–8 Ω, with amp module if needed)
2× 1 W LED strobes → constant-current drivers + MOSFET control
TP4056 solar charger + 18650 battery (2600–4000 mAh)
USB-C port for dual charging
⚙️ Arduino Code (EleTect Mini)This example:
- Reads knob mode via ADC
- Maps to animal deterrent sound
- Activates strobes for certain modes
- Plays sound files stored on DFPlayer
#include "Arduino.h"
#include "DFRobotDFPlayerMini.h"
#include <SoftwareSerial.h>

#define PIN_STROBE 4       // MOSFET gate for both strobe eyes
#define PIN_KNOB   A0      // Rotary potentiometer
#define PIN_DF_RX  10      // SoftwareSerial RX (to DFPlayer TX)
#define PIN_DF_TX  11      // SoftwareSerial TX (to DFPlayer RX)

SoftwareSerial mySoftwareSerial(PIN_DF_RX, PIN_DF_TX);
DFRobotDFPlayerMini myDFPlayer;

// Mode definitions
enum AnimalMode { ELEPHANT, BOAR, DOG, BIRD, MONKEY, SQUIRREL, UNKNOWN };

void setup() {
  Serial.begin(115200);
  mySoftwareSerial.begin(9600);

  pinMode(PIN_STROBE, OUTPUT);
  digitalWrite(PIN_STROBE, LOW);

  if (!myDFPlayer.begin(mySoftwareSerial)) {
    Serial.println("DFPlayer init failed!");
    while(true);
  }

  myDFPlayer.volume(25); // volume 0–30
  Serial.println("EleTect Mini ready");
}

void loop() {
  int knobVal = analogRead(PIN_KNOB);
  AnimalMode mode = getMode(knobVal);

  switch(mode) {
    case ELEPHANT:
      playAndStrobe(1, 3000); // bees.mp3 on SD track #1
      break;
    case BOAR:
      playAndStrobe(2, 5000); // pig_grunt.mp3 on SD track #2
      break;
    case DOG:
      playAndStrobe(3, 4000); // wolf_howl.mp3
      break;
    case BIRD:
      playAndStrobe(4, 3000); // owl_hoot.mp3
      break;
    case MONKEY:
      playAndStrobe(5, 3000); // monkey_chatter.mp3
      break;
    case SQUIRREL:
      playAndStrobe(6, 2000); // predator_sound.mp3
      break;
    default:
      // idle
      break;
  }

  delay(5000); // cooldown
}

// Map knob ADC reading to mode
AnimalMode getMode(int val) {
  if (val < 170) return ELEPHANT;
  else if (val < 340) return BOAR;
  else if (val < 510) return DOG;
  else if (val < 680) return BIRD;
  else if (val < 850) return MONKEY;
  else return SQUIRREL;
}

// Helper: play sound + flash strobes
void playAndStrobe(int track, int durationMs) {
  myDFPlayer.play(track);
  uint32_t t0 = millis();
  while (millis() - t0 < durationMs) {
    digitalWrite(PIN_STROBE, HIGH);
    delay(100);
    digitalWrite(PIN_STROBE, LOW);
    delay(100);
  }
}EleTect Mini provides low-cost, flexible deterrence for farmers who face different pests at different times. Instead of buying multiple single-purpose scare devices, they get one adaptive tool. The modular sound library can be updated with new deterrent calls, making it future-proof.
EleTect Echo & Ember: Acoustic and Fire Monitoring🌲 Echo Module (Illegal Activity Detection)Purpose:
Echo continuously “listens” for forest sounds like chainsaws, gunshots, or heavy vehicle engines. When detected, it:
- Logs the event with timestamp
- Sends a LoRa alert (
ILLEGAL:chainsaw,ILLEGAL:gunshot)
Hardware:
- Seeed XIAO ESP32-S3 (with onboard mic or external MEMS mic)
- LoRa Wio SX1262 radio (same as EleTect 2.0)
- RTC (DS3231) for time-stamped logging
- SD card for event historY
- Solar + battery (TP4056 + 18650, ~2600–4000 mAh)
📷 [INSERT_IMAGE: echo_wiring.png | Caption: Echo wiring – XIAO mic + RTC + SD + LoRa]
Manufacturing:
3D-printed shell (PETG) with vent holes covered by mesh (to admit sound but block water). front plate with acoustic grill.
- IP67 glands for solar/battery wiring.
Purpose:
Ember monitors smoke, flame, and rapid temperature rise to catch wildfires early.
Hardware:
- MQ-2 gas sensor (smoke)
- Flame sensor (IR flame detection)
- DHT22 (temperature + humidity)
- Mounted on a “cap” that sits above Echo
Manufacturing:
- 3D-printed ring mount to stack Ember on top of Echo.
- Laser-cut acrylic/PCB carrier for flame + gas sensors.
- Shared power via pogo pins or aviation connector from Echo.
Echo (bottom) → base with solar, battery, LoRa antenna.
- Echo (bottom) → base with solar, battery, LoRa antenna.
Ember (top) → slides into 3D-printed guides or connects via pogo pins.
- Ember (top) → slides into 3D-printed guides or connects via pogo pins.
Both share power bus (12 V or 5 V) and antenna if desired.
- Both share power bus (12 V or 5 V) and antenna if desired.
Connectors: GX12 for external solar, XT30 for battery, SMA for LoRa.
- Connectors: GX12 for external solar, XT30 for battery, SMA for LoRa.
EleTect Echo and Ember can be stacked like a Lego set and can function together
🌱 ImpactTogether, Echo & Ember turn EleTect into a forest guardian:
Echo protects against illegal logging & poaching.
- Echo protects against illegal logging & poaching.
Ember protects against wildfires.
- Ember protects against wildfires.
Both work offline, solar-powered, and integrated with LoRa mesh + EleTect Link handhelds.
- Both work offline, solar-powered, and integrated with LoRa mesh + EleTect Link handhelds.
Purpose: A portable receiver for forest rangers. Whenever EleTect 2.0/Echo/Ember send an alert, EleTect Link displays it immediately. It also provides peer-to-peer SOS calls.
Features:
- Hardware: A Seeed XIAO ESP32‑S3 Sense (for LoRa and UI), a small OLED display, a buzzer, a vibration motor, an LED, and an SOS push-button. All fitted into a rugged handheld enclosure. Rechargeable via USB-C.
- LoRa Mesh Comm: Using Meshtastic’s design, each Link is a node on the same LoRa network. When a sensor node broadcasts an alert, all Link devices in range receive it. Conversely, pressing SOS on a Link broadcasts an “SOS” alert to other Links and possibly to a base unit.
- Display & Alerts: The OLED shows the alert type and time (e.g. “ELEPHANT DETECTED” or “ILLEGAL:SHOTGUN”). The buzzer and vibration ensure the ranger notices it even in rough conditions.
- Operation: Turn it on in the forest. It automatically joins the mesh. When in a patrol vehicle or on foot, a ranger will be alerted to any nearby EleTect events (elephants, illegal activity, fire) with a text message and warning siren. They can also send manual alerts (injury, conflict) via SOS.
EleTect Link leverages the open-source Meshtastic LoRa mesh platform: this means no central infrastructure is needed. It simply requires each ranger to carry one. Such decentralized comms have been used in off-grid adventures and conservation patrols to great effect. In essence, EleTect Link turns all rangers and sensor nodes into a resilient, self-healing network: alerts propagate peer-to-peer until everyone is informed.
Website StructureThe Eletect website serves as a pivotal platform connecting advanced hardware deployed in forests and agricultural areas with users, including community members and forest officers. It provides real-time monitoring and alerts, enabling timely detection of elephants, wild boars, and illegal activities. This immediate access allows users to take swift preventive measures, ensuring human-wildlife conflict mitigation and forest protection.
Through hardware-software integration, the website consolidates data from AI-enabled devices such as Grove Vision AI modules, XIAO ESP32S3 sensors, and LoRa/LoRaWAN communication nodes. This integration ensures that information from multiple detection points is centrally accessible, visualized on maps, and displayed in interactive tables and image galleries. The platform allows users to track wildlife locations, upload and review images, and monitor detection logs in a clear and intuitive manner.
The website also provides role-based access, allowing community users to monitor wildlife and receive alerts, while forest officers gain access to advanced functionalities like illegal activity detection, anti-poaching monitoring, and deforestation tracking. This ensures that both the public and authorities can respond effectively and collaboratively.
Moreover, this maintains a historical record of detections, storing timestamps, locations, and images. This data supports research, trend analysis, and strategic planning for conservation efforts. Its scalable design allows for future enhancements, such as adding more detection nodes, expanding species monitoring, or integrating mobile notifications, all through the same user-friendly interface.
In summary, the Eletect website transforms raw hardware data into actionable intelligence, offering a centralized, real-time, and scalable solution for wildlife conservation, community safety, and forest management. By bridging the gap between field-deployed devices and end-users, it ensures efficient monitoring, informed decision-making, and proactive protection of both humans and wildlife.
Home Page
- Hero section highlighting the system’s purpose.
- Key features displayed as cards: Elephant Detection, Wild Boar Protection, Illegal Activity Detection.
- Login prompt for Community Users and Forest Officers. 📷
Login Page
- Role-based login form for Community and Officer accounts.
- Credentials validation to provide access to dashboards.
Dashboard
- Accessible after login.
- Role-specific features displayed as interactive cards.
- Community Users: Elephant, Boar, Bird monitoring.
- Officers: Illegal Activity, Deforestation, Anti-Poaching.
Feature Page
- Shows feature-specific information, detection logs, uploaded images, and live monitoring.
- For Elephant detection: Map showing detected locations (Kothamangalam, Kottapady), sample images, and hardware integration details.
- AI-powered detection using hardware nodes deployed in forests.
- Key locations: Kothamangalam (detected on 30/06/2025), Kottapady (detected on 20/12/2024).
- Features:
- Detection log with timestamp, location, confidence, size, and alert status.
- Live monitoring with real-time alerts.
- Image gallery for uploaded elephant images and sample images.
- Map integration using Google Maps or Leaflet to visualize detected locations.
· Backend Framework: Using Python with FastAPI to handle API requests, user authentication, and real-time data processing.
· Database: PostgreSQL for storing user accounts, detection logs, uploaded images, and hardware sensor data.
· Data Structure: Each detection entry includes location, GPS coordinates, detection confidence, size, timestamp, and alert status.
· Hardware Integration: Field nodes with cameras and sensors send data via REST APIs to the backend.
· Real-Time Updates: Backend can push instant updates to the frontend using WebSockets, ensuring immediate alerts and monitoring.
· Scalability & Security: PostgreSQL ensures reliable persistence, and the backend architecture allows scaling for more users, devices, and features.
Assembling and Using EleTect (2.0+ Modules)- Fabrication: 3D-print or laser-cut the enclosures for each module (you may insert custom PCBs). Ensure openings for sensors (camera window, speaker grill, solar panel mount).
- Wiring: Follow the schematics to connect all components. For example, see the prototype photos below for reference. (Attach camera ribbon, plug in XIAO, wire the LoRa module, etc..
- Coding: Load the Arduino (or ESP-IDF) code onto each XIAO: one for the 2.0 node (with all detection logic and LoRa), one for Echo (audio only), one for Ember (fire only), and one for each EleTect Link (mesh receiver with display). Full code listings are provided here. Key libraries: Edge Impulse inference SDK, LoRa (SX126x), Wire (I2C for RTC/EEPROM), SD, RTClib, and Adafruit SSD1306 for OLED.
- Testing: Verify each model by playing back known sounds or showing images. Check LoRa messages are received by Link. Ensure solar charging works.
- Deployment: Mount EleTect 2.0 nodes at known conflict hotspots, install Razor and Mini units as needed, and give each ranger an EleTect Link. Monitor events via Link or collected logs.
Impact: By combining edge AI with sustainable design, the EleTect ecosystem empowers communities and rangers. It provides timely, location‑specific alerts about wildlife and forest threats, enabling proactive responses. Unlike passive or centralized systems, EleTect is fully distributed and works where there is no cell service. The use of TinyML means the devices need minimal power and no internet, making them ideal “Earth guardian” tools. As forests and human habitats continue to overlap, EleTect stands out as an innovative, integrated solution – one that is grounded in ecological understanding (e.g. bees scare elephants) and empowered by cutting-edge Edge AI.
FULL WORKING VIDEOSFor full working videos please click here
For complete BOM Click here
[1] [3] EleTect - Mitigating Human-Elephant conflict with AI | project
[7] [8] EleTect 1.5 : Smarter Warnings, Safer journeys - Hackster.io
https://www.hackster.io/abhinav123krish/eletect-1-5-smarter-warnings-safer-journeys-1597d3


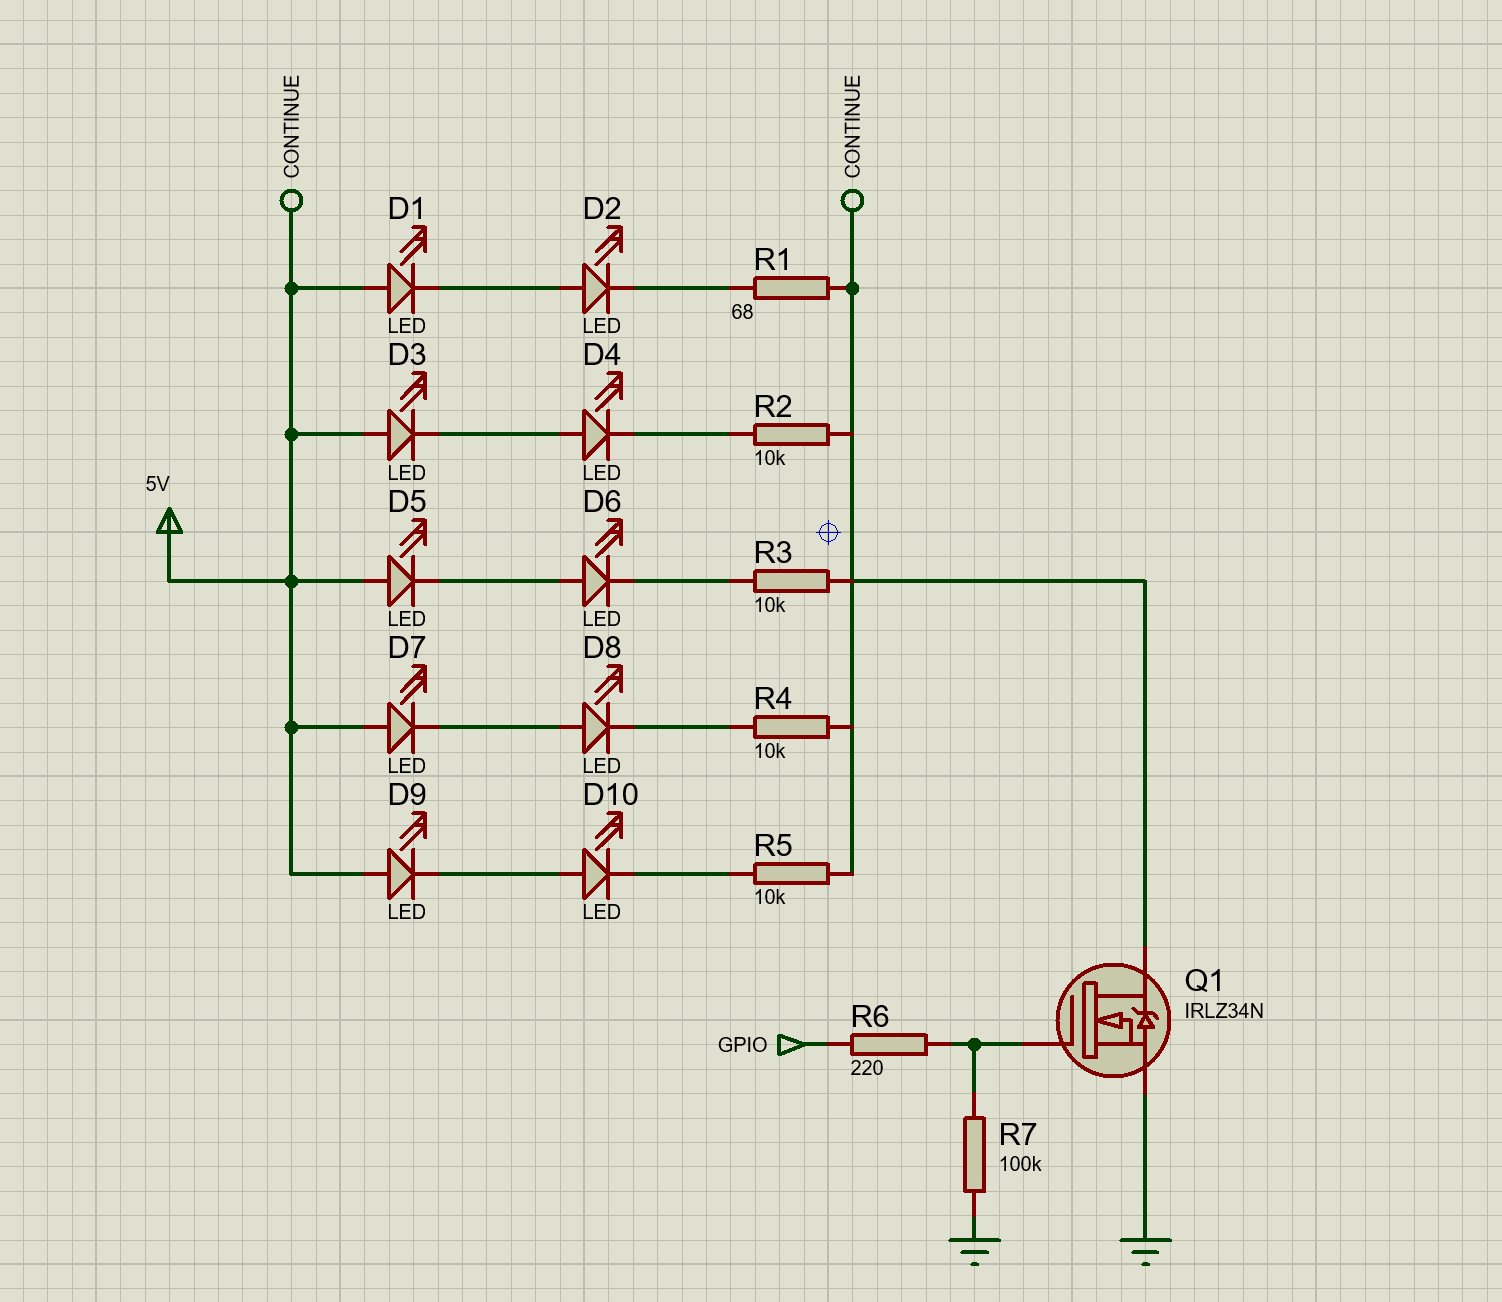
Comments