


Hardware components | ||||||
 |
| × | 1 | |||
 |
| × | 1 | |||
 |
| × | 1 | |||
 |
| × | 1 | |||
Software apps and online services | ||||||
 |
| |||||
| ||||||
| ||||||
| ||||||
| ||||||
| ||||||
| ||||||
Hand tools and fabrication machines | ||||||
 |
| |||||
 |
| |||||
 |
| |||||
First of all, I need to stop using movie themes especially after my last feature flopped.
Anyways, you're probably used to running software on hardware, but have you tried to run hardware on software? That's what Wokwi is.
It all started last year when many makers posted projects and tutorials about using Wokwi. Meanwhile, I was working on Tracking Space Stations With RT-Thread Studio and Space Station Pass Alert On STM32u575-st-nucleo which they ended up being too complicated.
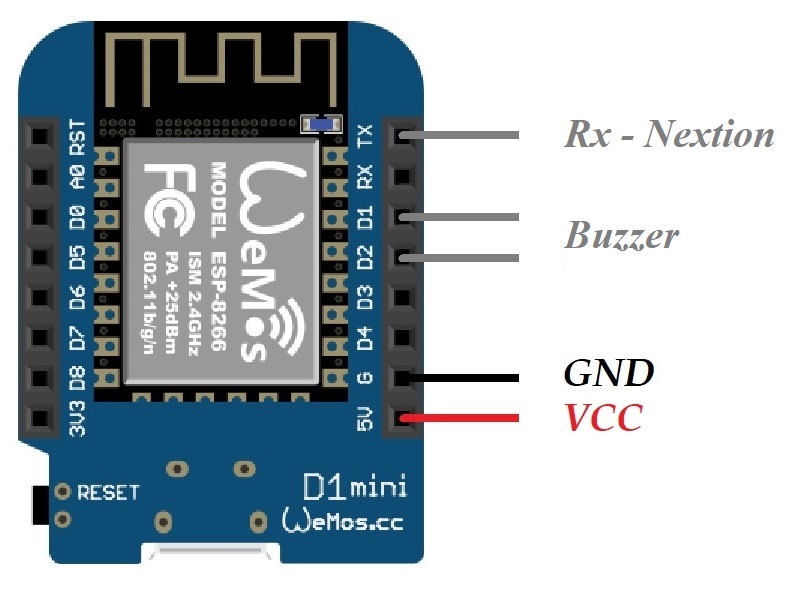
Simple DisplayOne way to reduce complexity is using UART Display. My friend Bert Ohlig sent me NX4827T043 by Nextion. One advantage of using such a touch screen is not having to relearn the everchanging LVGL on every project. Another advantage of using UART Display is you only need to connect 4 wires. You are not sending pixels from the microcontroller to the display, you are sending expected commands and values. Actually, we only used three wires because we're not expecting to hear back from the display. We used two more wires for the buzzer to make it sound louder.
The Nextion Editor is used to rapidly create Human Machine Interface GUIs for Nextion HMI devices. It is basic and it has a Debug feature that allows testing the code on the display or in simulation. Debug can take input from keyboard or MCU (physical or simulation). You'll need USB to serial adapter, or you can use Micro SD card to program the display. World map Nextion image has been saved here and the source is here.
Four markers appear on the display:
- Current GPS coordinates (Blue/Black)
- Sun position (Red/Yellow)
- ISS position (Green)
- Tiangong position (Purple)
At the bottom of the display, we show the time remaining till next pass at the current GPS location so we can plan our lives accordingly. We also show the expected brightness of the space station on that pass.
Nextion may not be the best on the market, but it does the job quickly. A lot of makers are using it and there are plenty of tutorials available. Few hiccups here and there, but nothing major.
Red PillYou don't need to register to use Wokwi, but a free account will allow you to save projects. A paid account will allow you to hide your projects, but you don't need that unless they're ugly. You only need 2 files to start a project:
- main.cpp: The typical program code
- diagram.json: The text representation of the image on the right side of the browser
In this project, Wokwi detected that we are using ArduinoJson so it installed it automatically.
The bottom right corner of the screen shows the serial monitor. By defining and connecting ext-serial in diagram.json, we can redirect serial from browser to ComPort.
.
.
.
{ "type": "wokwi-serial-port", "id": "ext-serial", "top": 0, "left": 0, "attrs": { "baud": "115200" } }
.
.
.
[ "esp:TX", "ext-serial:RX", "", [] ],
[ "esp:RX", "ext-serial:TX", "", [] ],
.
.
.
Another great free software we need here is Null-modem emulator (com0com). I created a pair of ComPorts so I can connect the browser to COM41 when prompted and connect COM42 to anything else like Putty (for troubleshooting) or Nextion simulator we discussed earlier.
For security reasons, you have to select the ComPort every time you want to use it from a browser. ComPort connection to the browser will be automatically disabled when browser loses focus.
Note that current GPS location will be Wokwi's (somewhere in Europe) not yours (unless you're there) since you are using Wokwi's Wi-Fi to reach Web APIs.
Speaking of which, we're using four Web APIs to get the following:
- Current time and GPS location
- More data to determine the Sun position
- Next pass at current location for each space station
- Current position of each space station
If you've been following my projects, you'd know that WeMos D1 Mini is my favorite Development Board, and that's why I used it instead of ESP32 as I did with the simulation (Wokwi has no ESP8266 boards). This is a much easier pill to swallow (just like The Matrix) when it comes to implementation. Some makers don't see the value of Wokwi when the hardware is so cheap.
I did use one of my favorite Arduino libraries, tzapu/WiFiManager, to avoid saving Wi-Fi credentials in the code. To connect to your Wi-Fi, you'd need to find WeMos access point and use "Vive La Resistance" (don't ask) as password. Next, use your browser to open http://192.168.4.1 and there you can tell WeMos how to connect to your Wi-Fi.
To create any project in PlatformIO, we need platformio.ini and to make sure main.cpp is in src folder.
Wokwi for VS CodeWhat if you were hungry and took both pills? After you address the stomachache that follows, you can use Wokwi for VS Code extension to run simulation locally if you're into these kinds of things.
We need wokwi.toml in addition to the two Wokwi files we used with the browser and the two PlatformIO files. Note that you can't edit diagram.json for free like you did on the browser, but it is the same file. If you get "Wokwi: firmware binary.pio/build/esp32/firmware.bin not found in workspace" error that means you need to Build the project using PlatformIO extension.


Comments
Please log in or sign up to comment.