The Arty 100T is the largest device available for the ARTY A7, this makes it ideal for deployment of soft core processors. These processors can be either proprietary or opensource, one of the hottest open source processors now is the RISC-V.
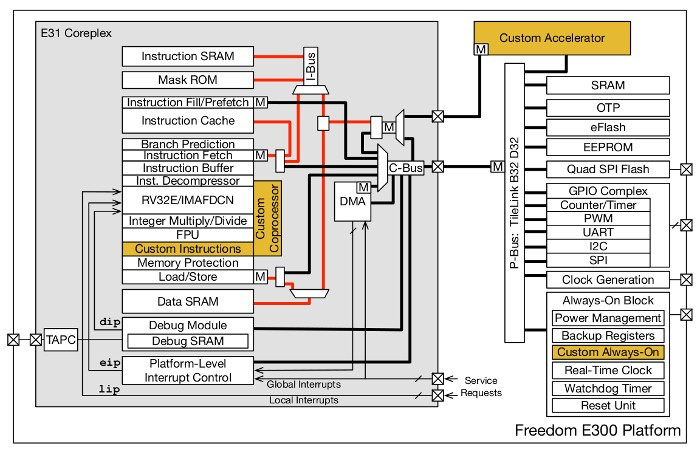
In this tutorial we are going to look at how we can build a RISC-V, specifically the SiFive Freedom E310.
To compile the processor, generate the bit stream and then upload applications to the processor we need to use a Linux development or virtual machine.
To complete this tutorial, you will need the following hardware
1) Arty A7-100T
2) Olimex ARM-USB-TINY-H USB programmer
3) 10 Flying leads to connect between the programmer and the PMOD which connected to the JTAG Test Access Port of the processor
You will also need the following SW installed on your Linux development environment
1) Vivado 2017.1 – web pack edition
2) Arduino Development environment
Ensure you have the following installed on your Linux Development machine
1) Git – sudo apt-get install git
2) Device Tree Compiler – sudo apt-get install device-tree-compiler
3) Java run time environment – sudo apt-get install default-jre
4) JAVC installed – sudo install openjdk-8-jdk
5) Ensure JAVA_HOME is set
Getting StartedThe first thing to is download and install Vivado, you can do so from this link once downloaded, open a terminal window. For this example, I will be working within the home directory.
It is using this terminal window we are going to build the RISCV processor. The first thing to do is to ensure we can call the Vivado programs just installed, we do this by sourcing the script
source/opt/Xilinx/Vivado/2017.1/settings64.sh
As we will be working with the Arty board we need to also down load and include the board definition files so that Vivado can use them. We can use git to download the board definition files from the Digilent repository using the command
git clonehttps://github.com/Digilent/vivado-boards.git
Once downloaded we need to copy these files into the appropriate Vivado directory this can be achieved with the command
sudocp -r vivado-boards/new/board_files/*/opt/Xilinx/Vivado/2017.1/data/boards/board_files/
We are now in a position that we can generate the processor and then generate the FPGA implementation.
Building the RISC-VGeneration of both the processor and the implementation is achieved by running make files.
First however we need to download the SiFive freedom processor, we do this again by using git and cloning a repository which contains everything we need.
git clone --recursivehttps://github.com/sifive/freedom.git
Cloning will take a little while as there is a significant number of files to download, once it is downloaded you will see a new folder called Freedom in your working directory.
Within this directory you will see several makefiles, the one that interests us for this example is Makefile.e300artydevkit
Using this script, we can generate the RISC-V processor for both the Arty 35T and Arty 100T. However, first must compile the tool chain.
In the terminal window navigate to the tool chains directory which is below rocket-chip/riscv-tools and run the build.sh script. This will build the tool chain we are going to be using when we generate the implementation files.
The next step is to generate the Verilog instantiation of the processor from the Chisel HDL files issue the command.
make -f Makefile.e300artydevkit Verilog
Again, this will take a little time to compile the files, such that we are ready to implement them. When we generate these files as it is generic Verilog we do not yet need to decide which of the Arty boards we are targeting.
Looking back in the terminal window you will be able to see the peripherals and there location in the memory map.
With the Verilog description of the processor available the next step is to decide which of the ARTY boards we wish to target. If you wish to target just the 35T we do not need to make any changes, however if we wish to target the 100T like we do in this tutorial we need to make a minor adjustment.
Open the makefile Makefile.e300artydevkit using a text editor, you will notice the board type is arty. By default, this will generate the FPGA implementation for the Arty 35T.
To generate an implementation for the Arty 100T need to change the board type to the correct one for the Arty 100T. Open a file browser and navigate to the freedom/fpga-shells/Xilinx directory you will find several folders named for each supported development board. Note the name of the arty_a7_100 development board.
Back in the text file with the Makefilechange the board name to the arty_a7_100
Save and close the modified file, we are now able to generate the FPGA implementation.
In the terminal window issue the command
make -f Makefile.e300artydevkit mcs
This will take time as the script will use Vivado and the RISC-V tool chain to generate both a bitstream and an MCS file. The MCS file can be programmed into the flash memory on the Arty 100T and load the RISC-V processor from power on.
The output files will be available under the directory
<workspace>/freedom/builds/e300artydevkit/obj
Under this directory you will find not only the BIT and MCS files but also the Vivado implementation reports
With the programming file available the next step is to program the flash memory using Vivado.
Open Vivado using the command
Vivado
Once the GUI starts the next step is to open the hardware manager, with the ARTY 100T connected to the development machine using the USB connection J10. We should see the device being detected under the hardware tab on the left of the screen.
Select the device, right click and select Add Configuration Memory Device, this will open a dialog box to select the memory type. The ARTY 100T of mine has a Spansion S25FL128xxxxx device fitted.
After selecting this device, you will be asked if you wish to program the device now, click yes and this will open a new dialog.
Select the generated MCS file and the device will be programmed, once this is completed the ARTY 100T will be running the RISC-V processor.
You can confirm this by pressing the following
1) Press button 3 and see LED 6 go out
2) Press the reset button and see LED 4 go out
See Video Example
However, we will want to connect to the processor and upload our own application. We can do this using the Arduino development environment.
Generating SWFirst though we need to connect the OlimexJTAG pod to Pmod D this allows us to download and debug programs using the JTAG interface. The pin out between for interconnecting the two can be found here.
With that we are ready to start developing our application, the best way to get started programming the RISC-V is to use the Arduino development environment.
Installing support for the SiFive Freedom processor is easy, under file -> preferences point the additional boards manager URL to the following URL
http://static.dev.sifive.com/bsp/arduino/package_sifive_index.json
The next step is to install the board using the board manager under
Tools -> Boards -> Board Manager
In the board’s manager dialog select the Type Contributed and the SiFive Freedom Boards should be present to be installed.
Once this is installed we can develop applications, just as we would for any other development in this environment.
Just remember to select the Freedom ArtyDevKit from the board selection list.
Gotchas
1) Ensure you have installed the Xilinx cable drivers. You can do this using the command
sudo./install_driverswithin the folder
<xilinx Install>Vivado/2017.1/data/xicom/cable_drivers/lin64/install_script/install_drivers
2) Ensure you have provided permission to the Olimex USB
Edit /etc/udev/rules.d/99-openocd.rules and add:
# These are for the Olimex Debugger for use with E310 Arty Dev Kit
SUBSYSTEM=="usb", ATTR{idVendor}=="15ba", ATTR{idProduct}=="002a", MODE="664", GROUP="plugdev"
SUBSYSTEM=="tty", ATTRS{idVendor}=="15ba", ATTRS{idProduct}=="002a", MODE="664", GROUP="plugdev"
Save and enter the command sudo udevadm control--reload-rules
If you have problems uploading – check the connections between the Olimex and Pmod d, and ensure you are a member of the plug dev group.
Adam Taylor
 Bogdan Ilieş


Comments
Please log in or sign up to comment.