This project is an IOT based Door lock system which consists of a NodeMCU board which has a inbuilt ESP8266 wifi chip.It is interfaced to a Sg90(9g micro servo motor) which is used for simulating the locking and unlocking mechanism of the door Lock.The power and gnd lines are connected to 3.3v and GND pins of NodeMCU board.The signal wire is connected to D8 pin on the board.In case the wifi goes out and you need to lock the door, a button is also connected to D2 pin to manually close the door by just pressing it.All this is remotely controlled through the Blynk app and we also get e-mail notifications regarding opening and closing of the door.
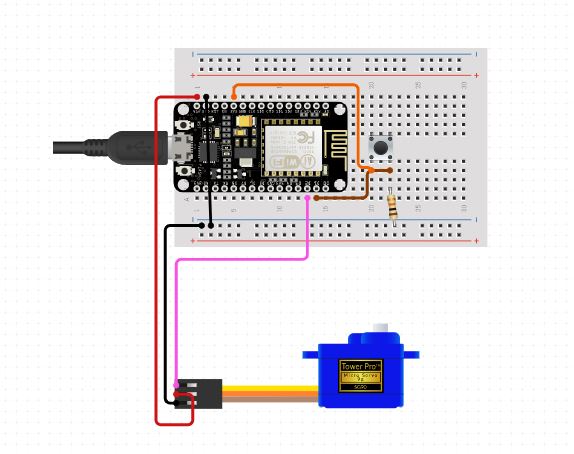
The physical wiring of the circuit is given below.
The algorithm works like this:
- ->First install the blynk library in arduino.
- ->Then install Blynk app from playstore or appstore in your mobile phone.Create a account and login using that account.Then create a new project.
- ->Put a button and configure that button to virtual Pin 3(V3) and change the ON and OFF states to Lock And Unlock and change it to a switch.Also add a e-mail notifier to the project.
The final layout should look like:
- ->Connect the hardware according to the wiring diagram given above and upload the code with the auth token sent to your registered e-mail id and wifi SSID and password to which your laptop is connected.
- ->Once your board is online, we can press the play button and lock and unlock the door by pressing the button on the app and rotating the servo motor accordingly.If the servo is in OPEN state we can also manually close it by pressing the button.
- ->In this code the button is used as an interrupt.
- ->We can know if the servo is in OPEN or CLOSE state by reading the e-mail notifications given to our registered e-mail id in the form of HTML/text.
The code is pretty much self-explanatory
The working of the circuit is given below:


_3u05Tpwasz.png?auto=compress%2Cformat&w=40&h=40&fit=fillmax&bg=fff&dpr=2)
Comments
Please log in or sign up to comment.