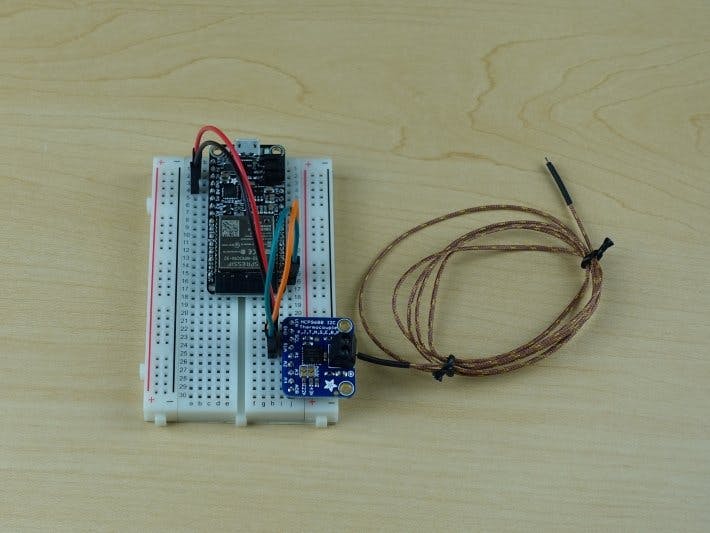
The AI Freezer Monitor is a DIY IoT ultra-low temperature freezer monitor that uses machine learning (ML) to provide early warnings of potential equipment failure. This guide covers building the device, collecting training data, setting up email alerts, training a custom machine learning model, and deploying the model to an Adafruit Feather HUZZAH32 development board.
The project is designed to be functional for low temperature scientific freezers (-60 C), with the goal of reducing catastrophic failure and the need to keep backup freezers running full-time. However, please note that this project is primarily for demonstrative and educational purposes and has not gone through extensive testing.
This project takes about two to three hours to fully complete. But the device will need to passively collect temperature data for about twodays before you will be able to train the machine learning model.
BuildThis part of the tutorial covers everything you'll need to build and run your own freezer temperature monitor and alert system. We'll cover how to build the device, setting up a free online database, flashing code onto the device, monitoring the database and sending email alerts. The components used in this project can measure temperatures as low as -200 Celsius.
This part of the project takes about 60 to 90 minutes to build.
1. Solder the screw terminal to the top side of your MCP9600.
2. Solder the pins to the bottom side of the MCP9600.
Tip: Put the in the breadboard to hold them in place when soldering.
3. Insert the ESP32 and thermocouple amplifier into the breadboard.
4. If the Feather HUZZAH32 you bought didn't have the headers pre-soldered, solder them now.
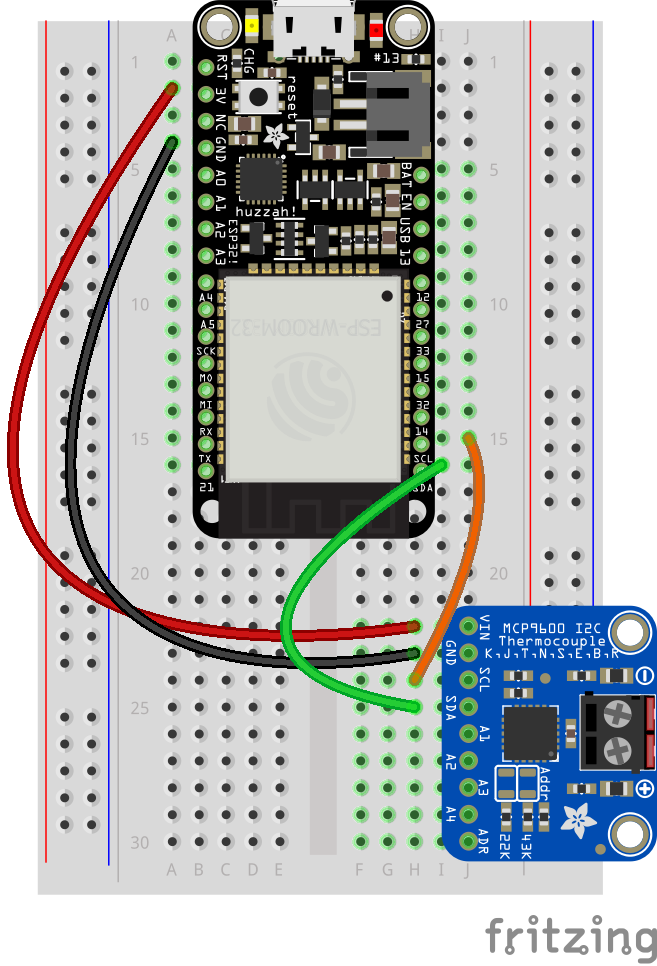
5. Insert the Feather and Thermocouple Breakout in to a breadboard and wire it using the diagram above
Your freezer monitor is ready! Next you'll set up your Azure resources and start collecting training data.
Prerequisite Internet Accounts and Software- A Free Azure Account
- An Edge Impulse Account
- Arduino IDE or VS Code with Arduino Extension
- Python 3
To collect and store the temperature data we'll use Azure IoT Hub and Azure Storage. The cost of this is minimal (less than $1/mo), and you'll only need to use it for 1 month to collect the initial dataset.
1. First create a resource group
2. Select Create a resource
7. Search for and select IoT Hub
8. Select Create
9. Select your Subscription and the Resource group you created
10. Name your IoT Hub and select a region near your location
11. Navigate to the Management tab, and select the F1: Free tier
Note: you can only have one free tier of IoT Hub per subscription
12. Select Review + create
13. Once validation is completed select Create
Setting Up Message RoutingYou'll set up a message route, this way all the telemetry that comes in from the device will be saved, and you can access it later when training your model.
1. In the IoT Hub resource you created select Message Routing from the left navigation menu, and then select + Add
2. In the Add a Route screen select + Add endpoint and Storage from the dropdown menu
3. Name your Endpoint and select JSON encoding. Then press Pick a container
4. Select + Storage account to create a new storage account.
Note: if you already have a storage account you can use an existing one
5. Name the storage account with a globally unique name and select a Location that is near where you are. Then Select OK to deploy the resource
Note: Storage accounts charge you only for the data you use
6. Validation may take a few minutes to complete
7. Select the storage account you created
8. Select + Create to create new container
9. Name your container
10. Choose the container you created in the previous step and press Select
11. Select Create to create and set the endpoint
12. Finally name your route and press Save
Now all your telemetry message will be routed to your new storage account and saved there as a JSON file. In the next section you'll set up your board to capture temperature data from your freezer and upload it to Azure.
Data Capture FirmwareClone this repo to your computer, or you can download the directory for this project here
Once you downloaded the project files you'll need to create an iot_configs.h file and fill in your WiFi and IoT Hub credentials.
1. In the DataCollection folder create a new text file called iot_configs.h
2. Copy and paste the code below into that that file and save:
// Copyright (c) Microsoft. All rights reserved.
// Licensed under the MIT license. See LICENSE file in the project root for full license information.

/**
* WiFi Credentials
*/
#define IOT_CONFIG_WIFI_SSID "your_ssid"
#define IOT_CONFIG_WIFI_PASSWORD "your_password"
/**
* IoT Hub Device Credentials
*/
#define IOT_CONFIG_IOTHUB_FQDN "your-iot-hub-address"
#define IOT_CONFIG_DEVICE_ID "dataCollector"
#define IOT_CONFIG_DEVICE_KEY "your-iot-hub-device-key"
3. Next you'll get the hostname for your IoT Hub.
4. Log in to Azure and Navigate to you IoT Hub Resource
5. In the Essentials section of the Overview page, copy the Hostname and past it in iot_configs.h replacing the text in the quotes.
#define IOT_CONFIG_IOTHUB_FQDN "your-iot-hub-address"6. After you've gotten the host name, you'll need to register a new IoT device in IoT hub, get the key for it.
7. From the left navigation menu select IoT Devices
8. Press + New to register a new device
9. Give your device a name and press Save
10. Select the device you created from the table
Note: You may need to refresh the table for the device to appear
11. Copy the Primary Key and paste it in here between the quotes:
#define IOT_CONFIG_DEVICE_KEY "your-iot-hub-device-key"Remember to treat your key like a password
12. Next you will need to add the WiFi SSID, or network name, and the password. Note: The code doesn't support WiFi networks that use a captive portal.
#define IOT_CONFIG_WIFI_SSID "your_ssid"
#define IOT_CONFIG_WIFI_PASSWORD "your_pass"
13. Install the following libraries from the library manager:
- Azure SDK for C @ v1.0.0-beta.1
14. Open the data_collection.ino sketch and upload it to your Feather Huzzah32
15. Install the temperature monitor in your freezer to start collecting data
You'll want to leave the monitor running for at least a day or two before training your model. The longer you can collect data for the better the model will be.
Preprocess Data1. Download and install Azure storage explorer
2. Open Azure data explorer
3. Select open connection dialog icon
4. Then select Storage account or service
5. Select Connection string (Key or SAS) and press Next
6. Log in to Azure and navigate to your storage account
7. Select Access Keys from the left navigation
8. Select Show Keys and copy the key 1 connection string
9. Go back to Azure data explorer and paste the connection string
10. Select Next, and Connect on the next window
11. Select the container you created in your storage account, and the folder in it
12. Download all the data you recorded from the freezer
13. Create a new folder in the data_collection folder and name its Data
14. Move the data you downloaded into the new folder you created
15. Run the data_processing.py script to reformat your data for Edge Impulse
python3 data_processing.pyYour data is now ready to use to train an anomaly detection ML model!
Train Your Model1. Go to https://edgeimpulse.com and log in
2. Then go to https://aka.ms/freezermodel and select Clone this project
Next you'll want to delete the data and replace it with the data you collected.
3. In the Edge Impulse project you cloned navigate to the Data Acquisition tab
4. Press the Select multiple items icon
5. Check the select all box
6. Then choose Delete
7. Next select the Upload data icon
8. Select the files you created earlier, and add a label to the data. You can use nominal here, since all the data collected was during normal operation of the freezer.
9. Navigate to the Flatten tab from the left navigation. Your data should have a similar shape.
10. Navigate to Anomaly detection in the left navigation, and press Start training
11. Next you'll test your model with some of the test data that was set aside earlier. Select a data sample from the drop down menu on the right side of screen, and press Loadsample.
12. The sample will run through model and predict the result. The lower the anomaly score the more likely the freezer is working properly.
13. Edge Impulse can build an Arduino library using the model you trained. To export a library, go to the Deployment tab in the left navigation.
14. Select Arduino then press Build
Your Arduino library is built and ready to use!
Deploy Your Model1. Open the Arduino IDE
2. Go to Sketch > Libraries > Add.ZIP Library...
3. Select the library you downloaded from Edge Impulse
4. Open the FreezerAnomalyDetector.ino file
5. Copy the iot_configs.h file you created earlier
8. Verify and Upload the code
9. Finally install the monitor back in your freezer
If an anomaly is detected in the freezer the board will send a message to IoT Hub and you'll be able to see that in your storage account. You can also add an integration to IFTTT or Write a logic app in Azure to send email or text notification.


Comments
Please log in or sign up to comment.