

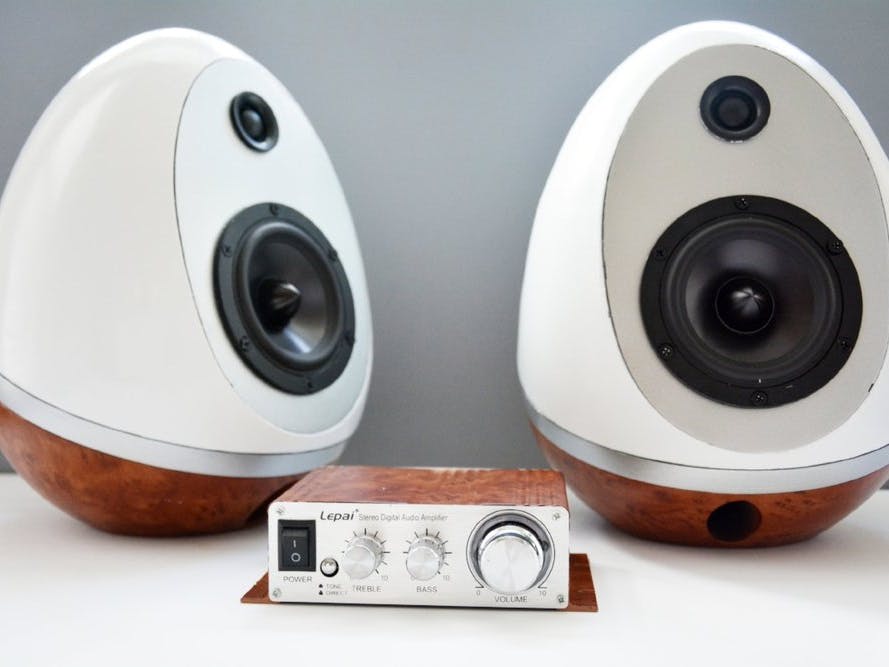
A DIY speaker build has been something I have wanted to do for a very long time and I’ve finally crossed that off my to-do list. This build was very challenging, the design work was fairly extensive and required many small modifications after the fact (rest assured the uploaded files are the best versions), the print time was extensive and having a good low-warp material with good surface quality is key, the finishing I chose to do was excessive but I really wanted that exact look, and finally the wiring was a bit over my head initially BUT all-in-all I learned so much during this build and am really happy with and proud of the result.
DisclaimerBecause speakers and sound quality, in general, is important to many people I want to preface that I am no speaker design expert, the opposite in fact so I cannot guarantee the design or sound is optimal, and I say that because this is a BIG project and quite expensive at that, so I don’t want anyone to put in this amount of work and be disappointed in the result. I think the speakers sound good but I am no audiophile and the speakers are brand new so not the best time to judge. I used several online calculators to help determine the speaker and crossover design so I did my due diligence on the design part as best I could. Anyway, with that out of the way here is how it was done.
What You Will NeedAny/all necessary protective equipment.
*Links provided are affiliate links if used to purchase something may provide Adylinn Studio a small commission.
View All Materials/Components Here
3D Printed PartsPrint time is roughly 160 hours for all 8 pieces @ 60 mm/s. The difficulty I would classify as intermediate for the printing and advanced for the wiring/assembly.
Enclosure Top, Base and Ring Print Settings
- Low warp filament recommended
- 0.2mm layer height
- 50% infill
- 4 outer perimeter shells
- Support is required (I was able to increase angle to 60 degrees from 45)
- Raft required
Front Speaker Panel Print Settings
- Low warp filament recommended
- 0.2mm layer height
- 50% infill
- 4 bottom layers
- Support optional
- Raft not required required
- Brim optional
Remove all support material and rafts.
Start by sanding down each outer portion of the printed parts – starting with 120 and slowly progressing up to 320 (or higher if desired).
Using a lightly damp cloth, wipe down sanded parts to remove any dust
Apply 1-2 coats of primer.
Lightly sand down dry primed parts with 600+ grit sandpaper
Using a lightly damp cloth, wipe down sanded parts to remove any dust
Apply 2-3 coats of paint to each component. I chose a glossy white paint for the top, metallic silver for the ring and speaker panel, and used a brown undercoat for the hydro-dipped base. The base was then dipped in a burlwood pattern. See my hydro-dipping guide here for instructions on how to apply this type of finish.
I clear coated each of the parts – glossy clear coat for the top, speaker panel, and ring and a matte clear coat for the wood base.
Review the pictures and wiring diagram and lay out the components to understand where they go prior to gluing or wiring.
Glue crossover components to back panel inside top according to pictures. I used a combination of glue and hot glue.
Tip - Do not wrap the crossover component wires to one another until you have the wiring ready to be soldered as to make sure you have a good connection for all points (I made the mistake of wrapping the crossover components together first and it made the wiring later much more difficult due to the rigidity of the inductor and capacitor wires).
Get the wiring into place according to the wiring diagram and confirm everything is in the right place and you feel confident you understand where each lead will go.
Combine all leads correctly and solder together.
Install the tweeter and speaker into the speaker panel. I used glue first and screws for the speaker.
Install the speaker binding posts to the bases.
Use sealant to seal the binding posts to the base – apply both inside and outside.
Wire the positive and negative leads to the corresponding locations on both the tweeter and the speaker. Solder the connections.
Wire the amp wiring inside the speaker enclosure to the binding posts and solder the connection.
Glue the ring to the base. Use a sealant to fill any seams.
Glue the speaker panel to the top enclosure, then use the sealant on the inside seams.
Glue the assembled top to the base assembly. Pre-apply the sealant where it makes sense to try fill any seams. The sealant I used, applied white and dried clear so I filled all out seams with the sealant then wiped off the excess.
Wire amp speakers to binding posts – ensure the negative & positive as well as the left and right are all correctly wired.
Plug in amp power, turn on, and enjoy!
Thanks for taking the time to explore the project, I hope you try it and if you do I’d love to hear your feedback and see pictures of your build!
categories Build tags 3D Printing, Home, Build, DIY, Decor, Speakers, Speaker Eggs, Home Audio, Amplifier, Office


Comments