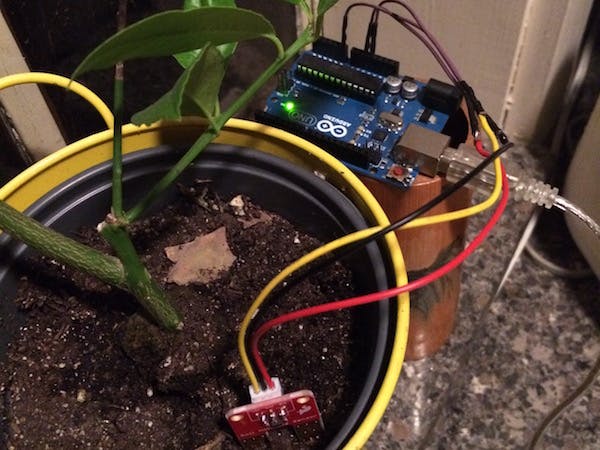
With a little solder, a sensor attached to an Arduino, and code that you can import, or 'flash', to your microprocessor, you can create a device that will test the moisture of the soil of a potted plant and flash a light if it is too dry. In this tutorial I'll show you how to hook up the parts and write the code to make your Arduino's built-in LED light blink when the soil is too dry and the plant needs to be watered. You can easily customize the code to change the range that is considered 'dry' or 'watered', and you could extend this project to make more interesting things happen if the soil is dry (like send a text).
Step 1: Connect the Sparkfun sensor to a set of wires.
You'll need to solder a set of wires to the Sparkfun moisture sensor. Don't know how to solder? Fear not! Learn how in this tutorial. If you're comfortable with a hot glue gun, you can solder!
Step 2: Solder the wires to three male>female jumper cables
Since you need to attach the wires to the Arduino, you have a few options. You could solder them to the proper port on the Arduino, but that's a somewhat permanent solution. It's better to solder the wires to jumper cables and then plug those cables into the Arduino. That way you can reuse your Arduino for a different project later, without a lot of messy disassembly.
Step 3: Attach the wires to the Arduino ports.
I have an Arduino Uno handy, so I attached the wires to it in this order:
Looking on the back of the sensor, determine which wires are associated to which port on the sensor. Attach the VCC wire (yellow in my case) to the 5V port on the Arduino. Attach the GND wire (black in my case) to the GND port on the Arduino. Finally, attach the SIG wire (red in my case) to Analog pin A0 on the Arduino.
This Fritzing Diagram gives you a clearer view of the way to hook up the sensor to the board:
Step 4: Program your Arduino
The Arduino comes with its own IDE (Integrated Development Environment) which allows you to upload, or "Flash" code to your Arduino. More information on how to do this is available in this tutorial. Connect your Arduino to an USB and to your computer. We are going to write a very simple program to test whether soil is damp or dry. The sensor will send a series of data points to your Arduino which can be observed and tested from your computer via the Arduino IDE's Serial Monitor.
Plug in your Arduino to your computer via a USB port. Make sure the Arduino IDE is set up for uploading code. The Board should be your Arduino board and the Port should be your USB port:
Copy this code from Github to a new file in your Arduino's IDE and upload it to the Arduino by pressing the 'upload' icon at the top of the IDE's window. Open the Serial Monitor, which is like a console, to observe the data coming from the SIG wire on the sensor.
What's going on in this code? First, you are stating that the sensor data is coming in to the Analog port A0 (where you just plugged in the sensor's SIG (signal) wire). Then we designate the LED that we want to activate on the Arduino, which is number 13. You'll see it flash when the sensor is dry, or its threshold drops below 250. We also set up a Serial.println function to make data print out to the Serial Monitor every second along with a DisplayWords value ("This plant is thirsty!" and so forth).
Test your code and your sensor setup!
Try your project in various potted plants. Clearly this spider plant needs water!
Extend your project! Visit ThingLearn.com for more tips on how to extend this project. Wouldn't it be cool to have your plant send you a text when it's thirsty?


_ztBMuBhMHo.jpg?auto=compress%2Cformat&w=48&h=48&fit=fill&bg=ffffff)


_3u05Tpwasz.png?auto=compress%2Cformat&w=40&h=40&fit=fillmax&bg=fff&dpr=2)
Comments
Please log in or sign up to comment.