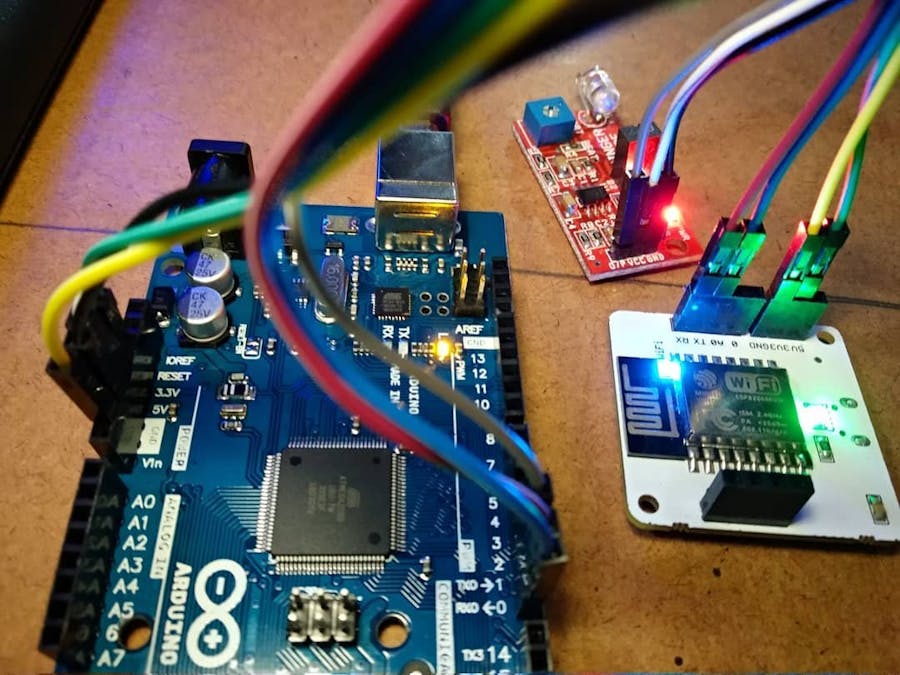
24x7 heart rate monitoring devices like fitness bands are common in the market right now and you might even own one or two even!. What if you could make a similar device but can also send you an SMS or email or both if there is an abnormality detected in your Heart rate? Excited? This project is all about how to get that done in the easiest way possible.
See the project in action:
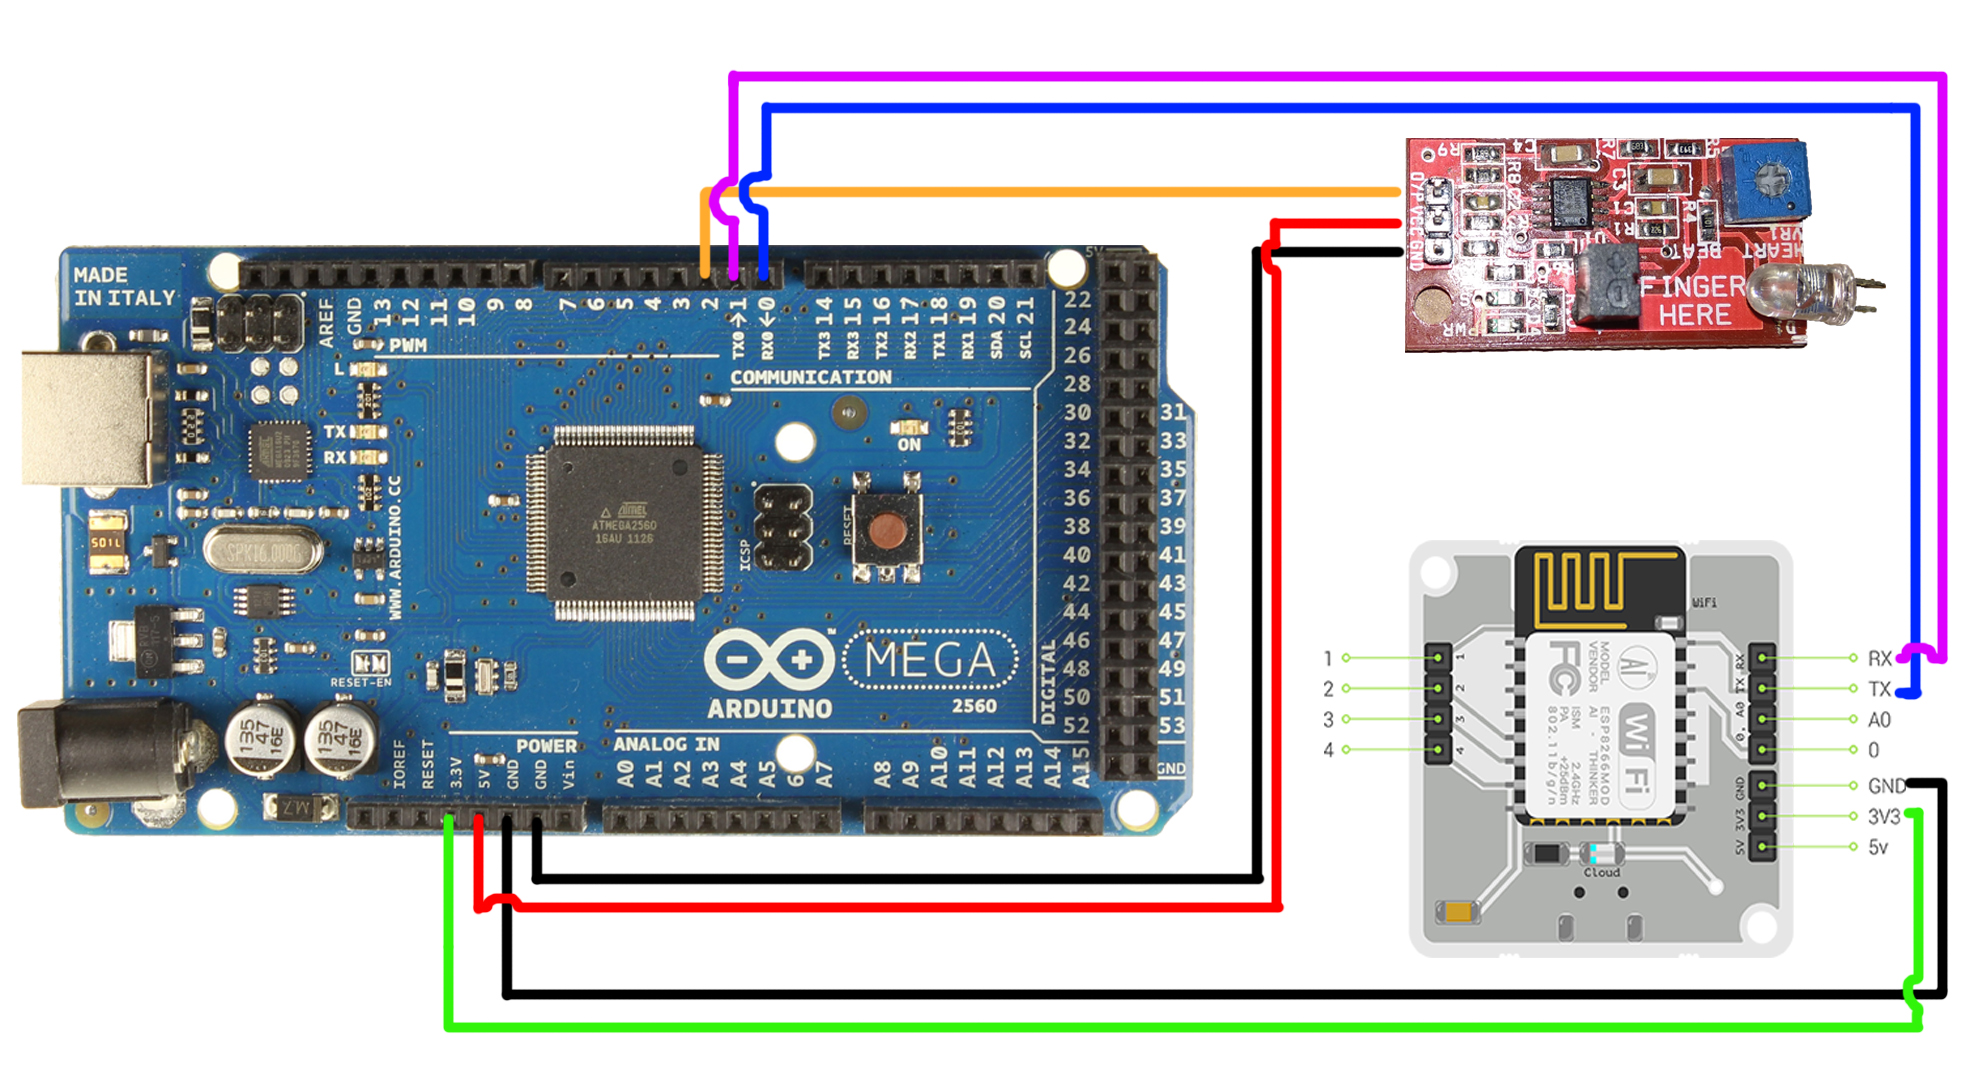
Step 1: Connecting Heart Rate sensor module to ArduinoUsing male to female jumper wires, make the following connections :
- pin 2 of Arduino & Output pin of Heart Rate sensor module.
- 5V pin of Arduino & VCC pin of Heart Rate sensor module.
- GND pin of Arduino & GND pin of Heart Rate sensor module.
Install Arduino IDE from https://www.arduino.cc/en/Main/Software and write the following code:
unsigned long highCounter = 0;
int pulse = 0;
int val = 0;
int lastPulse = LOW;
unsigned long oldMillis = 0;

void setup() {
 pinMode(2, INPUT);
 Serial.begin(9600);
 }

void loop() {
pulse = digitalRead(2);
if (pulse != lastPulse) {
  lastPulse = pulse;
  if (pulse == HIGH) highCounter++;
}

// print and reset highCounter every seconds
if ( millis() - oldMillis >= 10000 )
{
  oldMillis = millis();
  val = highCounter * 6;
  if (highCounter > 1)
  Serial.println(val);
  highCounter = 0;
}
}
Save, Verify and Upload the code.
This code will:
- Collect data from heart rate sensor module,
- Calculates heart rate
- Prints the value so that Bolt wifi module can receive it via serial communication.
Using Male to Male jumper wires, make the following connections:
- 3V3 pin of BOLT Wifi Module & 3.3V pin of Arduino
- TX pin of BOLT Wifi Module & RX pin of Arduino
- RX pin of BOLT Wifi Module & TX pin of Arduino
These connections powers BOLT Wifi Module and establishes serial communication between BOLT Wifi Module and Arduino.
At this point all hardware connections are over
Step 4: Setting up Email automation service using Mailgun- Create an account on Mailgun
- After verification of you phone number, Go to
Domainssection. Click onAdd Recipientbutton. - Click on
Invite New Recipientbutton. Enter the Receipient Email ID. - After adding Email ID, a new sandbox will be generated. Click on the ID of the newly generated sandbox.
- The new screen will have all the necessary credentials that you want for sending an email. Copy all this credentials and save in the notepad.
- Go to https://www.twilio.com and Click on
Get a Free API Keybutton to sign up - Fill all the necessary details in SIGN UP form as shown below:
- Enter and Verify your phone number.
- Click on "Products" as shown on the screen below.
- Now enable the SMS services by clicking on two checkboxes for Programmable SMS and Phone Numbers as shown below.
- Click on "Continue". Again click on "Continue" once you have entered the project name.
- Click on "Skip this step" when it asks you to Invite a Teammate.
- Click on "Project Info" to view the account credentials.
- You can view the Account SID and Auth token on this page. Keep these info safe.
- From the drop-down menu, choose "Programmable SMS". Now click on
Get Startedbutton to generate phone number. - Click on
Get a numberbutton. Then a popup will appear. Click onChoose this numberbutton. - Then a popup will appear which will have the final number. Copy this number and keep it safe.
Note: You can also keep a dedicated linux computer or run linux in virtual machine instead of using VPS like DigitalOcean.
- Go to https://www.digitalocean.com and Signup for an account.
- Create a project. Then create a droplet running ubuntu and access the machine using PuTTY.
- Login to ubuntu using credentials emailed to you.
- Run the following codes :
To update the packages on Ubuntu
sudo apt-get -y update
To Install python3 pip3
sudo apt install python3-pip
To install boltiot library using pip
sudo pip3 install boltiot
To make a python file namedconf.py
sudo nano confi.py
- Write the following code with correct data:
#Credentials from Twilio
SID = 'You can find SID in your Twilio Dashboard'
AUTH_TOKEN = 'You can find  on your Twilio Dashboard'
FROM_NUMBER = 'This is the no. generated by Twilio. You can find this on your Twilio Dashboard'
TO_NUMBER = 'This is your number. Make sure you are adding +91 in beginning'
#Credentials from Mailgun
MAILGUN_API_KEY = 'This is the private API key which you can find on your Mailgun Dashboard'
SANDBOX_URL= 'You can find this on your Mailgun Dashboard'
SENDER_EMAIL = 'This would be test@your SANDBOX_URL'
RECIPIENT_EMAIL = 'Enter your Email ID Here'
#Credentials from Bolt
API_KEY = 'This is your Bolt Cloud accout API key'
DEVICE_ID = 'This is the ID of your Bolt device'
- Save conf.py
- Make a python file named heart_rate.py
sudo nano heart_rate.py
- Write the following code in heart_rate.py:
import conf, json, time
from boltiot import Email, Bolt
from boltiot import Sms, Bolt
minimum_limit = 57 #the minimum threshold of heart rate
maximum_limit = 100 #the maximum threshold of heart rate
mybolt = Bolt(conf.API_KEY, conf.DEVICE_ID)
mailer = Email(conf.MAILGUN_API_KEY, conf.SANDBOX_URL, conf.SENDER_EMAIL, conf.RECIPIENT_EMAIL)
sms = Sms(conf.SSID, conf.AUTH_TOKEN, conf.TO_NUMBER, conf.FROM_NUMBER)
while True:
   response = mybolt.serialRead(2)
   data = json.loads(response)
   sensor_value = data['value']
   try:
       sensor_value = data['value']
       if sensor_value > maximum_limit or sensor_value < minimum_limit:
           response = mailer.send_email("Alert", "The Current Heart Rate is " +str(sensor_value))
           response = sms.send_sms("Alert! The Current Heart Rate is " +str(sensor_value))
   except Exception as e:
       print ()
   time.sleep(10)
- Save heart_rate.py
- Run Heart_rate.py.
sudo python3 Heart_rate.py
When the heart rate goes abnormal, a SMS and email will be send to you phone and email ID respectively.


_wzec989qrF.jpg?auto=compress%2Cformat&w=48&h=48&fit=fill&bg=ffffff)


Comments
Please log in or sign up to comment.