


Hardware components | ||||||
_ztBMuBhMHo.jpg?auto=compress%2Cformat&w=48&h=48&fit=fill&bg=ffffff) |
| × | 1 | |||
| × | 1 | ||||
| × | 1 | ||||
| × | 1 | ||||
| × | 1 | ||||
 |
| × | 1 | |||
Software apps and online services | ||||||
| ||||||
 |
| |||||
Yo guys! It's a long time without publishing new projects. But I'm back. :D
In this tutorial, we are going to build a 2WD robot controlled wirelessly from your laptop or PC through a simple GUI built on Processing IDE. We're going to divide this tutorial into two main parts:
Control the Two DC Motors from the Arduino Serial Monitor
- How do DC motors work.
- What is the H-bridge circuit and why we need it.
- What's the L298N motor driver module and how to use it with the Arduino board.
- What's the Arduino Serial Monitor.
- Code explanation.
Control the Two DC Motors from the Processing Control Panel GUI
- How to build our user interface using Processing IDE.
- What's the HC-05 Bluetooth module and how to use it with Arduino.
- Code modification explanation.
Working Scenario:
The user will control the two DC motors from the Arduino serial monitor according to the characters he/she send.
- By sending the char 'f', the two motors will rotate FORWARD.
- By sending the char 'b', the two motors will rotate BACKWARD.
- By sending the char 'r', the left motor will rotate FORWARD and the right motor will rotate BACKWARD.
- By sending the char 'l', the right motor will rotate FORWARD and the left motor will rotate BACKWARD.
- By sending the char 's', the two motors will STOP rotating.
How DC motor works?
Simply, DC motor is a component that converts the electrical energy into a mechanical energy. we will not dive deep into that Electromagnetism, induction, and magnetic field stuff. actually, i don't care about that, what i care about is how to drive this dc motor thing.
The DC motor will start rotating only when a current flow through it, the motor rotation direction depends on the current flow direction. (See Fig 1) By changing the polarity of the power source with the motor, motor rotation direction will get reversed. (NOTE: DC motors have no polarity.)
The important question here, how to drive the DC motor from your awesome Arduino board?
Actually, DC motors draw a large amount of current while rotating up to 500mA each (500mA in our case. but it depends on the motor size and its power rating), but our Arduino board only can provide 40mA at 5V on its digital pins. so we need to use an external power source(battery) to provide the motors with the required power to operate properly without damaging the Arduino board. Also we need to separate that power circuit(External power source) from the control circuit(Arduino Board).
- We will use a 7.4V 1.5Ah battery as a power source to provide the required power to our motor (power circuit).
- And, of course, the Arduino Uno board to control the motors (control circuit).
We can use a BJT Transistor like the 2N2222a NPN transistor to separate the power circuit from the control circuit. Some 2N2222a specs before using it:
- Collector emitter voltage is 30V.
- Continuous collector current is 800mA.
- Base current is 5mA max.
In the above circuit we are using the transistor as a switch, when the voltage across the base-emitter transistor is HIGH (5V) it will close the connection between the collector and the emitter. So, the current will flow through the motor which will make it rotates.
If the the voltage across the Base-emitter transistor is LOW (0V) it will open the connection between the transistor collector and emitter and the motor will stop rotating.
Don't forget to use a current limiting resistor on the transistor base pin (1k Ohm) to prevent it from damaging. also use a diode in parallel with your motor to protect your Arduino from any back EMF returning from the motor.
But this circuit will allow us to only control one direction of the motor ON and OFF. So, what if we want to control its rotation direction? we will need an H-bridge circuit.
Simply, the H-bridge circuit inverts the direction of the current flow through the motor. this circuit contains four switching elements(transistors in our case) by activating two particular switches at the same time we can change the direction of the current flow thus change the motor rotation direction. for example:
- When Q1 & Q4 are activated and the Q2 & Q3 are deactivated, the current will flow from the VCC of the power source passing through the Q1 then to the motor(from the left terminal to the right terminal) then to Q4 then to the GND. which will make the motor to rotate in the clock-wise direction.
- When Q2 & Q3 are activated and the Q1 & Q4 are deactivated, the current will flow from the VCC of the power source passing through the Q3 then to the motor(from the right terminal to the left terminal) then to Q2 then to the GND. which will make the motor to rotate in the anti clock-wise direction.
So, using only two output pins(A, B) from the Arduino board you can control the state of the four switching elements(transistors) thus controlling the motor rotation direction.
- 'A' pin Controls transistor Q1, and Q4.
- 'B' pin Controls transistor Q2, and Q3.
GUESS WHAT! I have some good news for you, you don't need to build this H-bridge circuit from scratch. we will use the L298N H-bridge motor driver module which gives us all these functionality.
Simply, the L298N Motor driver module is a dual H-bridge circuit that allows you to feed the motors with the needed power from an external power source, also allows you to control the motors rotation direction from your Arduino board.
the L298N Motor driver module is a two channel driver which means that you can connect two different DC motors and control each one independently. the L298N Module can drive DC motors that have voltage between 5-35V with 2A peak current at each channel.
- Motor A --> First Motor Terminal.
- Motor B --> Second Motor Terminal.
- 12V jumper --> if your using a power source more than 12V remove this jumper to not damage the onboard voltage regulator.
- Power Pin(Vs) --> is the pin where the motor power source is connected to, the input voltage should be between 5V and 35V.
- Power Pin(GND) --> is the pin where both the GND of the battery and the GND of the Arduino board is connected on.
- Power pin(5V IN/OUT) --> you can source 5V from this pin only if the 12V jumper is connected. but if the 12V jumper is disconnected you should feed the L298N IC with 5V input to operate properly.
- Enable pins(Enable A) --> by sending a PWM signal from your Arduino PWM Output pin you can control the speed of motor A.
- Enable pins(Enable B) --> by sending a PWM signal from your Arduino PWM Output pin you can control the speed of motor B.
- Logic pins(input1 & input2) --> by sending a digital signal from your Arduino digital Output pin you can control the rotation direction of the Motor A.
- Logic pins(input3 & input4) --> by sending a digital signal from your Arduino digital Output pin you can control the rotation direction of the Motor B.
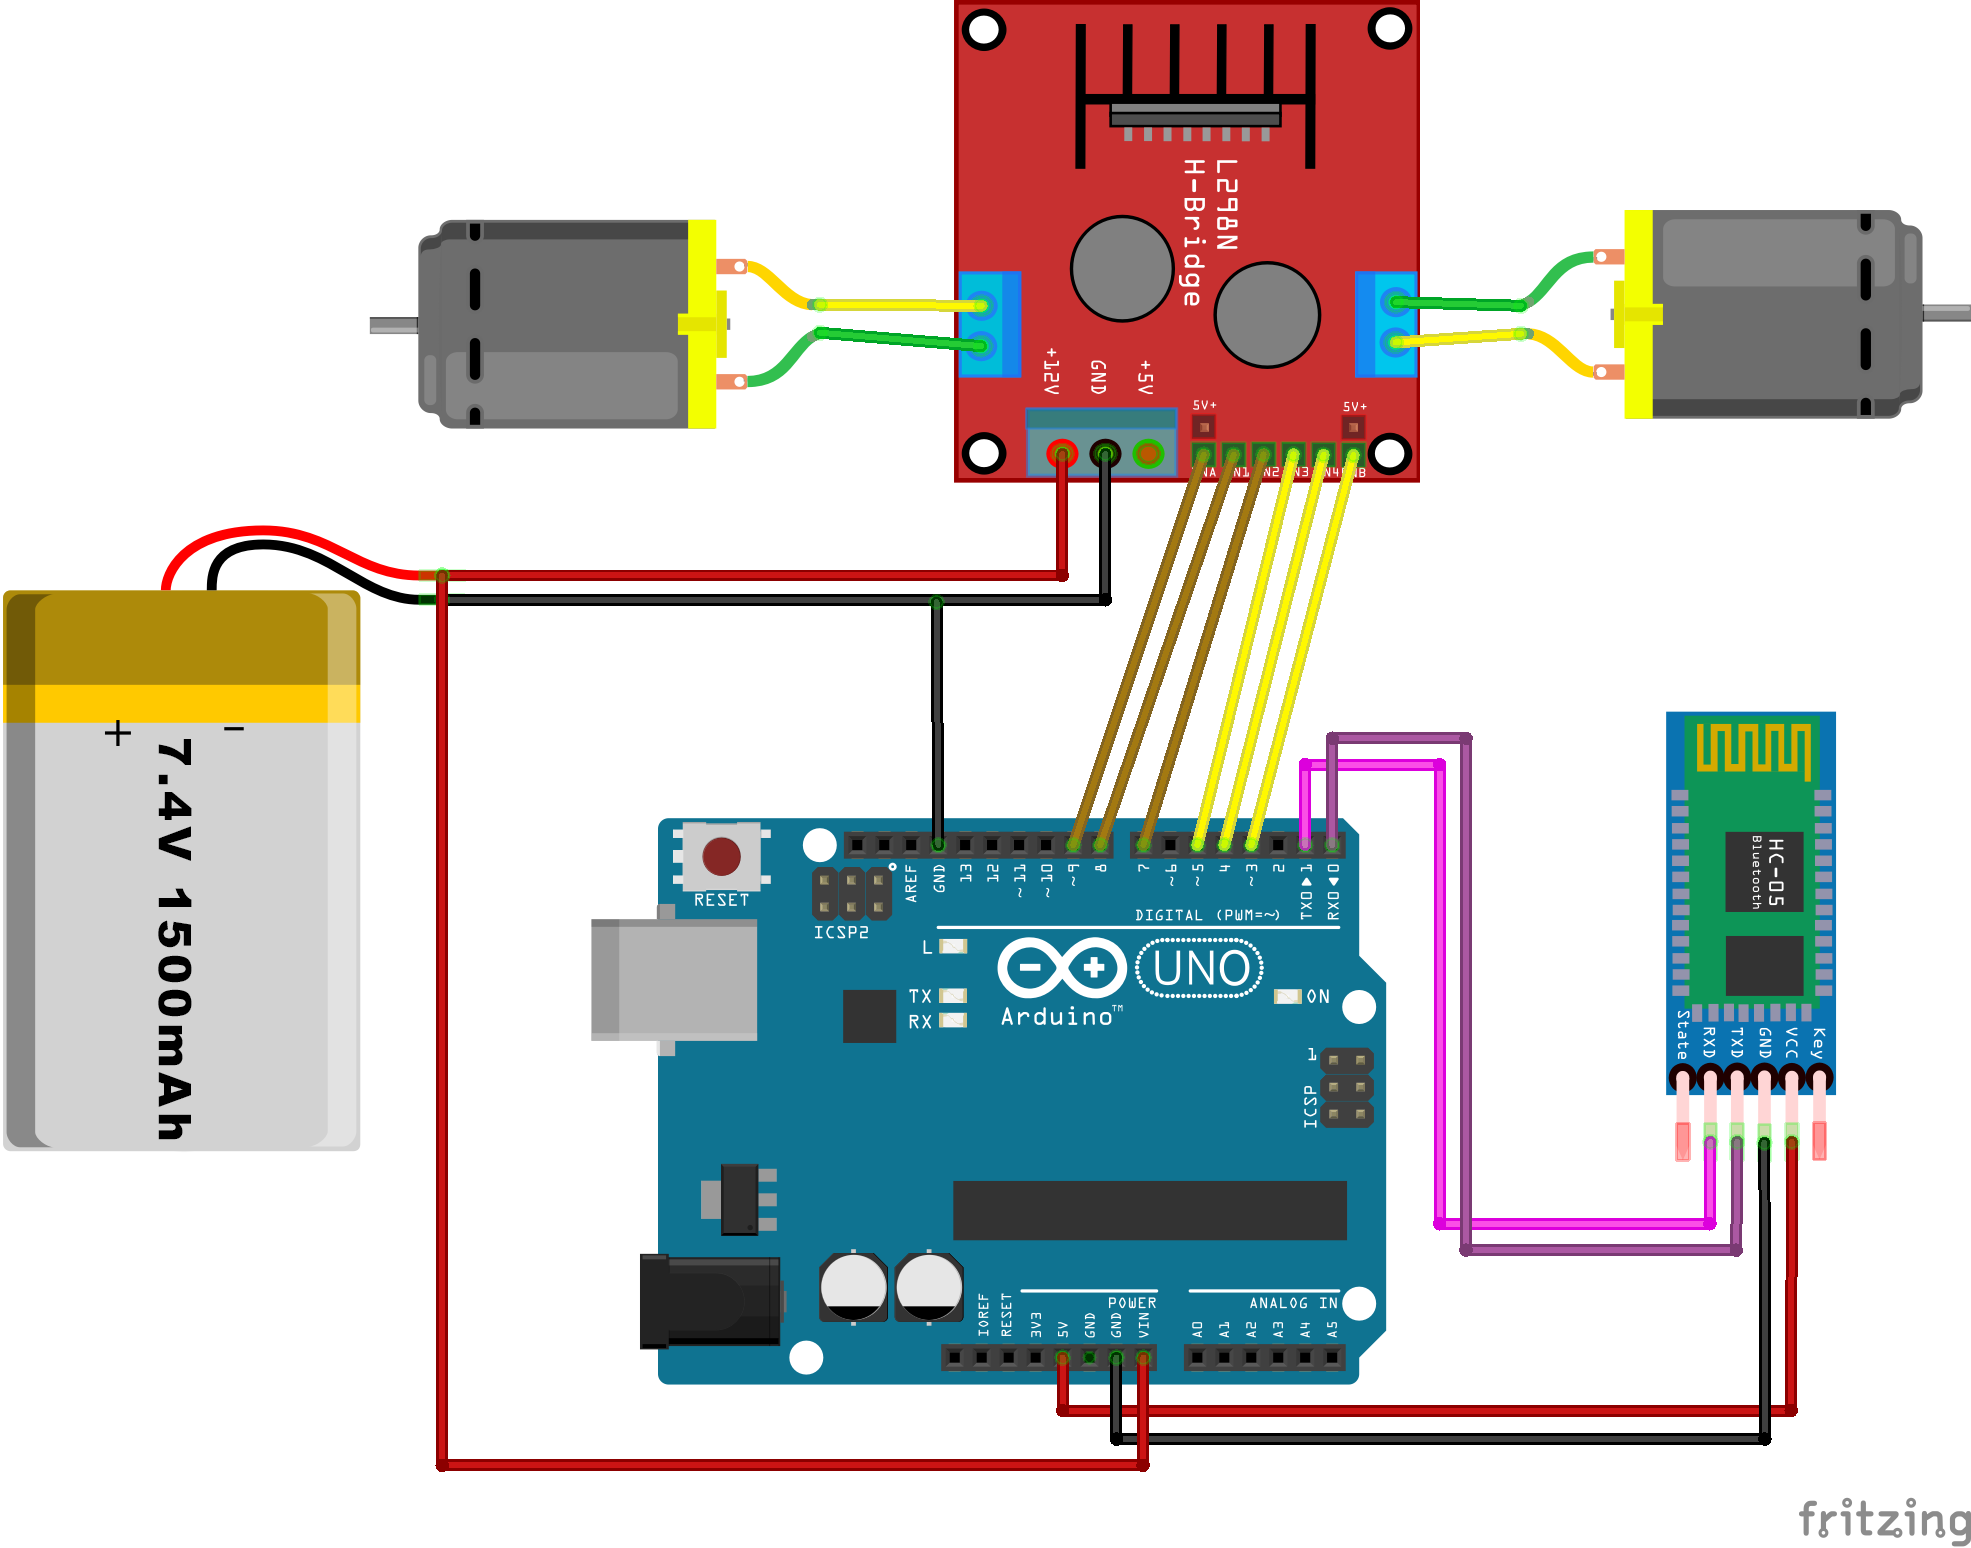
The wiring diagram is very simple,
- connecting the four logic input pins(L298n Module logical pins) with any four Arduino digital output pins to control the motors rotation direction.
- connecting the two enable pins with any two Arduino PWM output pins to control the motors rotation speed. (0 for lowest speed and 255 for highest speed).
- Connect the +VE terminal of the battery to the +12V pin of the L298N Module, also connect the -VE terminal of the battery to the GND pin of the L298N module. Don't forget to connect the Arduino GND pin as well to the L298N Module GND Pin.
Sending/Receiving Data between the Laptop and the Arduino.
Serial communication is the process of sending data one bit at a time, sequentially, over a communication channel or computer bus. Source: Wikipedia.com
Let's give an example, Imagine that you have an Ultrasonic sensor(it's a sensor that measures the distance between it and an object.) and you want to send this distance value to your computer to do some further actions. one simple solution is to connect your Arduino board with your computer via USB and send that data using the Serial communication. And fortunately that Arduino already has built-in functions to communicate with the serial port. You may also want to control your RC car motors remotely. in this case, you need to send your orders from your laptop or smartphone to the Arduino board also over the Serial communication.
To use Arduino serial port, you need to set the speed at which your computer will communicate with the Arduino board(it's called baud rate). in your program inside the void setup() function, use the .begin function with the builtin object Serial to set that speed. to see the valid baud rate values and for more details see the Arduino reference.
Serial.begin(9600);
Some methods you need to know more about:
- Serial.available() --> Get the number of bytes (characters) available for reading from the serial port
- Serial.read() --> Reads incoming serial data.
- Serial.println() --> prints data to the serial port as human-readable text with a line break at the end.
- Serial.print() --> same as the Serial.println() but without a line break at the end.
- Serial.write() --> Writes binary data to the serial port. This data is sent as a byte or series of bytes.
#define in1 4                                                           //defining const. variable named "in1" with value 0, which refers to the PICO D0.
#define in2 5                                                           //defining const. variable named "in2" with value 1, which refers to the PICO D1.
#define in3 7                                                           //defining const. variable named "in3" with value 2, which refers to the PICO D2.
#define in4 8                                                           //defining const. variable named "in4" with value 3, which refers to the PICO D3.
#define motorASpeedPin 9
#define motorBSpeedPin 3
char val;

/*
  forward function takes four arguments x, y, motorSpeed, speedPin.
  this function returns nothing.
  responsible for running motor A forward by a specific speed.
*/

void forward(int x, int y, int motorSpeed, int speedPin) {
 digitalWrite(x, HIGH);
 digitalWrite(y, LOW);
 analogWrite(speedPin, motorSpeed);
}

/*
  backward function takes four arguments x, y, motorSpeed, speedPin.
  this function returns nothing.
  responsible for running motor B backward with a specific speed.
*/

void backward(int x, int y, int motorSpeed, int speedPin) {
 digitalWrite(x, LOW);
 digitalWrite(y, HIGH);
 analogWrite(speedPin, motorSpeed);
}

void right(int motorSpeed) {
 forward(in1, in2, motorSpeed, motorASpeedPin);
 backward(in3, in4, motorSpeed, motorBSpeedPin);
}

void left(int motorSpeed) {
 forward(in3, in4, motorSpeed, motorBSpeedPin);
 backward(in1, in2, motorSpeed, motorASpeedPin);
}

void stopAll() {
 digitalWrite(in1, LOW);
 digitalWrite(in2, LOW);
 digitalWrite(in3, LOW);
 digitalWrite(in4, LOW);
}

void setup() {
 for (int i = 3 ; i <= 5 ; i++) {
   pinMode(i, OUTPUT);
 }
 for (int i = 7 ; i <= 9 ; i++) {
   pinMode(i, OUTPUT);
 }
 Serial.begin(9600);
 Serial.println("Please enter 'f' to run the motor FORWARD, or 'b' to run the motor BACKWARD");
 Serial.println("or 'r' to run the motor RIGHT, or 'l' to run the motor LEFT, or 's' to STOP all motors. ");
}

void loop() {
 if (Serial.available() > 0) {
   val = Serial.read();
 }
 if (val == 'f') {
   forward(in1, in2, 255, motorASpeedPin);
   forward(in3, in4, 255, motorBSpeedPin);
   Serial.println("forward");
 }
 if (val == 'b') {
   backward(in1, in2, 255, motorASpeedPin);
   backward(in3, in4, 255, motorBSpeedPin);
   Serial.println("backward");
 }
 if (val == 'r') {
   right(255);
   Serial.println("right");
 }
 if (val == 'l') {
   left(255);
   Serial.println("left");
 }
 if (val == 's') {
   stopAll();
   Serial.println("stopAll");
 }
}
inside the setup() function where we setup our program,
- set the pins 3, 4, 5, 7, 8, 9 as an output pins.
- then start the Serial Communication between the Arduino and our computer at baud rate 9600 using the
.begin()function. - then print this sentence one the Serial monitor is opened "Please enter 'f' to run the motor FORWARD, or 'b' to run the motor BACKWARD or 'r' to run the motor RIGHT, or 'l' to run the motor LEFT, or 's' to STOP all motors."
void setup() {
 for (int i = 3 ; i <= 5 ; i++) {
   pinMode(i, OUTPUT);
 }
 for (int i = 7 ; i <= 9 ; i++) {
   pinMode(i, OUTPUT);
 }
 Serial.begin(9600);
 Serial.println("Please enter 'f' to run the motor FORWARD, or 'b' to run the motor BACKWARD");
 Serial.println("or 'r' to run the motor RIGHT, or 'l' to run the motor LEFT, or 's' to STOP all motors. ");
}
Inside the loop() function, which is going to repeat over and over as long as our program is running. we just need to read the data coming from the Serial monitor if there's any. Then store it inside the "val" variable which we created earlier.
 if (Serial.available() > 0) {
   val = Serial.read();
 }
after reading the data,
- if the received character is 'f'. call the forward function and print "forward" on the serial monitor to make the debugging process easier.
- if the received character is 'r' call the right function and print "right" on the serial monitor to make the debugging process easier.
- if the received character is 'l' call the left function and print "left" on the serial monitor to make the debugging process easier.
- if the received character is 's' call the stopAll function and print "stopAll" on the serial monitor to make the debugging process easier.
- if the received character is 'b' call the backward function and print "backward" on the serial monitor to make the debugging process easier.
if (val == 'f') {
   forward(in1, in2, 255, motorASpeedPin);
   forward(in3, in4, 255, motorBSpeedPin);
   Serial.println("forward");
 }
 if (val == 'b') {
   backward(in1, in2, 255, motorASpeedPin);
   backward(in3, in4, 255, motorBSpeedPin);
   Serial.println("backward");
 }
 if (val == 'r') {
   right(255);
   Serial.println("right");
 }
 if (val == 'l') {
   left(255);
   Serial.println("left");
 }
 if (val == 's') {
   stopAll();
   Serial.println("stopAll");
 }
}
After Uploading and Running the Code, you have to open the Arduino Serial Monitor from this pin.
Now, You should see this window
Now, type 'f' in the upper bar and press the 'send' button or just press enter. you will notice that you motors are now running forward.
CONGRATS! now you are able to control your motors from the serial monitor. Let's go to the second step!
Second Part: Control the Two DC Motors from the Processing Control Panel GUIWorking Scenario:
We will build a GUI control panel using Processing IDE to control the motors from it instead of the Serial Monitor. the way of communication between the Processing IDE and the Serial port(Arduino IDE) is also a Serial Communication. So, we will build our logic upon the same concepts that we discussed in part one. Luckily, Processing comes with a Serial library designed for just this kind of thing!
to be able to use the Serial communication on processing you have to set the speed at which your computer will communicate with the Serial port(Arduino IDE) which is called the baud rate. Remember how we set Serial.begin(9600) in Arduino? we will do the same thing with processing but with a little change in the syntax.
- First things first, you have to import the Serial library.
You should now see at the top of your sketch a line like
import processing.serial.*; .
- then we need to take an object from the Serial class, i will name it "port" (you can name it as you want) this Serial object allows you to listen to any Serial communication incoming data.
Serial port;
- For our
setup()method in Processing, we're going to find the Serial port our Arduino is connected to and set up our Serial object to listen to that port.
Just like Arduino has setup() and loop(), Processing has setup() and draw() (instead of loop).
For windows users, it will look something like this. you just have to change the "COM6" value according to your Arduino Serial port.
port = new Serial(this, "COM6", 9600);
How to know my Arduino Serial port?
For macOS or Linux users, it will look something like this. you just have to change the "/dev/tty.usbmodem143101" value according to your Arduino Serial port.
port = new Serial(this, "/dev/tty.usbmodem143101", 9600);
How to know my Arduino Serial port?
Building the App GUI is pretty simple, we gonna divide it into three main parts to make it clear.
- Build the App Window.
Building the App Window means Defining the dimension of the display window width and height in units of pixels and setting its color. Also we will create a simple text to place it on the top of the window as a title.
- Placing the buttons on the window.
After building the App window, we need to create five buttons and position them on the App window to allow the user to interact with the app easily, each button is responsible for sending a specific order to the Arduino board. For example, when the user press the "forward" button the Processing IDE will send a specific character to the Arduino port via the Serial Communication, and according to this character Arduino IDE will trigger a specific event (Rotating the motors forward).
- Buttons Functionality.
After placing the buttons correctly on the App Window, we need to give each button a functionality. which means a specific event will get triggered according to which button is clicked. enough talking, let's build some stuff!
Build the App Windowvoid setup() {
size(500, 300);
}
void draw() {
background(150, 0, 150);
fill(255);
text("Motor Control GUI", 195, 30);
}
inside the setup() function
- We used the
size(500, 300);Method to create the App Window with 500px width and 300px height.
inside the draw() function
- we used the
background(150, 0, 150);method with these RGB values to set the background color of the Processing window, This method is typically used within thedraw()function to clear the display window at the beginning of each frame. - then we used the
fill(255);method to set the color of any subsequent component to the white color. - then we used the
text("Motor Control GUI", 195, 30);method to create a text on the x-coordinate 195 and the y-coordinate 30
the coordinate system for pixels in a computer window, however, is reversed along the y-axis. (0,0) can be found at the top left with the positive direction to the right horizontally and down vertically. (See the next Figure)
import controlP5.*;                  //import ControlP5 library

ControlP5 cp5;                       //create ControlP5 object

void setup() {
 size(500, 300);
 cp5 = new ControlP5(this);          //take an object from the ControlP5 Class

 cp5.addButton("forward")            //add new button
   .setPosition(190, 50)
   .setSize(120, 70)
   ;
 cp5.addButton("backward")           //add new button
   .setPosition(190, 210)
   .setSize(120, 70)
   ;
 cp5.addButton("right")              //add new button
   .setPosition(350, 130)
   .setSize(120, 70)
   ;
 cp5.addButton("left")               //add new button
   .setPosition(30, 130)
   .setSize(120, 70)
   ;
 cp5.addButton("stop")               //add new button
   .setPosition(190, 130)
   .setSize(120, 70)
   ;
}
void draw() {
 background(150, 0, 150);
 fill(255);
 text("Motor Control GUI", 195, 30);
}
we will use the ControlP5 library which allows us to add some buttons to our App, this library use not limited on buttons only, it also gives you many more features like adding sliders, checkboxes, radio buttons, canvas, drop down lists, ...
installing any library in Processing is very simple, you just need to go to the sketch tab-> Import Library-> Add Library.
After this window appears, search for ControlP5, then select the ControlP5 library and press install. The installation process will take only few minutes.
- Import the ControlP5 library to our sketch
import controlP5.*; - Take an Object from the ControlP5 class
ControlP5 cp5;. i will name it "cp5" (you can name it as you want) this cp5 object allows you to use the ControlP5 library methods to add buttons, sliders, checkboxes, etc...
inside the setup() function
- Set up the cp5 object
cp5 = new ControlP5(this); - adding buttons using the ControlP5 library is very simple, you just need to use the
.addButton("name")method to give it a name. and use the.setPosition(x, y)method to position it on the screen, and the.setSize(w, h) method to set it's dimensions. that's it.
import controlP5.*;             //import ControlP5 library
import processing.serial.*;     //import the Serial Library

ControlP5 cp5;                  //create ControlP5 object
Serial port;                    //create Serial object

void setup() {
size(500, 300);
cp5 = new ControlP5(this);
port = new Serial(this, "/dev/tty.usbmodem143101", 9600);

cp5.addButton("forward")
  .setPosition(190, 50)
  .setSize(120, 70)
  ;
cp5.addButton("backward")
  .setPosition(190, 210)
  .setSize(120, 70)
  ;
cp5.addButton("right")
  .setPosition(350, 130)
  .setSize(120, 70)
  ;
cp5.addButton("left")
  .setPosition(30, 130)
  .setSize(120, 70)
  ;
cp5.addButton("stop")
  .setPosition(190, 130)
  .setSize(120, 70)
  ;
}

void draw() {
background(150, 0, 150);
fill(255);
text("Motor Control GUI", 195, 30);
}

void forward() {
 port.write('f');
}
void backward() {
 port.write('b');
}
void right() {
 port.write('r');
}
void left() {
 port.write('l');
}
void stop() {
 port.write('s');
}
We will implement 5 different methods, One method for each button. the method name should be the same name as the button. this method will get called once the button get clicked.
For Example, when we click the "right" button, the right() method will get called. So, the Processing IDE will send the character 'r' to the Arduino Serial port via the Serial Communication.
- Now all you have to do is to connect your Arduino board using the USB cable with your laptop and upload the Arduino code.
- Then run the Processing program and enjoy your Work!
Voilaaa! Now we are able to control the Motors from Processing through the Serial Communication, but what about getting rid of the ugly USB cable. Cool, Right!
To make it wireless we will use the HC-05 Bluetooth module which has a wide use, it can set as slave or master as well (unlike the HC-06 module which can work only as a slave) which means that you can make a bluetooth connection between two different Arduino boards. the HC-05 Bluetooth module is a SPP (Serial Port Protocol) module, which means that it communicates with the Arduino board via the Serial communication.
Circuit Diagramwe need to make a slight modification in our Processing Code, we need to update our port name "/dev/tty.usbmodem143101" to the new HC-05 port name.
port = new Serial(this, "/dev/tty.usbmodem143101", 9600);
- First, you need to pair your laptop with the HC-05, after powering up your Arduino board go to your bluetooth preference on your laptop and pair with the bluetooth module, if asked you for a passcode enter "1234".
- Create a new Processing sketch and paste this code in the new sketch and run it, after running the program it will print all the available Serial Ports on the console, choose the HC-05-DevB port.
import processing.serial.*;
Serial port;

void setup(){
 printArray(Serial.list());
}
void draw(){
}
So in my case i will update this line
port = new Serial(this, "/dev/tty.usbmodem143101", 9600);
To
port = new Serial(this, "/dev/tty.HC-05-DevB", 9600);
- First, you need to pair your laptop with the HC-05, after powering up your Arduino board go to your bluetooth preference on your laptop and pair with the bluetooth module, if asked you for a passcode enter "1234". the bluetooth device need to be set up to use a COM port, open up the Bluetooth settings and press More Bluetooth Options.
- Switch to the COM Ports tab and then press the Add button
- In the Add COM Port dialog select the Outgoing radio button. Choose the HC-05 device under Device that will use the COM Port drop down and then click OK.
- It will assign the device to a COM port, click OK out of the Bluetooth settings.
So in this case i will update this line
port = new Serial(this, "/dev/tty.usbmodem143101", 9600);
To
port = new Serial(this, "COM10", 9600);
- After uploading the code to the Arduino board, Remove the USB cable and power up the Arduino board using the external battery.
- connect with the HC-05 bluetooth module from your laptop (passcode 1234).
- Modify the Processing Code Serial Port name According to your connected Serial Port name.
- Run the Processing Code, AND ENJOY PLAYING!
TADA, WE ARE DONE! if you have any questions don't hesitate to drop it in the comments section. And if you like this tutorial send me some memes on my FB account facebook.com/AhmeddEbrahem i will appreciate it LOL
you wanna see more Tutorials and open source projects you can also visit my blog www.makesomestuff.org


Comments
Please log in or sign up to comment.