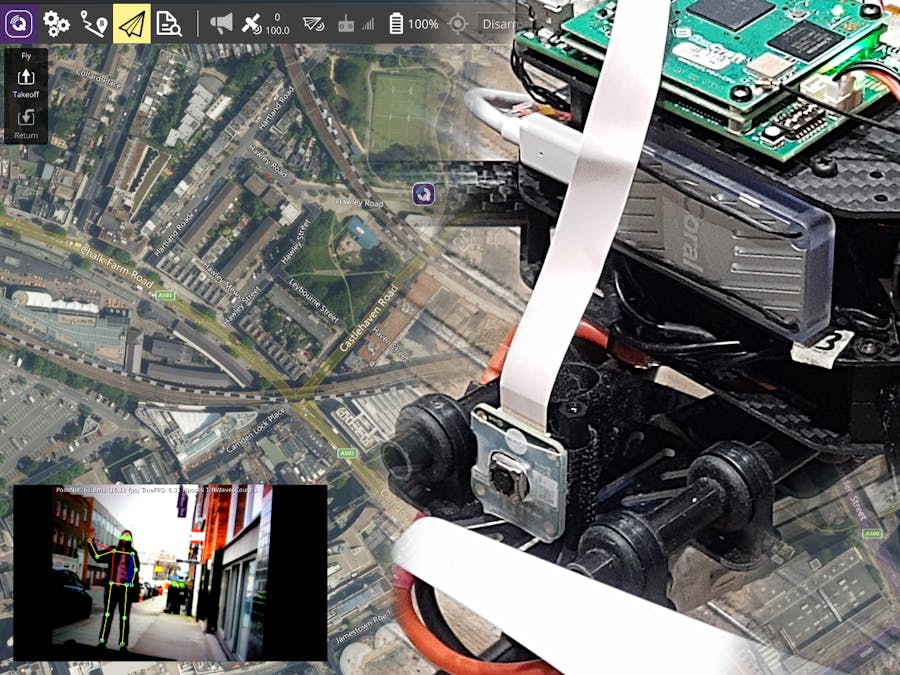
When pandemic strikes, suddenly many people migh become suddenly vulnerable.
This poses multiple challenges:
1) locating
2) communicating
3) helping
When we know that someone is in need, and what the needs are, we can deploy point-to-point route and deliver the package. To find out what we need to deliver, we can mount communication device on the device on the drone. However I found the locating the most tricky and interesting problem. For that I had two ideas, one is searching for the "HELP" signs and the second one was to look for a distress calls, which I have decided to investigate further.
When someone seeks the attention it usually waves with hand or both. I have decided to explore whether we could use autonomous drone, flying through predefined path to detect anyone waving for help en-route. If this works, then the event of detecting someone trying to get attention could be mapped and then used to instruct support services which areas they should pay attention to. Alternatively, it could be a basis as event trigger for the drone to land in order to deliver pharmaceutical supplies.
What I will be building is system for performing "distress calls survey".
Technique of operationThe drone is flying over predesigned area. It collects and analyses surrounding. During the analysis, it tries to detect human beings and estimates the pose(s). The system goes beyond ordinary and common human detection in a bounding box. With on the drone ML estimated human skeleton model it takes it to another level and uses pose data to detect significant behaviour and actions signalling distress and need for a help.
The key implementation steps:
- Obtaining the camera data
- Detect pose
- Detect behaviour/actions
- Stream results
- Video, especially RAW requires significant bandwidth, therefore processing on the drone would be desirable
- Drone operator, should have visibility what the drone is detecting
- It should be possible to stream low bandwidth data (ie. Location, bearing, detecting results such as number of persons, number of call for help)
- Take advantage of NavQ companion computer capabilities
- High-speed wireless Video Data Link over 5Ghz Wifi
- Internet-Networking stack - UDP Video streaming
- IMX VPU-based AVC/H264 video encoder (vpuenc_h264)
- Coral Camera and video interface
- USB for the edgeTPU with Coral
- fast EMMC storage (no need for slow SD card)
- (optional) utilising ethernet (to connect AP)
- (unfinished) connecting LTE modem (PPP or direct MQTT support in sim7000E or similar device)
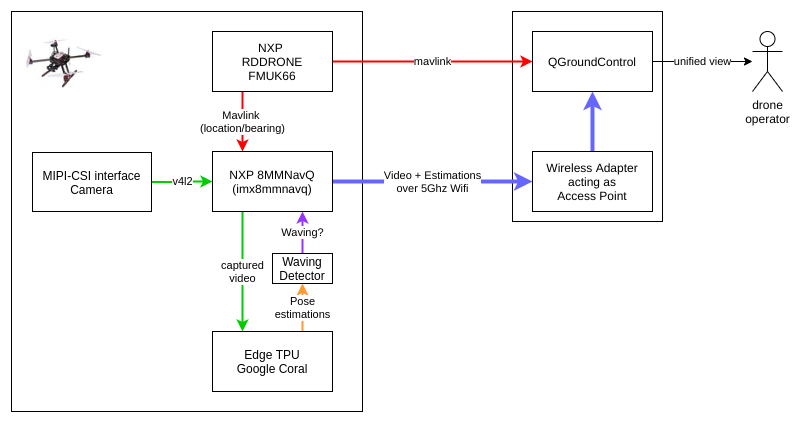
The following diagram illustrates the implemented data flow from the capture using the Coral Camera, then data being passed to tensorflow ML device which provides pose estimation. That is then few to the waving detection algorithm and results are streamed together with video to operator's QGroundControl over the high-speed 5Ghz wireless link.
The diagram bellow shows solution in bigger picture of future possibilities where events are fed back to the drone and/or the recognition events are streamed together with drone position data to the central operations center.
It started as bumpy road, thus worth noting some of the issues that might help others:
- NavQ arrived, but it doesn't work
When the board first arrived and I managed to find time to connect it, it did not work. Serial, no response, not even uboot prompt. At first I though it could be not enough power. Thus replacing the mobile phone charger with brand new bench power supply adapter. But, still nothing. Thinking this must be DOA. Then on the glimpse of dmesg after thinking of sending the board back, last try. Let's flash it all.
get all the tools
- https://github.com/NXPmicro/mfgtools/releases/tag/uuu_1.4.72
- https://drive.google.com/file/d/1AYRxy-okiu8_9_9EmC5DWbCq-hZk2PKw/view?usp=sharing
- https://www.hovergames.com/EULA
# check we can see the board
./uuu -lsusb

# set boot to USB
# dip switches: LED | x | x | x | x | UP | DOWN | UP | DOWN

# and flash
./uuu -b emmc_all imx-boot-imx8mmnavq-sd.bin-flash_navq navq-october.img

# switch back to boot from EMMC
# dip switches: LED | DOWN | UP | DOWN | UP | UP | DOWN | DOWN | UP
and hooray
screen /dev/ttyUSB0 115200gives a login prompt and we are in (navq/navq)
now with serial port working, flashing becomes breeze next time, as we can tell uboot what we want (no need to fiddle with fiddly switches)
# 1. power/restart device
# 2. stop uboot by pressing a key
# 3. type and press enter
fastboot 0- connecting to network
with connman this must be straightforward for sure. Nope, the simple sequence almost works
connmanctl
enable wifi
scan wifi
services
agent on
connect wifi_4aeb722a7c2c_65737133_managed_psk
services are giving 2 IDs for same network id, when it doesn't work try the other, that helped me.
connect wifi_48eb72a77c2c_65737133_managed_pskthey look almost same but they are not.
- install some additional software
ouch, run out of the space pretty quick. Hmm, let's start again (see fastboot above). and then let's utilise all the EMMC benefits instead of slow SD-card. Surprisingly simple.
sudo ./resizeDisk.sh eMMC- it's coral time
Time to have some fun with the coral camera and predictions.
sudo apt install  python3-pip
pip3 install --user mendel-development-tool
echo 'export PATH="$PATH:$HOME/.local/bin"' >> ~/.bash_profile
source ~/.bash_profile
echo "deb https://packages.cloud.google.com/apt coral-edgetpu-stable main" | sudo tee /etc/apt/sources.list.d/coral-edgetpu.list
echo "deb https://packages.cloud.google.com/apt coral-cloud-stable main" | sudo tee /etc/apt/sources.list.d/coral-cloud.list
curl https://packages.cloud.google.com/apt/doc/apt-key.gpg | sudo apt-key add -
sudo apt-get update
sudo apt-get install python3-pycoral
sudo apt-get install libedgetpu1-std
# we could get some more power with ...-max package
# it will be nicely cooled airbone, but let's play safe
sudo usermod -aG plugdev navq
time to try the if the parrot is parrot
pip3 install --extra-index-url https://google-coral.github.io/py-repo/ pycoral
git clone https://github.com/google-coral/pycoral.git
cd pycoral
wget -P test_data/ https://github.com/google-coral/test_data/raw/master/mobilenet_v2_1.0_224_inat_bird_quant_edgetpu.tflite
wget -P test_data/ https://github.com/google-coral/test_data/raw/master/inat_bird_labels.txt
wget -P test_data/ https://github.com/google-coral/test_data/raw/master/parrot.jpg
python3 examples/classify_image.py \
--model test_data/mobilenet_v2_1.0_224_inat_bird_quant_edgetpu.tflite \
--labels test_data/inat_bird_labels.txt \
--input test_data/parrot.jpg
hmm, odd.. no TPU?
# let's double check
sudo apt install usbutils pciutils
lspci
lsusb
Time to read datasheet. Ah, there isn't TPU on this board, so we need to supply one. No problem there is USB-C.
Ah but where is the USB3 hub? Oh, then PCIe, the SOM connector, won't happen in time.
navq@imx8mmnavq:~$ lsusb
Bus 001 Device 003: ID 18d1:9302 Google Inc.
Bus 001 Device 001: ID 1d6b:0002 Linux Foundation 2.0 root hub
Thus we have to go to USB2 hub. One OTG cable and we are running.
navq@imx8mmnavq:~/pycoral$ python3 examples/classify_image.py \
> --model test_data/mobilenet_v2_1.0_224_inat_bird_quant_edgetpu.tflite \
> --labels test_data/inat_bird_labels.txt \
> --input test_data/parrot.jpg
----INFERENCE TIME----
Note: The first inference on Edge TPU is slow because it includes loading the model into Edge TPU memory.
119.1ms
12.6ms
12.9ms
12.6ms
12.7ms
-------RESULTS--------
Ara macao (Scarlet Macaw): 0.75781
All running, nothing can stop us..
- apartfrom Segfault
With setup ready, what a find - project posenet:
that will be perfect baseline.
git clone https://github.com/google-coral/project-posenet.git
cd project-posenet
sh install_requirements.sh
python3 pose_camera.py
what can go wrong?
$ python3 -Xfaulthandler pose_camera.py
...
Thread 0x0000ffff9e048010 (most recent call first):
  File "/home/navq/project-posenet/gstreamer.py", line 66 in run
  File "/home/navq/project-posenet/gstreamer.py", line 366 in run_pipeline
  File "pose_camera.py", line 122 in run
  File "pose_camera.py", line 162 in main
  File "pose_camera.py", line 166 in <module>
Segmentation fault
gdb time
$ gdb
(gdb) file python3
(gdb) run pose_camera.py
....
[   104] Failed GLES11 API GetProcAddress: glUnmapBufferOES !
[   105] Failed GLES11 API GetProcAddress: glGetBufferPointervOES !
[   106] Failed ES Common GLES11 API GetProcAddress: glMapBufferOES !
[New Thread 0xffffdd7411e0 (LWP 21052)]
[New Thread 0xffffdcf401e0 (LWP 21053)]
[Thread 0xffffdd7411e0 (LWP 21052) exited]
[Thread 0xffffdf0b71e0 (LWP 21050) exited]
[New Thread 0xffffdf0b71e0 (LWP 21054)]

Thread 19 "gstglcontext" received signal SIGSEGV, Segmentation fault.
[Switching to Thread 0xffffdf0b71e0 (LWP 21054)]
0x0000ffffe8b9d760 in fbdev_GetWindowInfo () from /usr/lib/libEGL.so.1
to cut story short...
Wyaland runs as root, so we can't talk to it as user, so autovideosink is trying hard to display camera and thus we need to run it as root.
- installed but not available?
/home/navq/project-posenet# python ./pose_camera.py
....
ValueError: Namespace GstVideo not available
what a strange thing, it was installing it.
navq@imx8mmnavq:~/project-posenet$ sudo find / -iname *GstVideo*typelib*
/usr/lib/aarch64-linux-gnu/girepository-1.0/GstVideo-1.0.typelib
this path is the answer, so a bit of hand-holding is needed:
export GI_TYPELIB_PATH=/usr/lib/aarch64-linux-gnu/girepository-1.0done.
PosenetRunning the pre-built ML posenet model gives as results like these when 1 person is in the view.
PoseNet: 63.5ms (15.74 fps) TrueFPS: 2.94 Nposes 1
  NOSE                 x=205  y=273  score=1.0
  LEFT_EYE             x=207  y=269  score=1.0
  RIGHT_EYE            x=202  y=270  score=1.0
  LEFT_EAR             x=212  y=271  score=0.8
  RIGHT_EAR            x=197  y=273  score=0.8
  LEFT_SHOULDER        x=224  y=288  score=1.0
  RIGHT_SHOULDER       x=186  y=294  score=1.0
  LEFT_ELBOW           x=245  y=280  score=0.9
  RIGHT_ELBOW          x=170  y=324  score=1.0
  LEFT_WRIST           x=253  y=259  score=0.8
  RIGHT_WRIST          x=161  y=350  score=0.8
  LEFT_HIP             x=214  y=346  score=1.0
  RIGHT_HIP            x=190  y=346  score=1.0
  LEFT_KNEE            x=216  y=389  score=0.9
  RIGHT_KNEE           x=182  y=389  score=0.9
  LEFT_ANKLE           x=183  y=433  score=0.8
  RIGHT_ANKLE          x=191  y=433  score=0.8
Each X/Y coordinate corresponds to the points as shown on the diagram:
- option 1: posenet ML + develop ML model to detect waving
For this option the idea is that we could create 2 simpler identical sets of 3-4 points, and buffer these for few frames (let's say it takes 3 seconds to wave) that will be 90 frames at 30fps. Then we could try to build a model.
Question is, is this the most straightforward solution? Can we ran 2 models at same device or do we need to use posenet as baseline. Is this achievable in the time constraint?
- option 2: posnet ML + simple mathematics
While thinking about the ML option, and trying all different hand rotations and movements, in many cases, when we are trying to wave (vigorously and visibly), our hand ends up above the shoulder. However that doesn't deal with the whole body rotation. If we add position against the body, which we could approximatelly establish from shoulder-hip vertex we are getting closer. Combining these 2 observations, if we ignore where elbow is and look only on shoulder-wrist vertex, we can see that angle measurement could possibly work.
Obtain the key points:
p0 = keypoint.point[LEFT_HIP]
p1 = keypoint.point[LEFT_SHOULDER]
p2 = keypoint.point[LEFT_WRIST]
Turn them into vertices and calculate angle:
def calculate_angle(p0,p1,p2):
    '''
    compute angle (in degrees) for p0p1p2 corner
    Inputs:
        p0,p1,p2 - points in the form of [x,y]
    '''
    v0 = np.array(p0) - np.array(p1)
    v1 = np.array(p2) - np.array(p1)
    angle = np.math.atan2(np.linalg.det([v0,v1]),np.dot(v0,v1))
    angle_deg = np.degrees(angle)
Which will form bases for the pipeline:
Once we know the angle, the simple detector is just
def detect_hand_waving(angle):
    if angle > -180 and angle < -90: return True
    if angle > 90 and angle < 180: return True
    return False
The image shows wave detect in red and inactivity in blue:
And few more poses:
Video from the camera is processed by the pipeline which splits it into two streams. One is fed to the application, while other one is enriched with the overlay and streamed over the network to the QGroundControl application.
The overlay in addition to number of poses detected, adds additional NWavesCount which counts how many poses are waving.
Separately the individual hand status is logged to console.
The full pipeline can be visualised as follows:
Which is feeding the QGroundcontrol with the video and can be viewed as part of the operators pane.
- in QGroundControl v4.1.1 video doesn't work, but just one version down to v4.1.0 and it works again (on Linux) and all previous versions.
For development purposes, connecting as client to the existing access point, however what about outside.
The wireless card should be capable to provide hostAP with hostAPd. However connman supports tethering mode, which doesn't seem to make the AP working. Thus I have configured the laptop instead as access point and connected the drone to it instead. Example configuration of AP on the ubuntu laptop:
From perspective of drone it's just another AP and it acts as ordinary client.


Comments
Please log in or sign up to comment.