Tutorial on Connecting NodeMCU to Thingsio.ai Cloud
The Raspberry Pi 3 Model B is the earliest model of the third-generation Raspberry Pi. It replaced the Raspberry Pi 2 Model B in February 2016.The Pi isn’t like your typical machine, in its cheapest form it doesn’t have a case, and is simply a credit-card sized electronic board of the type you might find inside a PC or laptop but much smaller.
The goal of this tutorial is to enable you to send capture and send data to cloud from your device. Before starting this tutorial make sure you have your Raspberry pi and DHT11 Humidity and temperature sensors handy, so that this tutorial should go smoothly.
Part I: Installation and Settings of Raspberry Pi:- You can have hardware like HDMI cable, LAN cable, SD card 8/16 GB, DHT11 and one data cable with your device raspberry pi 3.
- Download and install the softwares: Advance IP scanner, SD card formatter, XLaunch and Xming, Putty, VNC Viewer and Win32 Disk Imager for installation and settings for Raspberry Pi 3 on windows platform.
- Download the OS for raspberry pi 3 “Raspbian stretch with desktop” from the link: https://www.raspberrypi.org/downloads/raspbian/ .
- Completely format the SD card through SD card formatter. You can follow this link for unallocated space in SD card. https://www.isumsoft.com/computer/how-to-use-unallocated-space-on-usb-drive.html .
- Flash the OS Raspbian stretch through Win32 Disk Imager
Make “ssh”and wpa_supplicant.conf file in notepad as type “All Files”
- Enter your wi-fi credentials like this in wpa_supplicant.conf and save it. Now, you can access remotely your raspberry pi through your windows system. ctrl_interface=DIR=/var/run/wpa_supplicant GROUP=netdevnetwork={ssid=”YOUR_NETWORK_NAME”psk=”YOUR_PASSWORD”key_mgmt=WPA-PSK}
- Eject the SD card and attach into the raspberry pi.
- Wait for the booting of raspberry pi.
- Scan the IP addresses attach through Advance IP scanner and enter “168.0.1-254, 192.168.137.1-254”.
- Open the putty and enter the IP address of your raspberry pi in SSH option. Port number will be the same. Click on Open
- Enter the Login as “pi” and password as “raspberry”(default)
- To enable the ssh on raspberry pi. Enter the “sudoraspi-config”.
- Navigate to the Advance options and hit enter. Enable the ssh option.
- Install the vnc server. Enter the “sudo apt-get install tightvncserver”.
- After that, enter the “tightvncserver”. You will see the console like this.
- Open the VCN Viewer and register.
- In VCN Server, Go in File-> New connection and enter the same IP address which you gave in putty and write the Name of device.
- Click on connect option. You will be now in raspberry pi OS.
- Raspberry pi 3 side of the setup is now done. We will park it here for few minutes and setup cloud account, which will give you sample code to paste it back. Cloud account will be setup on Thingsio.ai, which enables the raspberry pi to send, store and visualize your sensor data
- ThingsIO.AI is aIoT Platform for developers. As a developer we understood the pain of not having a seamless place to connect, analyze and process device data. Many pure analytics platforms does not offer device management, which is core for the iot. That is the reason of ThingsIO.AI
- Register the account in http://thingsio.ai/#/register.
- You will get the notification for sign up.
- Go in your email address and verify your account.
- After that, sign in your account with your email address and password
- Now, you will be on the project dashboard. Click on the new project option:
- Click on the add a new device option. You will get devide ID.
- Enter the device name and click on the create and configure device
- You will be on your device dashboard:
1. Track your device’s special parameters here. This can be set in device configuration(default to null).
2. Youcan see your real time and special parameter’s graph.
3. Youcan see your all data points.
4. Youcan see here your last 5 data points.
5. Youcan see here all the list of created graphs.
Go in sample device code options and click on the Raspberry pi.
You will get the sample code from there copy and paste into your vi-editor or Geany programmer’s editor.
Click on the “Send trial data” to send a trial data to the server:
Part III: Setting up Raspberry Pi 3Now switch back to your Raspberry pi compiler. The new few steps you have to do it you project and is related to raspberry pi 3.
- Open the terminal page and enter:sudo apt-get updatesudo apt-get upgradesudo apt-get install git-coregit clone git://git.drogon.net/wiringPi
- After that, open the Geany programmer’s editor.
- Before compiling and executing a program with WiringPi library in Geany Programmer’s Editor, we should add few lines in build settings. To add these lines, click on Build and select Set Build Commands which is shown as follows
- Modify C and Execute commands section for compiling and executing program using WiringPi Library shown as follows and click on OK.
- Go in sample device code options in http://thingsio.ai/
- Copy and paste the sample code into your editor/compiler in “file.c”.
- Now, click on the configure device option
You can set the special parameters (this is tracked on the dashboard) & transform it accordingly and add new
Click on the update device option:
- You can also set your device geographical location
- To create a graph for your device click on the “create graph option”
- Click on the preview option and click save change
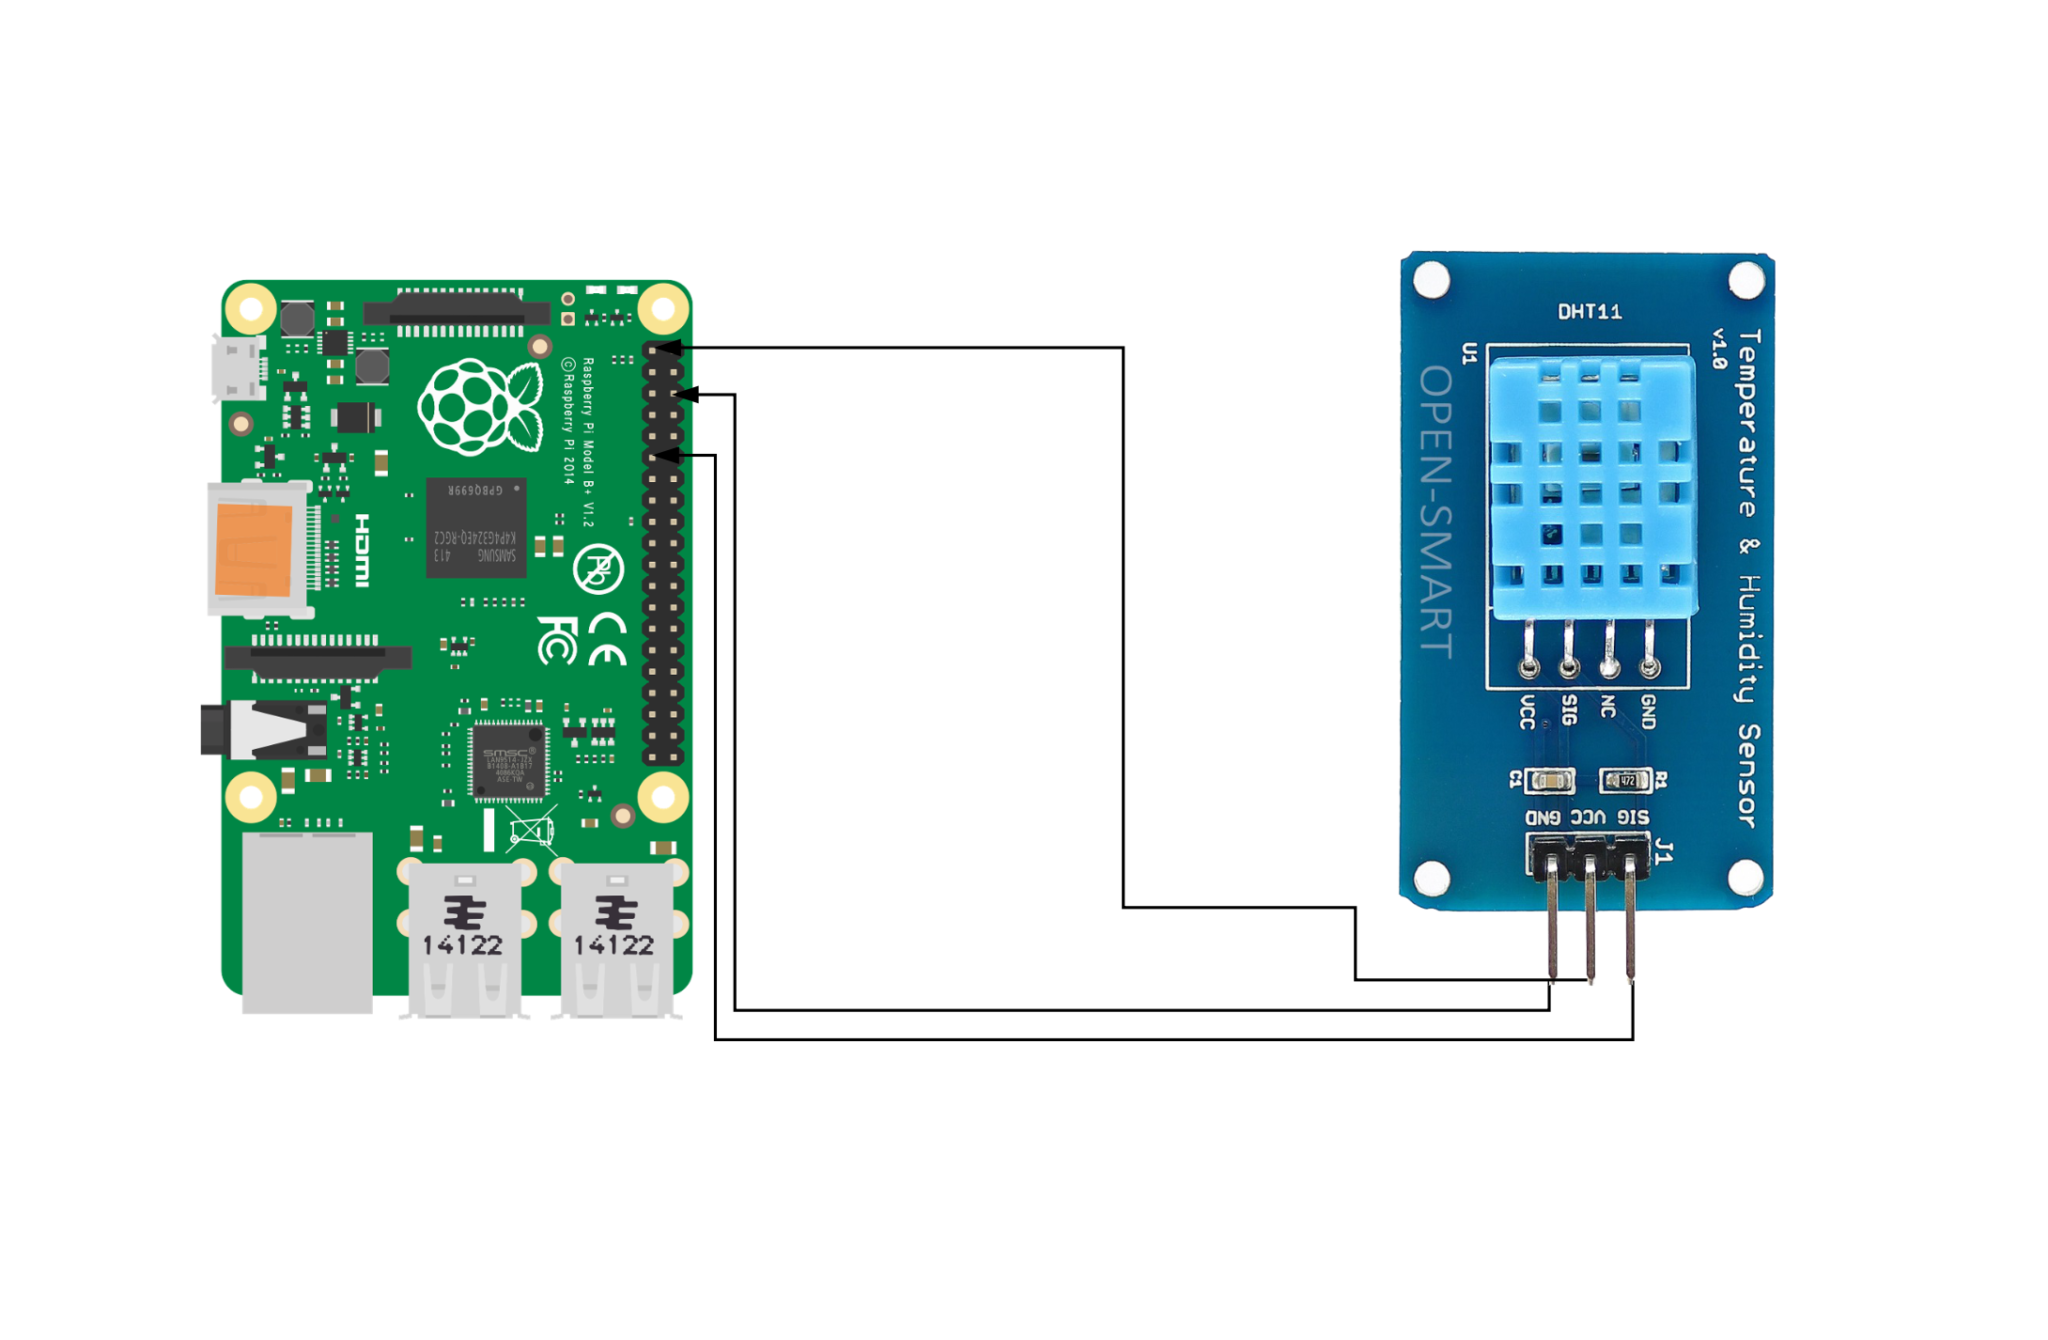
- Attach the DHT11 sensor on GPIO pin
- Click on the build option and build the code


Comments
Please log in or sign up to comment.