


Hardware components | ||||||
_ztBMuBhMHo.jpg?auto=compress%2Cformat&w=48&h=48&fit=fill&bg=ffffff) |
| × | 1 | |||
| × | 1 | ||||
 |
| × | 1 | |||
 |
| × | 1 | |||
| × | 1 | ||||
| × | 1 | ||||
| × | 1 | ||||
Software apps and online services | ||||||
 |
| |||||
In this time, Sharing the water tap or using a public water tap is very dangerous. This may help to spread the virus. You can read my previous article here. That discuss about the construction of an Automatic Hand Sanitizer. The same distance sensor using here. You no need rotate the knob of water tap to turn on or off.
How it works?Working is almost same as my previous project. There we use a Servo motor to operate the sanitizer bottle. Here I am using a Solinoid valve to operate the water tap. First we read the distance from distance sensor to the hand with the help of Arduino Uno. If the distance is less than 20 cm, the solinoid valve will turn on and start the water flow. Otherwise the solinoid valve is turned off.
Before starting we need to know "What is a solinoid valve?"
Solinoid ValveSolinoid valve is a electro-mechanical device. Simply a valve only open or close only when the required is voltage is available. This device is basically available in two models. One is "Normally Closed (This is closed when the absence of electricity. And open the presence of electricity). The second model is "Normally Opened" (This is opened when the absence of electricity. And closed the presence of electricity). Here we are using the "Normally closed" type.
You can also get the solinoid valve from old washing machine.
It's time to start.
Buy electronic components with free shipping on utsource.net
Step - 1
First we need to create a sketch(code)
Here I am using HC - SR 05 Ultrasonic distance sensor. You can read the interfacing of HC-SR 05 here. Here I am going to define two variables and set attach pins. One is echoPin on Arduino digital pin 5 and other is tritPin on Arduino digital pin 4. Then we need to declare two variables. One is "duration" and other is "distance".
#define echoPin 4
#define trigPin 5
int long duration;
int distance;
Now we need to code the setup part of Arduino program.
First I am going to set the pinModes. EchoPin as "INPUT", trigPin as "OUTPUT" and finally digital pin 3 as "OUTPUT". Because we use this pin (pin 3) for control the Solinoid valve. Then set the pin 3 as "LOW" for 2 seconds.
void setup(){
pinMode(echoPin,INPUT);
pinMode(trigPin,OUTPUT);
pinMode(3,OUTPUT);
digitalWrite(3,LOW);
delay(2000);
}
The setup part is completed. Next loop part.
Step - 2
Now we need to set the trigPin in "LOW" for 2 microseconds. Then set the trigPin "HIGH" for 10 Microseconds. And set it back to "LOW". Then read the total travel time using the function pluseIn(). Then calculate the distance from this time. And use "if" and "else" for control the solinoid valve. Set pin 3 as "HIGH" only the distance is less than 20 cm. Otherwise it keep as "LOW".
void loop(){
digitalWrite(trigPin,LOW);
delayMicroseconds(2);
digitalWrite(trigPin,HIGH);
delayMicroseconds(10);
digitalWrite(trigPin,LOW);
duration=pulseIn(echoPin,HIGH);
distance=(duration*0.034/2);

if(distance<=20){
digitalWrite(3,HIGH);
}
else{
digitalWrite(3,LOW);
}
}
The coding part is complete. The complete code is given in the attachment part. Now we need to setup the hardware.
First connect the solinoid valve to the pipe. Connect it between the water tap and supply pipe with the help of other connectors and thread seal. Keep the knob of the water tap always on
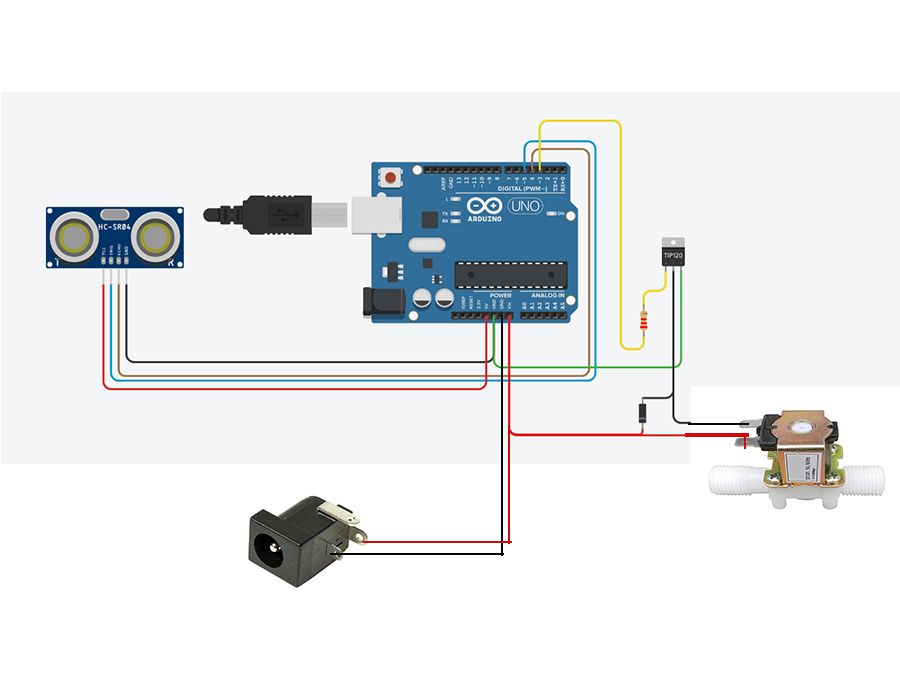
Connection
Arduino digital pin 3 - Base of TP120
Arduino digital pin 4 - Echo pin of HC-SR 05
Arduino digital pin 5 - Trig pin of HC-SR 05
Arduino Vin pin - 12V DC (+ve from adapter)
Arduino Gnd 1 - Gnd of adapter
Arduino Gnd 2 - Gnd og HC-SR 05
Arduino Gnd 2 - Emiter of TP120
Collector of TP120 - Solinoid valve terminal 1
12V DC (+ve from adapter) - Solinoid valve terminal 2
Anode of Diode - 12V DC (+ve from adapter)
Cathode of Diode - Collector of the TP120
Here TP120 is used as a switching device. It will drive the Solinoid valve. This Solinoid valve will draw 500 milli amphere. That's why I use the additional power supply. One IN4007 diode is used as flyback diode. It help to protect the TP120 from back current due to the coil of solinoid valve. Complete the hardware connections with the help of circuit diagram. Place the sensor in the front the water tap and other circuits in an enclosure.
It's time to rock!!!!!
Don't copy-paste my code. try to understand each line of the code and make your own.
You can join our telegram group here or search INNOVATION.
Follow me on,
Instagram : five_volt_player
Facebook : Akshay Joseph
Github : akshayjoseph666
Share your experience and suggestions on the comment box.
STAY HOME, STAY SAFE, STAY CREATIVE. Let break the chain.


Comments
Please log in or sign up to comment.