"Time is't the main thing. It's the only thing." - Miles Davis.
In most of the projects uses time related operations. For example, We can automate our outdoor light with time. It automatically turn on from a specified time to another pre-setted time. Or we can make a automatic school bell. And many more. MCU can't do by itself. We use the RTC (Real Time Clock) for set the real time in MCU.
"Digital calendar clock" is a basic project with RTC. There are so many type RTC Modules are available in market. Here I use 1307 RTC module.
Here I use the same I2C LCD which I previously documented. If you haven't read it before, Please read it first from here.
In this article,
- Introduction to DS1307 RTC
- Installing libraries in Arduino IDE.
- Key points to create Arduino Sketch
- Arduino Code explained.
- Finally make the "Digital Clock Calendar.
- DS1307 is a RTC IC which help to keep track of time. It is a 8 pin IC
- In DS1307 data is transferred in binary decimal coded, bits pattern. The data transfer rate in DS1307 is 56 bytes.
- I2C is the protocol is used to communicating with MCU
- DS1307 RTC Module mainly consist of DS1307 IC, 3V coin cell, 2 pull-up resistors and a 32.768 kHz crystal oscillator.
- We can get the current hour, minute, second, day of the week, day, month and year.
Pinout of DS1307
- PIN 1, 2: These pins are for standard 32.768 quartz crystals.
- PIN 3: This pin is used for battery connection to DS1307.
- PIN 4: We have to apply Ground on this pin.
- PIN 5: This pin is labeled as SDA, which is short for Serial Data Line.
- PIN 6: It is used for serial clock input (SCL) and data synchronized.
- PIN 7: This pin is used for output square wave obtainer (SQW).
- PIN 8: At this pin, we provide an external power supply (Vcc).
Here we use the "RTClib" library. We can get the 24 hour clock. For 12 hour clock we need to convert it. So many methods for this conversion. here I use if,else condition and the map() function. Alternatively you can use any other method.
Lets start!!!!!
Step 1
Installing libraries in Arduino IDEif you already installed these libraries, PLEASE SKIP STEP.
We need to install two libraries.
1. First one is "RTClib". This is a master library. So you can use the same library for other some RTC modules. For install this library open Arduino IDE and go to Sketch > Include Library > Manage Libraries Then type RTClib in the search bar located in the top right corner. And click Install
2. second library is "LiquidCrystal-I2C". Go to the link and download the library Arduino-LiquidCrystal-I2C-library. Then open Arduino IDE and go to Sketch>Include Library> Add.ZIP Library. Next select the downloaded ZIP file and click open.
Library installation is completed.
Step - 2
Next I am going to create a sketch. First add the three header files 1. RTClib.h, LiquidCrystal_I2C.h and Wire.h. Wire library used because of here we use the I2C protocol for communication. RTClib library will help to communicate with RTC module. And the LiquidCrystal_I2C library help to communicate with I2C LCD.
#include <RTClib.h>
#include <Wire.h>
#include <LiquidCrystal_I2C.h>
Step - 3
Next I declare, the RTC I am going to use. Here it is DS1307 and also create an object named "rtc" for this device.
RTC_DS1307 rtcStep - 4
Then I create another object to call the I2C LCD. The object name is lcd. And set the address of the LCD, number of columns and number of rows. Here my I2C LCD's address is 0x27, the number of column is 16 and the number of rows is 2. This is my case. If you use a different LCD please use it's number of columns and number of rows. If you don't know the address of your LCD click here then go to the Step - 1 in that article.
LiquidCrystal_I2C lcd(0x27, 16, 2);Step - 5
The function now.dayOfTheWeek() returns integer numbers. Eg. 0 representing Sunday, 1 representing Monday and so on. So we need to convert it to Sunday, monday,... for easy understanding. For that I declare a 2D character Array.. Please take more care about the size of array. I use the array name as "daysOfTheWeek". The name is similar to the function. You can use any other name. Then fill the Array. Here I use "Sun" instead of "Sunday" for save the space on LCD ( here I use 16x2 I2C LCD ). Next I declare a integer type variable, named "temp". This is for store the information about AM/PM.
char daysOfTheWeek[7][12] = {"Sun", "Mon", "Tue", "Wed", "Thu", "Fri", "Sat"};
int temp;
Step - 6
In set up part, initialize the LCD and turn on the backlight of the LCD.
lcd.begin();
 lcd.backlight();
Step - 7
Print a message on LCD when the RTC is not running. This is for debugging purpose. Clear the LCD and set the cursor to (0, 0).
if (! rtc.begin()) {
    lcd.clear();
    lcd.setCursor(0, 0);
    lcd.print("RTC Not Working");

  }
Step - 8
Next line of code is used to update the to MCU (here Arduino) for first time. When we compail the code, these line help to fetch the date and time from computer. Please take more care about these line. Because after first upload the complete code to Arduino the you need to comment these lines and upload the code to Arduino again.
rtc.adjust(DateTime(F(__DATE__), F(__TIME__)));Step - 9
Now we need to print a welcome message. Here I am going to print "Digital Calendar Clock". First set the cursor at (0, 0) and print "Digital Calendar". Then set the cursor to (5, 1). And print "Clock".
lcd.setCursor(0, 0);
  lcd.print("Digital Calendar");
  lcd.setCursor(5, 1);
  lcd.print("Clock");
The setup part is completed
Step -10
Next code the loop part. There's pretty much only one way to get the time using the RTClib, which is to call now(), a function that returns a DateTime object that describes the year, month, day, hour, minute and second when you called now().
DateTime now = rtc.now();Step - 11
Then clear the LCD by using clear() function. Next Set the cursor at (1, 0). I am going to print the date in "DD/MM/YYYY" format. Here I use now.day() function to get the current day. The function now.month() used for get the current month and now.year() for current year. First print the "day" then print a "/" and then print "month" and next print another "/" and next print the "year".
lcd.clear();
  lcd.setCursor(1, 0);
  lcd.print(now.day());
  lcd.print('/');
  lcd.print(now.month());
  lcd.print('/');
  lcd.print(now.year());
Step - 12
Next set the cursor at (12, 0) and print day of the week. The function "now.dayOfTheWeek()" returns an integer value corresponding to the day of the week. We will insert that return value to our array "daysOfTheWeek[]" and print the current day of the week.
lcd.setCursor(12, 0);
lcd.print(daysOfTheWeek[now.dayOfTheWeek()]);
Step - 13
Set the cursor to (2, 1). Now I am going to print the hour. Before that we need to convert the 24 hour clock to 12 hour. "now.hour()" function returns the current time. 0 represent 12 AM and 23 represent 11 PM
Here I am going to divide hour into four parts.
- 0
- 1 to 11
- 12
- 13 to 23
Use "if" statement to make a decision. Print "12" if the now.hour() is 0 and make temp=0 for AM.
if (now.hour() == 0) {
    lcd.print("12");
    temp = 0;
  }
Step - 14
Next use a "else if()" statement. print the now.hour() only when the now.hour() is greater than or equal to 11. 0 will exclude from this statement. Because step - 13 already work with that condition. And then make temp==1 for AM.
else if (now.hour() <= 11) {
    lcd.print(now.hour());
    temp = 0;
  }
Step - 15
Then use another else if() statement. This part is mainly responsible for the conversion of 24 hour clock to 12 hour clock. Here we use map() function. This function have 5 attributes. First is the "value". Here, "value" is returned value of the function "now.hour()". The second attribute is "FromLow". Which means the lowest value of "value" is 13. Next Attribute is "FromHigh". Mean the maximum value of "value". The third attribute is "ToLow" Here that is 1. And the last attribute is "ToHigh". It is 11. The function map() returns the mapped value and we print that value. Then make temp==1 for PM.
else if (now.hour() >= 13) {
lcd.print(map(now.hour(), 13, 23, 1, 11));
temp = 1;
}
Step - 16
Next print the now.hour() if the now.hour()==12 and make temp==1 for PM.
if(now.hour()==12){
    lcd.print(now.hour());
    temp=1;
  }
Step - 17
The hour will print by one of the above statement. Next print a colon and then print minute by the function now.minute() and again print a colon then print current second by the function now.second().
lcd.print(':');
  lcd.print(now.minute());
  lcd.print(':');
  lcd.print(now.second());
Step - 18
Then set the cursor at (12, 1). Then print AM if the temp==0 and print PM if temp==1. And then add a delay of 1000 milliseconds.
else if (temp == 1) {
    lcd.print("PM");
  }
delay(1000);
The programming is completed. The complete code is given in the code section.
Step - 19
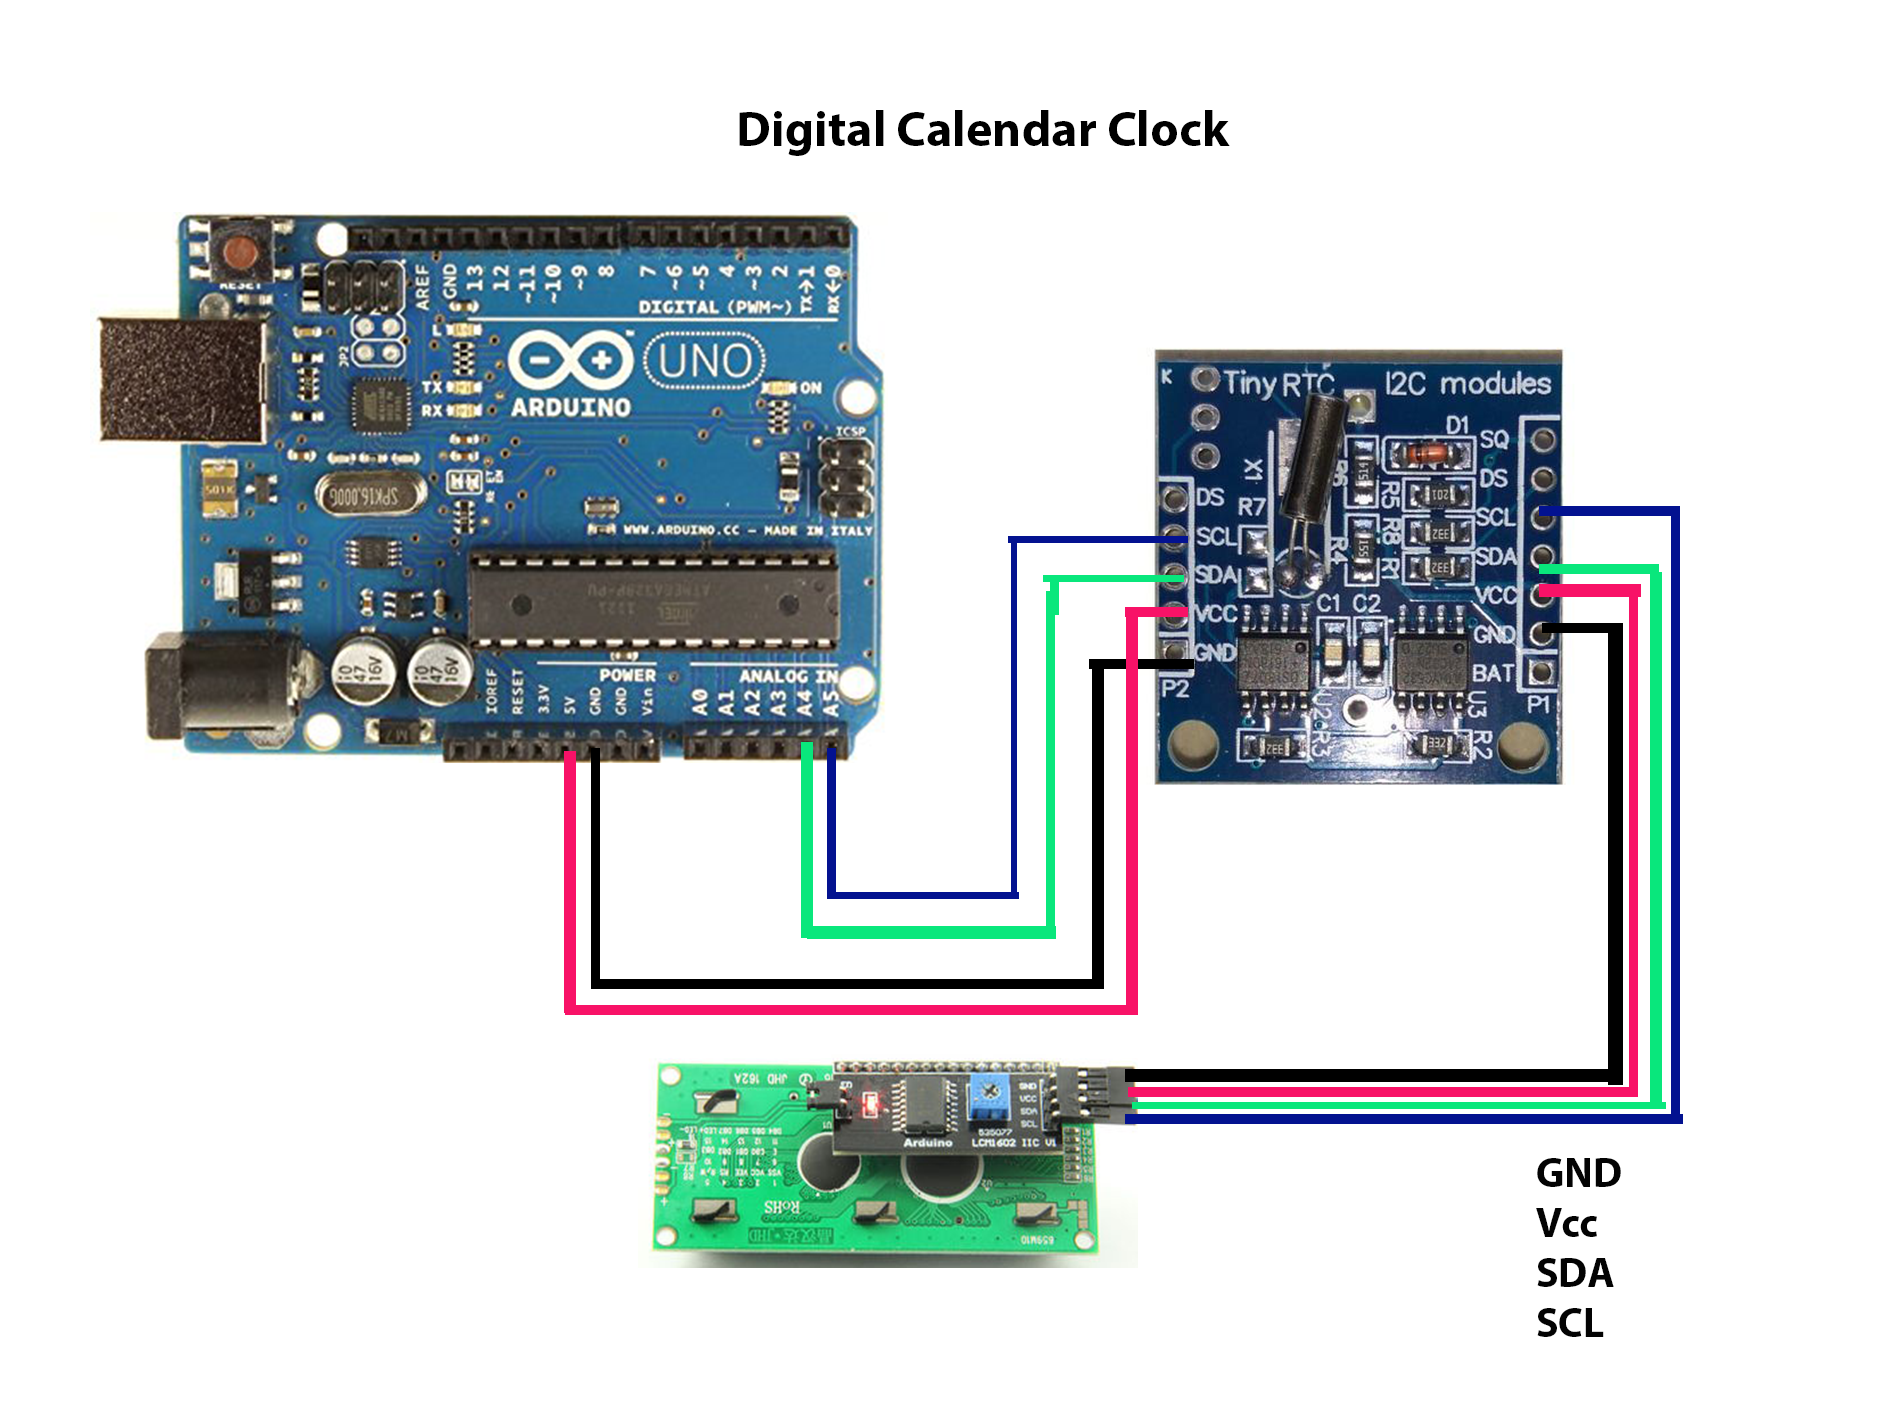
Please complete the wiring before upload the code.
Connection
Circuit diagram is given in the diagram section.
Step - 20
Upload the code to Arduino Uno. And then comment or remove( I recommend for first option) the statement
"rtc.adjust(DateTime(F(__DATE__), F(__TIME__)));"
with "//" and then again upload the code.
The Digital Calendar Clock is completed. You can also get a digital calendar clock
Please don't copy paste my code. Understand each line of code and create your own sketch
Follow me on,
Instagram : five_volt_player
Contact : akshayjoseph666@gmail.com
Read my previous articles here.
Share your experience and suggestions on the comment box.


_ztBMuBhMHo.jpg?auto=compress%2Cformat&w=48&h=48&fit=fill&bg=ffffff)


Comments