Soil moisture is a measure of soil health, the water content present in a certain area of the ground. In my previous project Self Greenery, I build a Micro: bit Automated Self Watering Plant, so in this project, we will send the real-time soil moisture sensor data to qubitro for visualization.
What it doesFor this project, we will be using a node MCU ESP8266 WiFi module and a soil moisture sensor that measures the volumetric content of water inside the soil and we will send this sensor data for visualization in the Qubitro platform.
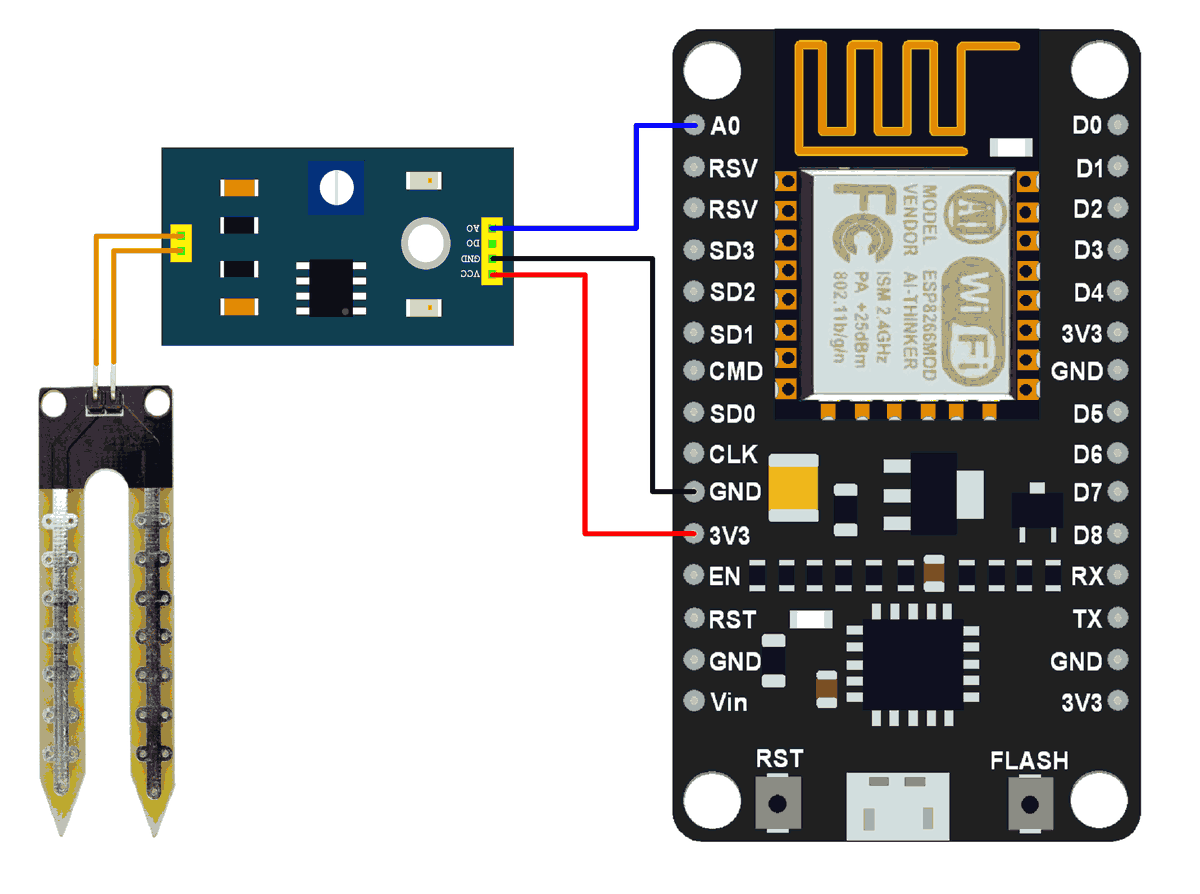
Let's BuildConnection Diagram
Connect the soil moisture sensor FC-28 to the ESP8266 in analog mode.
- VCC of FC-28 to 3.3V of ESP8266
- GND of FC-28 to GND of ESP8266
- A0 of FC-28 to A0 of ESP8266
- Connect the two pins from the probe to the two pins on the Amplifier circuit via jumper wires.
Now, let's start to code in Arduino IDE. Firstly I wrote this basic code of getting the sensor data in the COM3 serial Monitor.
#define SensorPin A0
void setup() {
  Serial.begin(9600);
}
void loop() {
  float sensorValue = analogRead(SensorPin);
  Serial.println(sensorValue);
  delay(30000);
}
Connecting to Qubitro Platform
- SignUp/Login on the qubitro portal
- Create a new project with your device
- Go to the device settings and there you can see your unique device id and device token
Full Code
Add your wifi SSID, password also add your unique device ID and token in the below code. Install Qubitro MQTT client from Arduino IDE library manager if not already installed.
#include <QubitroMqttClient.h>
#include <ESP8266WiFi.h>
// WiFi Client
#define SensorPin A0
WiFiClient wifiClient;
// Qubitro Client
QubitroMqttClient mqttClient(wifiClient);
// Device Parameters
char deviceID[] = "ADD_DEVICE_UNIQUE_ID";
char deviceToken[] = "ADD_DEVICE_UNIQUE_TOKEN";
// WiFi Parameters
const char* ssid = "ADD_WIFI_SSID";
const char* password = "ADD_WIFI_PASSWORD";
void setup() {
  // Initialize the serial port
  serial_init();
  // Initialize wireless connectivity
  wifi_init();
  // Initialize Qubitro
  qubitro_init();
}
void loop() {
  float sensorValue = analogRead(SensorPin);
  Serial.println(sensorValue);
  String payload = "{\"Sensor \":" + String(sensorValue)+ "}";
  mqttClient.poll();
  mqttClient.beginMessage(deviceID);
  mqttClient.print(payload);
  mqttClient.endMessage();
  // Delay
  delay(30 * 1000);
}
// Initialization code
void serial_init() {
  // Initiate serial port connection
  Serial.begin(115200);
  // Delay for stabilization
  delay(200);
}
void wifi_init() {
  // Set WiFi mode
  WiFi.mode(WIFI_STA);
  // Disconnect WiFi
  WiFi.disconnect();
  delay(100);
  // Initiate WiFi connection
  WiFi.begin(ssid, password);
  // Print connectivity status to the terminal
  Serial.print("Connecting to WiFi...");
  while(true)
  {
    delay(1000);
    Serial.print(".");
    if (WiFi.status() == WL_CONNECTED)
    {
      Serial.println("");
      Serial.println("WiFi Connected.");
      Serial.print("Local IP: ");
      Serial.println(WiFi.localIP());
      Serial.print("RSSI: ");
      Serial.println(WiFi.RSSI());
      break;
    }
  }
}
void qubitro_init() {
  char host[] = "broker.qubitro.com";
  int port = 1883;
  mqttClient.setId(deviceID);
  mqttClient.setDeviceIdToken(deviceID, deviceToken);
  Serial.println("Connecting to Qubitro...");
  if (!mqttClient.connect(host, port))
  {
    Serial.print("Connection failed. Error code: ");
    Serial.println(mqttClient.connectError());
    Serial.println("Visit docs.qubitro.com or create a new issue on github.com/qubitro");
  }
  Serial.println("Connected to Qubitro.");
  mqttClient.subscribe(deviceID);
}
Compile and upload this code to your board and now you are ready to send the data to the qubitro server.
Here is the output which you will see in Arduino IDE serial monitor.
Go to the project dashboard and you can create an analytics chart of your sensor data.
I tried using it with my garden plants and it really worked perfectly, you can also insert the sensor in the soil and see the real-time sensor data in the platform.
So this was all about this interesting project, I hope you will also try it and for more exciting blogs involving qubitro, you can follow qubitro blogs


Comments
Please log in or sign up to comment.