Note: the code had been updated so there's only AP mode now. The HTML page also has a bit CSS style.
This was actually my first ESP8266 project, with the idea of making a WiFi-controlled car as simple as possible. The NodeMCU board itself would create a WiFi server, send a control web page to user's computer of phone, and control the car by user's request. No apps required - just your browser.
See Arduino on ESP8266 for how to add ESP8266-related boards to your Arduino IDE. Also be noted that NodeMCU V2 and V3 has different sizes; V3 is bigger than the V2 I used here.
Power SupplyESP8266 boards like NodeMCU has a voltage regulator, which in theory can input as high as 12V. In the beginning I was planning to power both the board and motors with 4 AA batteries (6V). But then the problem with ESP8266 boards surfaced: when the motors started to run, the whole system's voltage would momentarily drop below 2.5V and causing the board reboot itself.
I didn't want to use two seperate power sources, that would just make things more complicated.
In the end I solved this by using a power bank and micro USB cable directly powering the NodeMCU - then use the board's Vin pin to power the motors. The voltage at Vin is like 4.5V, and the current is not very high, so the car can't run very fast. But...it works. And it's pretty easy to recharge the power bank.
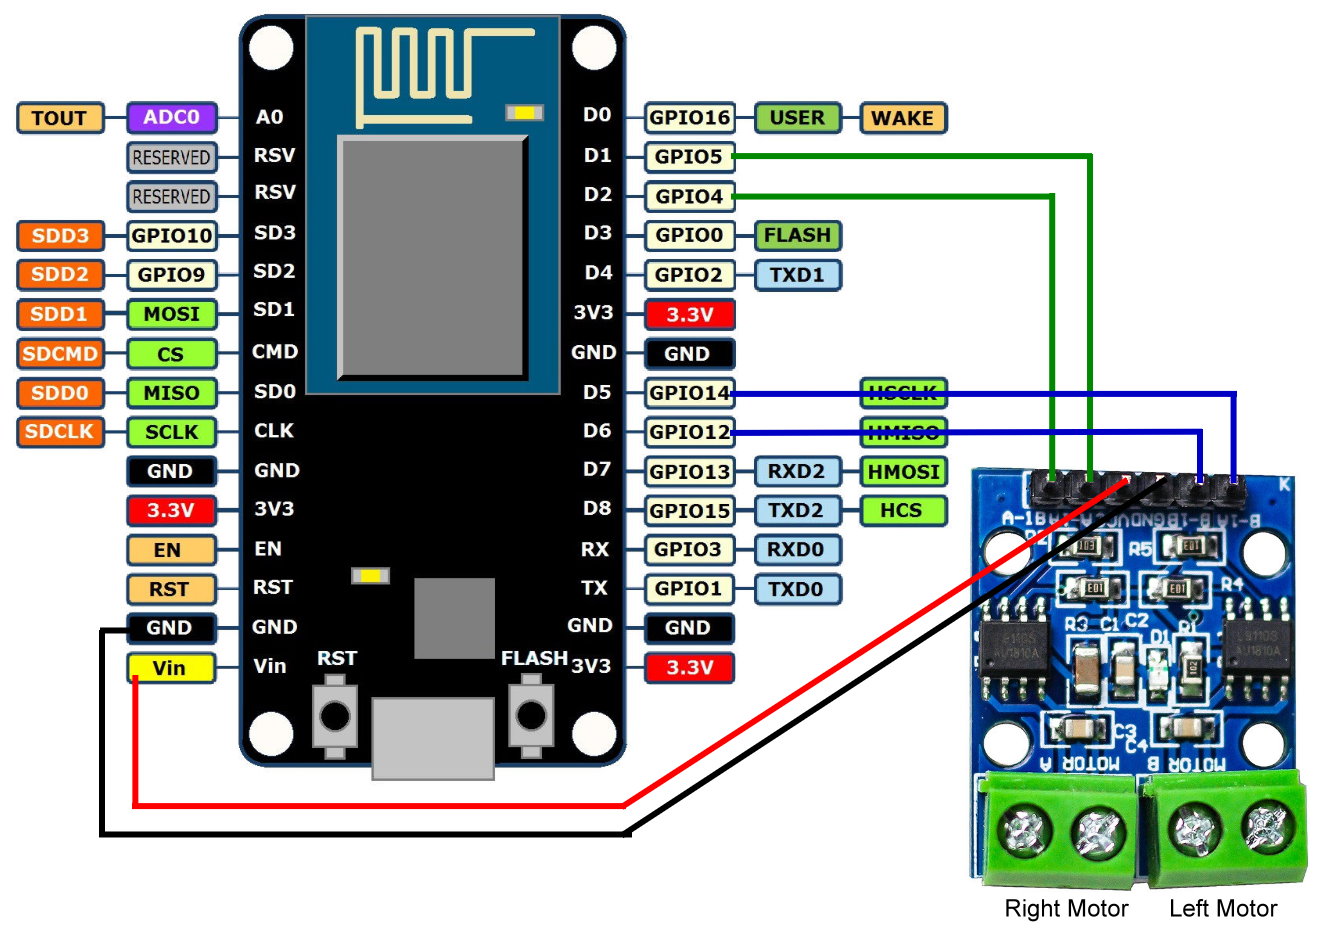
L9110SL9110S is one of the cheapest DC driver board, which is small enough to directly plug in the breadboard. You don't really need the L298N.
Vcc -> power
Gnd -> ground
A-1A (Right motor pin 2) -> D1 (GPIO 5)
A-1B (Right motor pin 1) -> D2 (GPIO 4)
B-1A (Left motor pin 2) -> D5 (GPIO 14)
B-2A (Left motor pin 1) -> D6 (GPIO 12)
The pin naming is a bit confusing, but basically each motor has two pins. If you set one at HIGH voltage and another at LOW, the motor would run in a certain direction, thanks for the H-bridge circuit. If the motors don't run in the way you expected, you can always change the pins in either wiring or code.
As the car chassis I bought has a on/off switch on it, I connected it on L9110S' power line, so that I can shut down motors quickly without using web pages.
WiFi ControlWhen the NodeMCU boot up, it would create a WiFi AP called "NodeMCU_WiFi_Car". Enter the password 12345678 (you can change both the AP name and password) to connect the server.
Then open your browser and enter 192.168.4.1. You should see the web page created by NodeMCU appear.
(The code also provides option to run in station mode, which would connect to existing AP like your own WiFi. However you'll first need to read the serial port output to see the IP it got.)
The code itself should be pretty clear: setup the WiFi server and define what actions to do when the user send specific HTTP GET requests from their browser. You can adapt the basis of the code to do other Internet of Things (IoT) applications.
One line in the code
html += "<meta name=\"viewport\" content=\"width=device-width, initial-scale=1\">\n";is to make the web page viewed as mobile version, so that the buttons won't be too small on phone screens.
The web page uses JavaScript to HTTP GET a new URL. It's possible to do it by POST, but for now GET is enough. If you know enough about HTML, CSS and JavaScript, you can also modify the web page anyway you like.


Comments
Please log in or sign up to comment.